Apologies for leaving you hanging. It’s now almost three weeks since I published the first part of this post, and I’m sure you’ve been holding your breath ever since.
There’s been a lot going on since the last post. First, my favorite sports team in the world, San Antonio Spurs, won their fifth NBA championship from the defending champs, Miami Heat. Next, my wife and I moved to our new house, and we’ve been remodeling ever since. It’s been hectic with work and life getting mixed up in a potpourri of saw dust and web analytics, but now it’s time to return back to the wonderful world of Google Tag Manager!
I promised you four new tips in this one, but I’m going to top myself and give you six gems from the world of tag management. Here’s what you’ll get:
dataLayer declaration and push
Using eventCallback in dataLayer.push()
Stopping a Timer Listener
Naming and version control conventions
Fire a single tag multiple times
{{true}} and {{false}}
The Simmer Newsletter
Follow this link to subscribe to the Simmer Newsletter! Stay up-to-date with the latest content from Simo Ahava and the Simmer online course platform.
dataLayer declaration and push
Google Tag Manager uses dataLayer as its own proprietary data model. dataLayer is a JavaScript object of Array type. This means that it has some methods unique to Arrays, such as push().
(See my comment to this post here for an overview of how to access Array objects vs. object properties.)
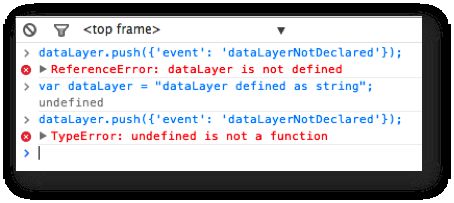
The thing is, you can’t use dataLayer.push() if you haven’t declared dataLayer as an array first. The repercussions of this are that if you try to use dataLayer.push() before dataLayer has been declared as an Array, or if it’s been declared as something different (such as a normal object or string), you’ll get some errors:
So here’s the first tip:
You need to declare dataLayer as an Array before you can use its push() method.
To turn dataLayer into an array, you need the following code before the container snippet:
var dataLayer = [];If you don’t declare it with this explicit statement, then GTM will declare dataLayer for you. This is very important, since it ensures that you will always have dataLayer available for your tags.
The thing with JavaScript objects and primitives (numbers, strings, etc.) is that if you redefine a JavaScript entity, its previous state will be overwritten! JavaScript entities are dynamic, so you can redefine a string as an object, an Array as a number, and so forth without any difficulty. There’s also no way of protecting a global variable such as dataLayer from being redefined as a different type, so precautions must be taken so that you don’t mess things up.
Why is this important? Well, if you have more than one dataLayer declaration on your page template OR in your GTM tags, you will erase all previous information in the structure! Oops. Here’s an example:
var dataLayer = [{'pageCategory': 'home', 'logged-in': 'true'}];
...
var dataLayer = [{'event': 'allDone'}];
After the first line of code, dataLayer has a single object with two properties: pageCategory and logged-in. A little on further down the code is the second declaration. Now, after this code is run, dataLayer will still only have one object, but with just the event property! Can you see how harmful this is? None of the previous information is recoverable after this.
The safest way to prevent this is to preface the ONLY dataLayer declaration on the page with the following line:
window.dataLayer = window.dataLayer || [];And then only use dataLayer.push() to add objects to the Array. This line ensures that if dataLayer has already been declared, it won’t be overwritten. It’s not foolproof, since it doesn’t test whether the global variable dataLayer is of type Array or not, but I think it’s good enough. If you have another JavaScript library which HAPPENS to use a variable called dataLayer as well, you might be in trouble. But this is what testing and debugging is for.
So here’s my final tip for this section:
Declare dataLayer JUST ONCE and use dataLayer.push() for all interactions afterwards.
In your GTM tags you can just use dataLayer.push(), and you don’t need to check whether dataLayer exists or not, since GTM declares it for you in the container snippet. But when working on the page template, you need to be extra careful not to overwrite the Array.
Using eventCallback in dataLayer.push()
You can use the eventCallback dataLayer variable in the push() method to execute code after all dependent tags have fired. I know, that was a mouthful but it’s really simple. Take this example:
dataLayer.push({
  'event': 'fireEvent',
  'eventCallback': function() {
    console.log("Event has fired");
  }
});
Well, it’s a pretty lousy example, but it does what it’s meant to. After all tags that fire upon {{event}} equals fireEvent have completed, the eventCallback function will execute and you should see the text in the JavaScript console.
eventCallback is, in essence, a shorthand for the proprietary hitCallback feature that you can invoke in your Google Analytics tags.
You can use this for a quick callback, such as waiting for all tags to fire before a link redirects or pushing a second event as the callback to impose a rudimentary tag firing order.
Stopping a Timer Listener
You know of the Timer Listener, right? You can use it to have an event push every X milliseconds. You can limit the number of times the timer fires, or you can just let it fire from here to eternity.
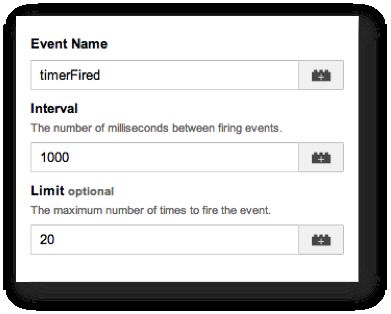
The thing is, you might want to halt the listener before the limit is reached. For example, if you’re using the Timer Listener to send pulses reflecting the time the user has spent digesting content, for example, you might want to halt it once the reader reaches the end of the page to keep your events from being cluttered with timer hits.
To halt a timer, you need to use the window.clearInterval() method. It requires a parameter, namely the ID of the timer that is firing.
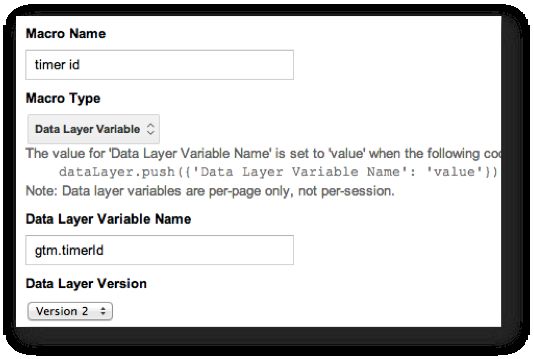
GTM’s timer listener is your run-of-the-mill JavaScript setInterval() timer, and its ID is stored in, what else, a dataLayer variable called gtm.timerId. So to halt the timer, you need to send the content of gtm.timerId as the parameter of window.clearInterval(). For this to work, you’ll need to create a new Data Layer Variable Macro which refers to gtm.timerId:
After this, whenever you want to halt a timer, all you have to do is have the following line of JavaScript in your Custom HTML tag or your Custom JavaScript macro:
window.clearInterval({{timer id}});This will halt the most recently fired timer. So if you have multiple timers, you might have to edit the code somewhat to find the proper timer (easiest way to do this is to use {{event}} equals your_timer_event as one of the rule conditions of the tag that stops the timer).
Naming and version control conventions
GTM doesn’t exactly shine when it comes to managing a bucketload of tags, macros, and rules (TMRs). Because of this, it’s really important to adopt a good naming convention so that you can make sense of what you have in your container.
For alternative approaches (more explicit naming to satisfy the in-tool search), check Doug Hall’s original, excellent post on online-behavior. A more recent post by Justin Goodman covers similar ground.
I use a very simple naming convention in all my TMRs. It scales pretty nicely, as it works in large enterprise implementations as well as in smaller containers. Also, the most important thing is that it’s readable.
Here’s what I use.
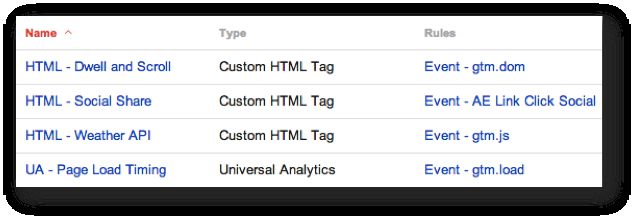
TAGS
Tag type - purpose
HTML - Weather API Call
HTML - Social Share Tracking
UA - Page View Tracking
Listener - Link Click
Listener - Click
Having the tag type is pretty redundant since you can see that in the second column of the tag list. However, I enjoy that it makes the list look a bit less cluttered.
RULES
Key macro - trigger
Event - gtm.js
Event - Outbound Link Click
URL - Thank you page
The key macro is what drives the rule. Most often its an {{event}}, but every now and then you might have the same event across many rules, and then you’ll need to use some other macro to express the difference between the two rules. An example of this is the URL rule above. It’s underlying {{event}} is gtm.js, so I have to use the URL condition to make it different from all the other gtm.js rules.
MACROS
What is returned
Random Number
Debug Mode Status
Element URL
URL Hostname
With macros, we’re only interested in what they return, since that’s what macros are used for. So in the macro name, it’s important to express just what is returned when the macro is called.
As for version control, my tip is this:
Name your versions AND add notes!
That’s it. It’s so important to annotate your container versions with information what was updated and what changed. This is the only way to stay on top of your game, especially if you’re dealing with a huge version history. Be pedantic about this and make sure it’s part of your quality assurance process for tag management!
Fire a single tag multiple times
Here’s a common problem: You have multiple trackers firing on the same domain, but you want to use just one tag for them. Well, currently GTM doesn’t have a switch with which you can fire the same tag multiple times with different parameters, so you’d need to create a separate tag for each tracker.
However, there’s a workaround. You can use hitCallback, the Lookup Table Macro and a global JavaScript variable to fire your tag multiple times with different values in the fields!
(Note: GTM’s Debug mode doesn’t let you push items into dataLayer, even if you’re doing it from a returned function (which is totally valid). Unfortunately this means that you won’t be able to test this solution in the Debug mode, and you’ll have to publish the container to test it.)
Here’s what you need:
JAVASCRIPT VARIABLE MACRO {{tag callback counter}}:
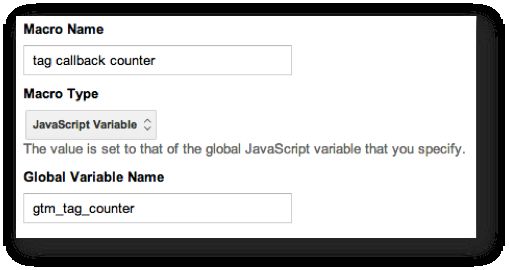
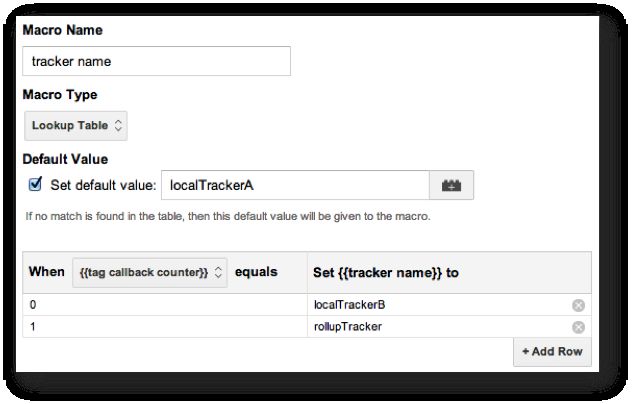
LOOKUP TABLE MACRO {{tracker name}}:
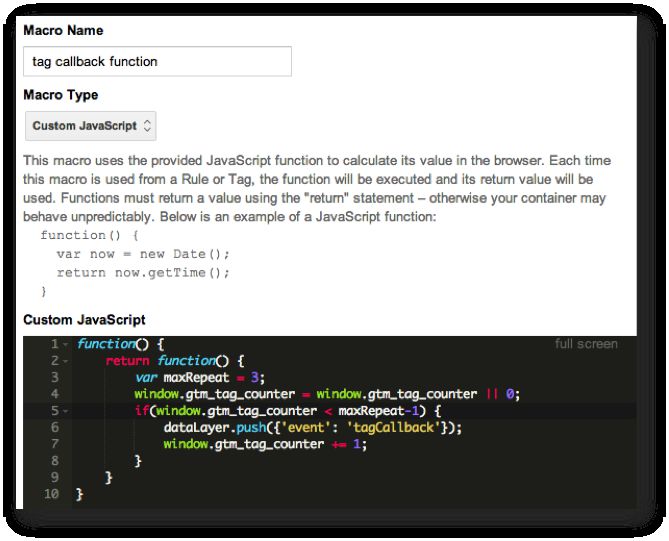
HITCALLBACK MACRO {{tag callback function}}:
So, before we check how the tag is set up, let’s go over these macros. The {{tag callback counter}} is a JavaScript variable macro which refers to the global JS variable you set up later in {{tag callback function}}. The idea here is that the {{tracker name}} Lookup Table macro returns a different string, depending on what the counter is. Every time the callback is executed, the counter goes up by 1.
The key is to use your first tracker as the default value of the Lookup Table macro. This is because when the tag first fires (on {{event}} equals gtm.js), the JavaScript variable that {{tag callback counter}} refers to will not exist yet (since it’s defined in the CALLBACK of this tag).
When the callback is executed, a GTM event is pushed into dataLayer and the counter value is increased by one. You define the maximum number of times the tag should fire with the maxRepeat variable in the callback function. Just remember to have a row for each iteration in the Lookup Table, otherwise the tracker in the Default Value field of the Lookup Table will be returned for each iteration that doesn’t have a row in the table!
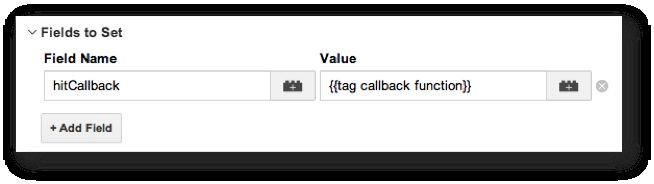
In your tag, add the following in the Fields to Set:
This will ensure that the callback function is executed every time the tag has fired.
Now that you have your Lookup Table, you can use it in the Tracker Name field of your tag:
Using the macro here makes it so that with every iteration of the tag, a different value is set as the Tracker Name, thanks to the Lookup Table and the counter that increases by 1 with every pass.
Finally, you need to add TWO rules to the tag. That’s two rules, not two conditions. The rules are
{{event}} equals gtm.js
and
{{event}} equals tagCallback
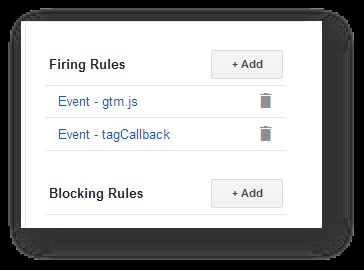
Having two rules means that the tag will fire when and if either one is matched. So first it will fire upon {{event}} equals gtm.js, since that’s the event that is pushed when GTM is first loaded. Next, it will fire every time {{event}} equals tagCallback, so twice in my example. Thus, the tag fires three times with three different tracker names.
You could use this also if you have different properties you want to track to. Just replace the tracker names with UA-XXXXX-Y codes and you’re set!
Here’s a quick recap of what happens:
Tag is fired upon {{event}} equals gtm.js. Since {{tag callback counter}} can’t find the global variable, the Lookup Table macro {{tracker name}} returns the default value, which is localTrackerA
When the tag has fired, the counter is created with value 0, and the tagCallback event is pushed into dataLayer
tagCallback triggers the tag again, and this time the Lookup Table finds the counter with value 0, and returns localTrackerB
When the tag has fired, the counter number is increased to 1, and the tagCallback event is pushed into dataLayer
tagCallback triggers the tag for the third time, and again the Lookup Table finds the counter with value 1, thus rollupTracker is returned
The hitCallback is fired again, but this time the maximum number of repeats is reached and the function just returns an undefined value. Thus, no callback event is pushed into dataLayer, and the tag does not fire again.
I think this is an amazing feat of strength from dynamic macros and the callback function. This should make any enterprise setup much, MUCH leaner.
{{true}} and {{false}}
This one’s a quicky but pretty important. Create two Custom JavaScript macros:
{{true}}
function() { return true; }{{false}}
function() { return false; }Why, you ask? Well, let’s say you want to set the Anonymize IP setting to true for one domain and false for two other domains (this idea came from Carmen Mardiros, by the way!). You want to use a Lookup Table Macro to achieve this, but when your Lookup Table aligns domains with the return value of “true” and “false”, you notice that things don’t work as you’d like them to. The problem is that if you add text to a field in GTM, it is always cast to string type. Anonymize IP requires Boolean type, otherwise it fails.
To circumvent this problem, instead of typing “true” and “false” into GTM’s fields, use the macros you just created. They return true and false in proper Boolean type! This way you will be able to pass the correct value types to the settings which require Boolean values.
Naturally, this should be fixed by adding Boolean true and false as possible values in all GTM fields.
Conclusions
Well there you have it! Another round of GTM magic. I can’t wait to experiment more and uncover even more cool stuff to share with you. Be sure to join our amazing Google+ community which has served as inspiration for most of these tips.
Also, if you happen to be in any of the following upcoming conferences, come say hi to me:
Google Analytics conference in Stockholm (August 2014)
Web Analytics Wednesday in Copenhagen (September 2014)
Conversion Conference in London (October 2014)
eMetrics in London (October 2014)
Marketing Festival in Brno (October-November 2014)