One of the cool things about Enhanced Ecommerce deployments in Google Tag Manager is that you can use a Custom JavaScript variable to generate the necessary data.
There are many reasons to do so, with the biggest one being the flexibility it offers for manipulating the dataLayer object in case quick changes are required on the site, and it would take too long to wait for a new release of the site JavaScript.
However, there’s also the chance that you don’t have access to a dataLayer implementation of Enhanced Ecommerce at all. This is not a very enjoyable situation, as you’ll have to rely on things like DOM scraping to populate the necessary values.
To help with some of the pains of manipulating the ecommerce object in dataLayer and for generating an entire Enhanced Ecommerce implementation from scratch without dataLayer, I want to introduce a new custom template of mine: the Enhanced Ecommerce Object Builder variable template.
The Simmer Newsletter
Follow this link to subscribe to the Simmer Newsletter! Stay up-to-date with the latest content from Simo Ahava and the Simmer online course platform.
Purpose
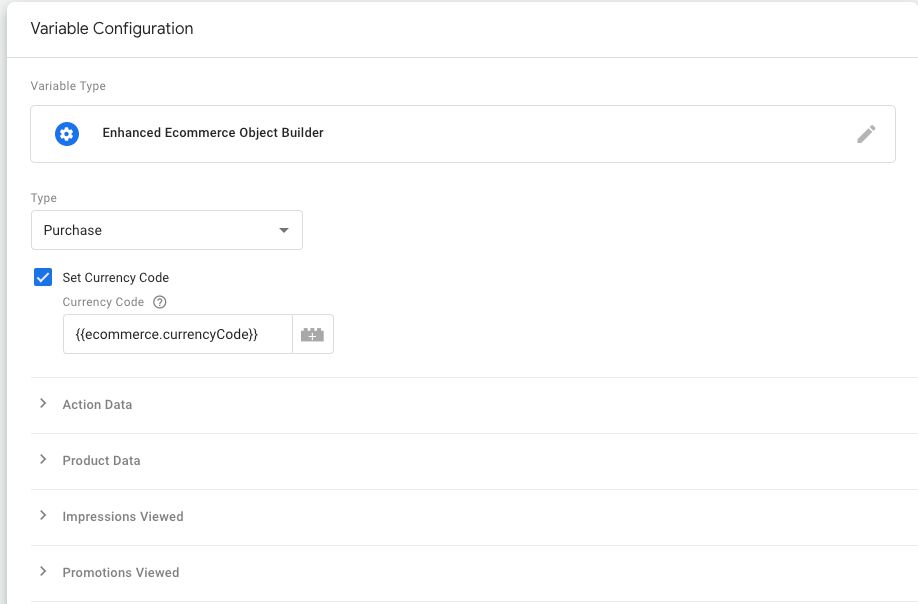
The template allows you to generate an Enhanced Ecommerce object from scratch. You can, of course, use Google Tag Manager variables to populate parts of the ecommerce object from dataLayer in the template itself (see in the screenshot above how the Currency Code field is populated with a variable).
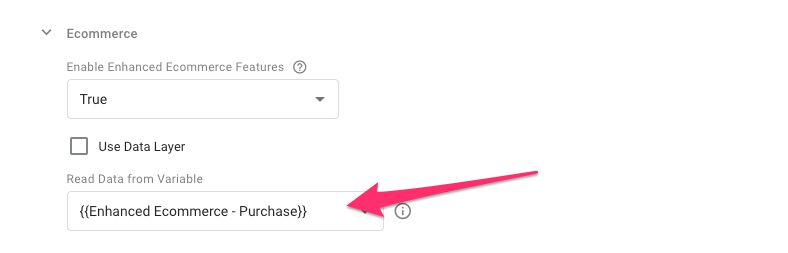
Any variable created with this template will then return a syntactically valid ecommerce object as its return value, which means that you’ll need to have a tag that has the Enable Enhanced Ecommerce Features setting toggled on, and the respective variable selected from the list:
Now, when this tag fires, it will pull in the ecommerce object generated by the variable (and the template code), and as a result, populate the hit to GA with the correct Enhanced Ecommerce parameters.
Download and import template
To download the template, save the following file with the .tpl extension somewhere in your computer:
Enhanced Ecommerce Object Builder.tpl
Then, use the instructions found here to import the template into your container.
How to use the template
First, you need to create a new User-defined Variable using the template. So head on over to Variables, click New, and choose the Enhanced Ecommerce Object Builder when prompted for the variable type.
An important thing to note is that all the text fields in the template accept Google Tag Manager variables. So if you want to populate some fields dynamically, you can.
Enhanced Ecommerce data type
The first selection you need to make is Type. The options are:
Promotion View
Promotion Click
Impression View
Impression Click
Product Detail View
Add To Cart
Remove From Cart
Checkout
Checkout Option
Purchase
Refund
If these choices look odd or unfamiliar, I urge you to read about them in my Enhanced Ecommerce guide.
In case you selected Promotion View, Promotion Click, or Impression View, the Action Data and Product Data groups will disappear, as those three Enhanced Ecommerce data types do not support the sending of action and product data.
Currency Code
If you want to set a local currency for the hit, you can set it by toggling the Set Currency Code checkbox and typing the currency code into the field that appears.
Action Data
Action Data is only available if you selected an Enhanced Ecommerce action as the tag type. This rules out Promotion Views, Promotion Clicks and Impression Views, which have their own settings in the template.
Under Action Data, you’ll see some options, depending on which type you selected.
If you selected Checkout or Checkout Option, you’ll see the fields for checkout step and option:
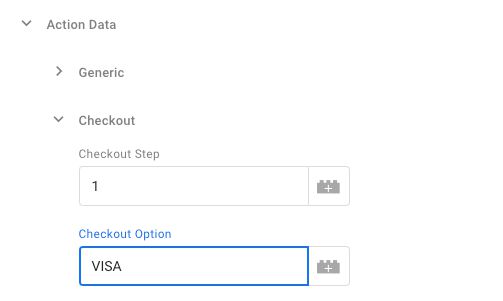
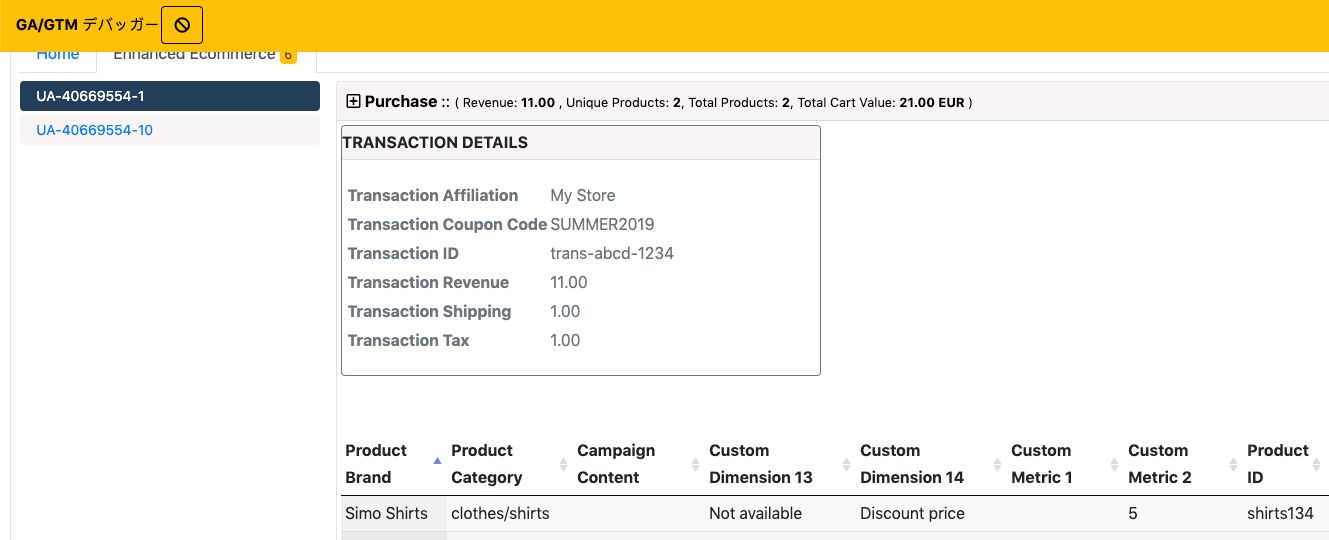
If you selected Purchase or Refund, you’ll see the fields for a transaction:
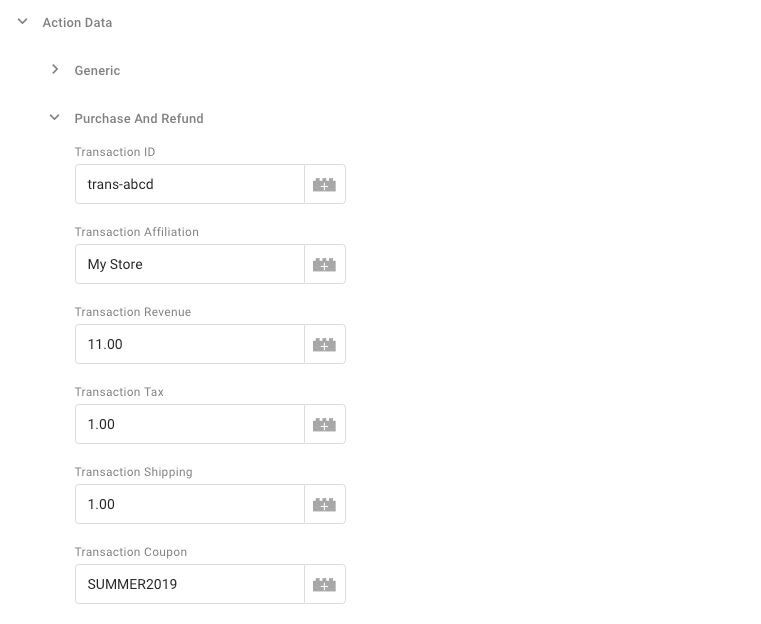
Regardless of which action you selected, you will always see the field where you can add the Product List:
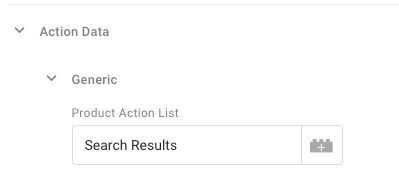
Product Data
Product Data is only available if you selected an Enhanced Ecommerce action as the tag type. This rules out Promotion Views, Promotion Clicks and Impression Views, which have their own settings in the template.
The Product Data group is split into three options. First, you have the products themselves. Second, you have the possibility to add Product-scoped Custom Dimensions. Finally, you can optionally add Product-scoped Custom Metrics.
Products are added by clicking the Add Product button. This opens an overlay where you can configure individual product settings.
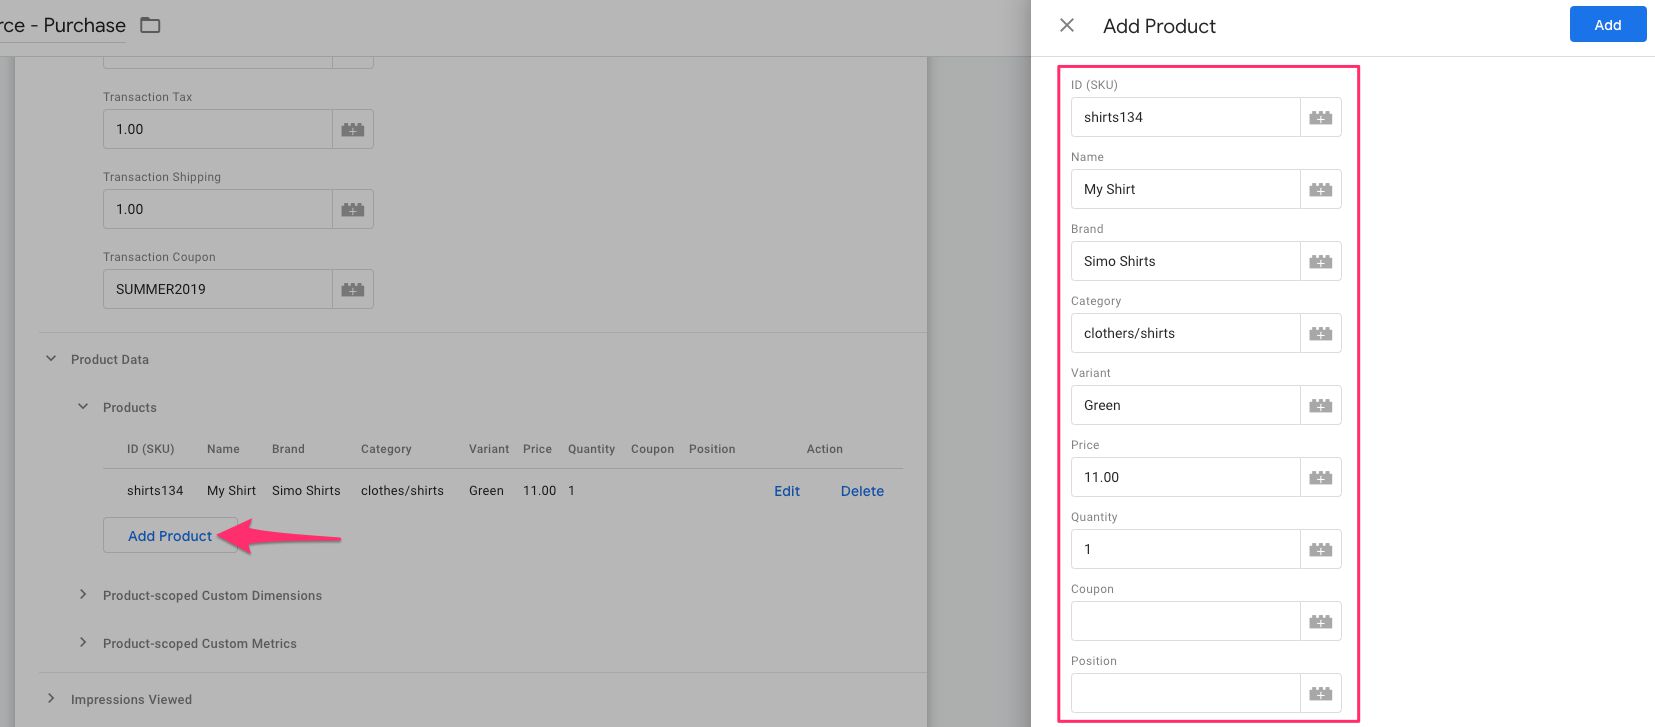
You can add as many products as you wish, keeping in mind that there’s an 8192 byte limit to the payload size of Google Analytics hits.
Note also that not all the fields are necessary for all the action types.
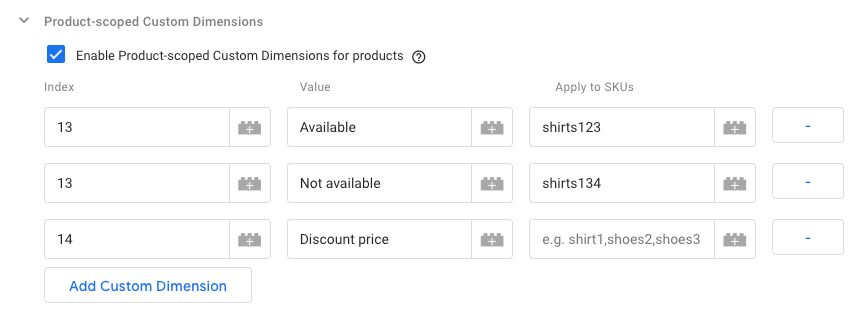
Product-scoped Custom Dimensions are added by enabling Product-scoped Custom Dimensions by checking the relevant checkbox, and then inserting new rows into the table that appears.
Add the index number of the Custom Dimensions to the Index column, and the value of the Custom Dimension to the Value column.
In the Apply to SKUs field, you add the product IDs/SKUs to which the custom dimension should apply. If you want the dimension to apply to all the fields in the hit, leave the Apply to SKUs field blank.
As you can see from the screenshot above, you can add multiple rows with the same index as long as the Apply to SKUs field does not overlap. Otherwise, only the last value for any given index is sent to Google Analytics.
Note also that you can add more than one SKU to the field. You can do this by separating the values with a comma: shirts123,shirts1234.
Yes, this is a rather convoluted way to add custom dimensions to the products, but unfortunately there’s no way to have a table of dynamic size (or really of any kind) as one of the fields in the Add Products table.
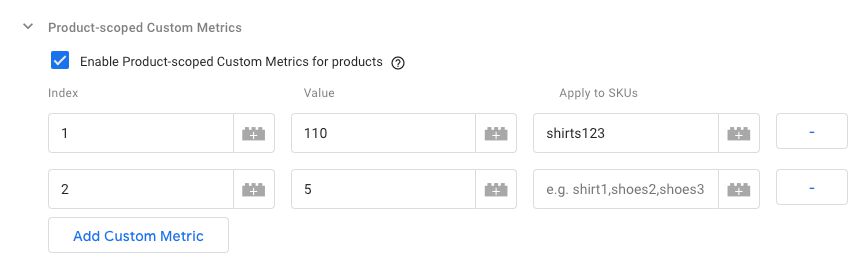
The same process outlined above applies to Product-scoped Custom Metrics, too.
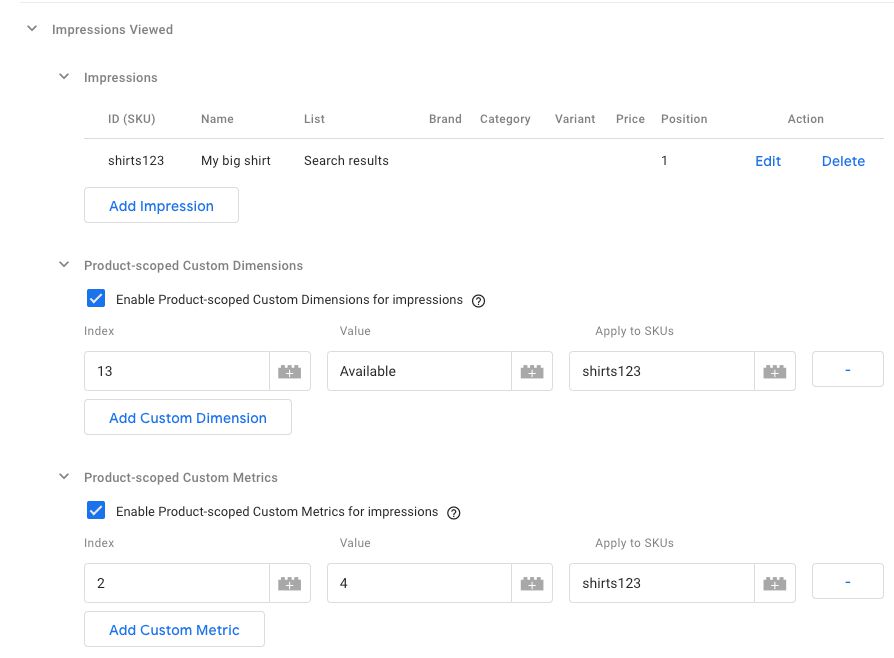
Impressions Viewed
You can add Impressions to any Enhanced Ecommerce hit, regardless of hit type.
Adding impression views and any Product-scoped Custom Dimensions and/or Metrics related to them follows the exact same process as the one for regular products, so check out the previous chapter for a refresher. The main difference is that list is one of the fields you need to add to the impression data, so that the impression can be assigned to a specific product list.
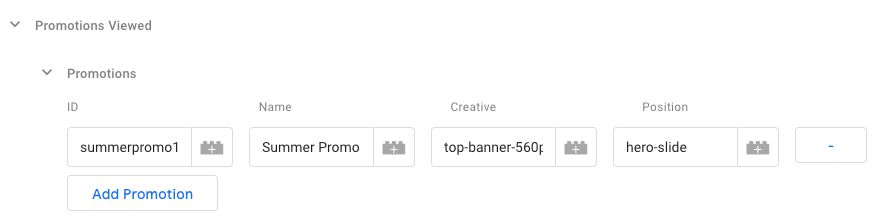
Promotions Viewed
You can add Promotion Views to any Enhanced Ecommerce hit, apart from Promotion Click.
Promotion views are added simply by clicking the Add Promotion button, and then inputting values for ID, Name, Creative, and Position.
Promotions Clicked
You can add Promotion Clicks if you’ve selected Promotion Click as the action type.
The clicked promotions are added exactly the same way as you would add viewed promotions, so see the previous chapter for reference.
Testing everything
Once you’ve created the variable and added it to a tag (see the chapter titled Purpose for a refresher on how to do that), you’ll need to test it works.
The easiest way to test is by using a browser extension like GTM/GA Debug or dataLayer Inspector+. If everything works, you should see all the data added to the hit generated by the tag whose ecommerce settings you modified.
Summary
With this variable template, you should be able to build your custom Enhanced Ecommerce settings without the benefit of a fully-formed, syntactically valid dataLayer object. Naturally, having access to dataLayer for formatting the Enhanced Ecommerce data is almost invariably more reliable than building the payloads from scratch like this, but I do believe there to be use cases for a custom setup as well.
Also, since you can add other GTM variables to almost all the fields of this template, you can use the Enhanced Ecommerce Object Builder to format and manipulate the data already in dataLayer.
Let me know in the comments if you think there are features missing. One thing I’d like to work on at some point is to let you provide an ecommerce object from dataLayer as the foundation for the variable, but then override individual fields and values of that object with this template.