Universal Analytics: Grab Offline Data From Excel
UPDATE 9 Oct 2013 - This works in Google Spreadsheets now as well! Feel free to make a copy of the sheet and work with the code. It’s still just a prototype, but I’m happy to see data bouncing from spreadsheets to Google Analytics.
View the Google Spreadsheet here
ORIGINAL POST Inspired by Daniel Waisberg’s excellent post detailing the use of Google Web Forms to send data to your Analytics account, I decided to create something similar.
If you didn’t know already, Universal Analytics is the new version of Google Analytics, and the Measurement Protocol is its heart and soul. The protocol serves as an endpoint for raw visit data, which can be pushed from any service, application, or interface equipped to send HTTP requests. In this post, I’ll introduce you to a prototype of a Microsoft Excel extension I’ve been working on. With the extension, you can push data from Excel back to your account. By using carefully labelled events and by extracting the client ID from the online visit, you can combine offline and online data together in Google Analytics.
Without further ado, I give you: the journey of the coupon.
XThe Simmer Newsletter
Subscribe to the Simmer newsletter to get the latest news and content from Simo Ahava into your email inbox!
The premise
Let’s say we have a traditional brick-and-mortar store, which wants to award its regular customers with something special. So they send an e-mail with a link to a page, where the user can download a special coupon, with which they can get a pack of coffee for 5 euros. Incredible deal!
So the user goes to the page and sees this on the phone (of course they used a mobile device!).

Yes, I know it looks like phlegm, but like I said, this is a prototype!
When they press the button, this happens:

And, as the button is pressed, this happens in Google Analytics:

So what happened?
When the user clicks the button, they receive the coupon code. In reality, the coupon code is the user’s client ID, which is a variable Universal Analytics uses to identify the client. In essence, all events, transactions, pageviews etc. done by this client ID are always registered to the same unique visitor. Because it’s so easy to get (just a simple function), I chose the variable to anchor the data.
After the button is clicked, an event is sent to Google Analytics with the label get-coupon. The action is always the coupon code (the client ID), which can then be used to categorize the events nicely.
Trip to the store
So now the user has the coupon code on their mobile phone. Next, she heads on down to the store.
She chooses two cans of Coffee Java (a delicious brand), which each cost just 5 euros each, thanks to the coupon.
She goes to the checkout, gives the coupon, thanks, and leaves.
When registering the sale, the cashier types down the coupon code the customer showed.
At the end of the day, the cashier fills the obligatory Microsoft Excel worksheet with the transaction details for the day.
I have no idea what these systems look like in reality, but in my wicked dreams I saw something like this:

Here you have basic information, which can be exported from any backend system. We have the transaction details for each transaction (just one for the day, how sad!). Under each transaction are the items that were purchased in that one transaction.
Each transaction can have a coupon code attached to it.
There’s also the basic information required for Universal Analytics (namely, the tracking ID).
Upon checking the details and clicking the Big Blue Button, these three message boxes pop up one after another:
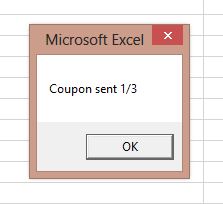
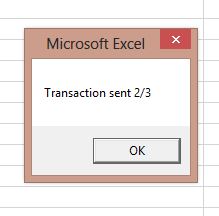
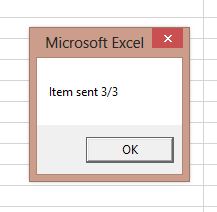
I’ve actually bound the button to a custom macro, which sends the HTTP POST request to Google Analytics. First, an event is sent, to link the coupon use to the coupon download that was processed earlier. Next, the transaction details are sent, and finally, the item is pushed through the API to Google Analytics.
The end result
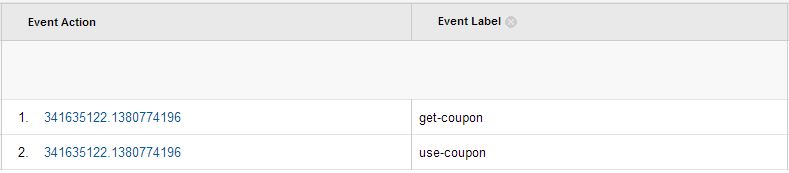
First of all, we can see that the coupon code has both get-coupon and use-coupon events attached to it:
Also, we can see that the transaction was registered as well:

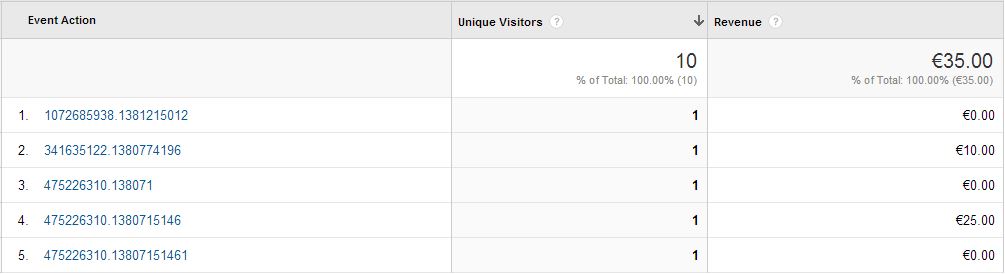
And finally, with a custom report, we can display a number of things. First, each coupon is associated with just one unique visitor, so the client ID really works! Also, we can quickly see whether some coupons were used in transactions by looking at the Revenue column:
Conclusions
This was, and I hope I made it clear, just a prototype. But it shows the power of the Measurement Protocol. You can send visit data (pageviews, events, transactions, you name it) from almost any digital source equipped with some scripting language which supports sending HTTP POST requests!
Using the client ID has its pros and cons. Basically, with the one device, only one coupon can ever be downloaded and used, since the client ID is always the same. But the user only has to switch to another device, and a new client ID is generated. So some other checks need to be in place to make sure that the system is not abused.
Also, and this is a major problem with the Measurement Protocol:
You can’t attach a custom timestamp to hits!
This means that in order to preserve at least some level of accuracy, the events should be sent from Microsoft Excel at the end of the day the transaction occurred. This is the only way to make sure that the transactions are registered on the correct date. I see this as a major shortcoming, and I hope a timestamping feature is introduced in a future version.
(Queue Time will not do, as it can only introduce a time lag which stretches no further than four hour past midnight of the day when the event is sent)
I’m looking forward to expanding the features of the Excel extension. It should be possible to send heaps of transaction data with one button press, as now the macro only supports one item, one transaction, and one coupon event.
