Understanding Tag Sequencing In Google Tag Manager
A recent update to Google Tag Manager introduced a feature which has been on the wishlist of many users for a long time. It’s called Tag sequencing, and its purpose is to facilitate the sequential firing of Tags. The idea is that you can specify a setup and a cleanup for each Tag in your container.
This article is intended to function as a quick tour of the feature. It’s not the simplest feature to understand, as Tag sequencing runs parallel but separate from the normal flow of your container. Don’t worry, I’ll get back to this soon.
XThe Simmer Newsletter
Subscribe to the Simmer newsletter to get the latest news and content from Simo Ahava into your email inbox!
1.Sequence in a nutshell
A sequence comprises three phases:
The setup, which is a Tag which must successfully complete before the main Tag fires.
The main tag, which is the Tag with the dependencies. It’s either dependent on the setup, or it establishes a dependency with the cleanup.
The cleanup, which is a Tag which fires after the main tag has completed successfully.
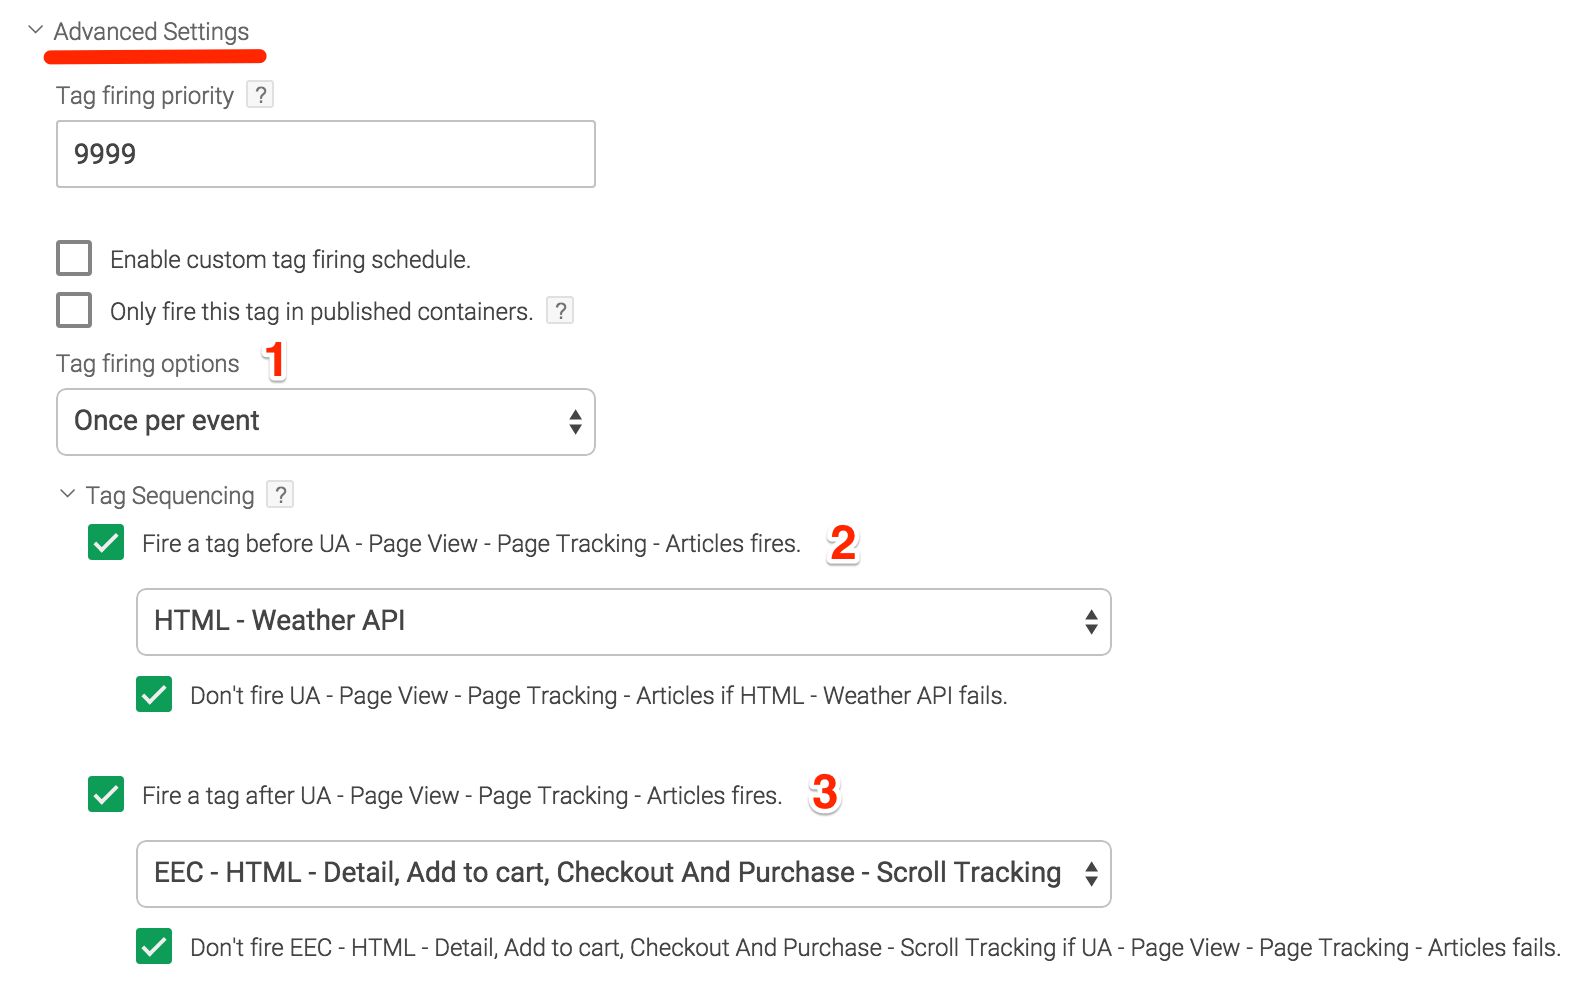
The sequence is created by editing the Advanced Settings of the main tag. You will see two new settings here:
-
Fire a tag before…
-
Fire a tag after…
The first setting is for choosing the setup for the main Tag. The latter is for the cleanup. If you choose a setup, it will need to complete before the main tag itself fires. If you choose a cleanup, the main tag will need to complete before the teardown is fired. For both, you can choose whether or not a failure in either the setup or the main tag will abort the sequence.
OK. That was confusing. Allow me to visualize it with my superior PowerPoint skills.
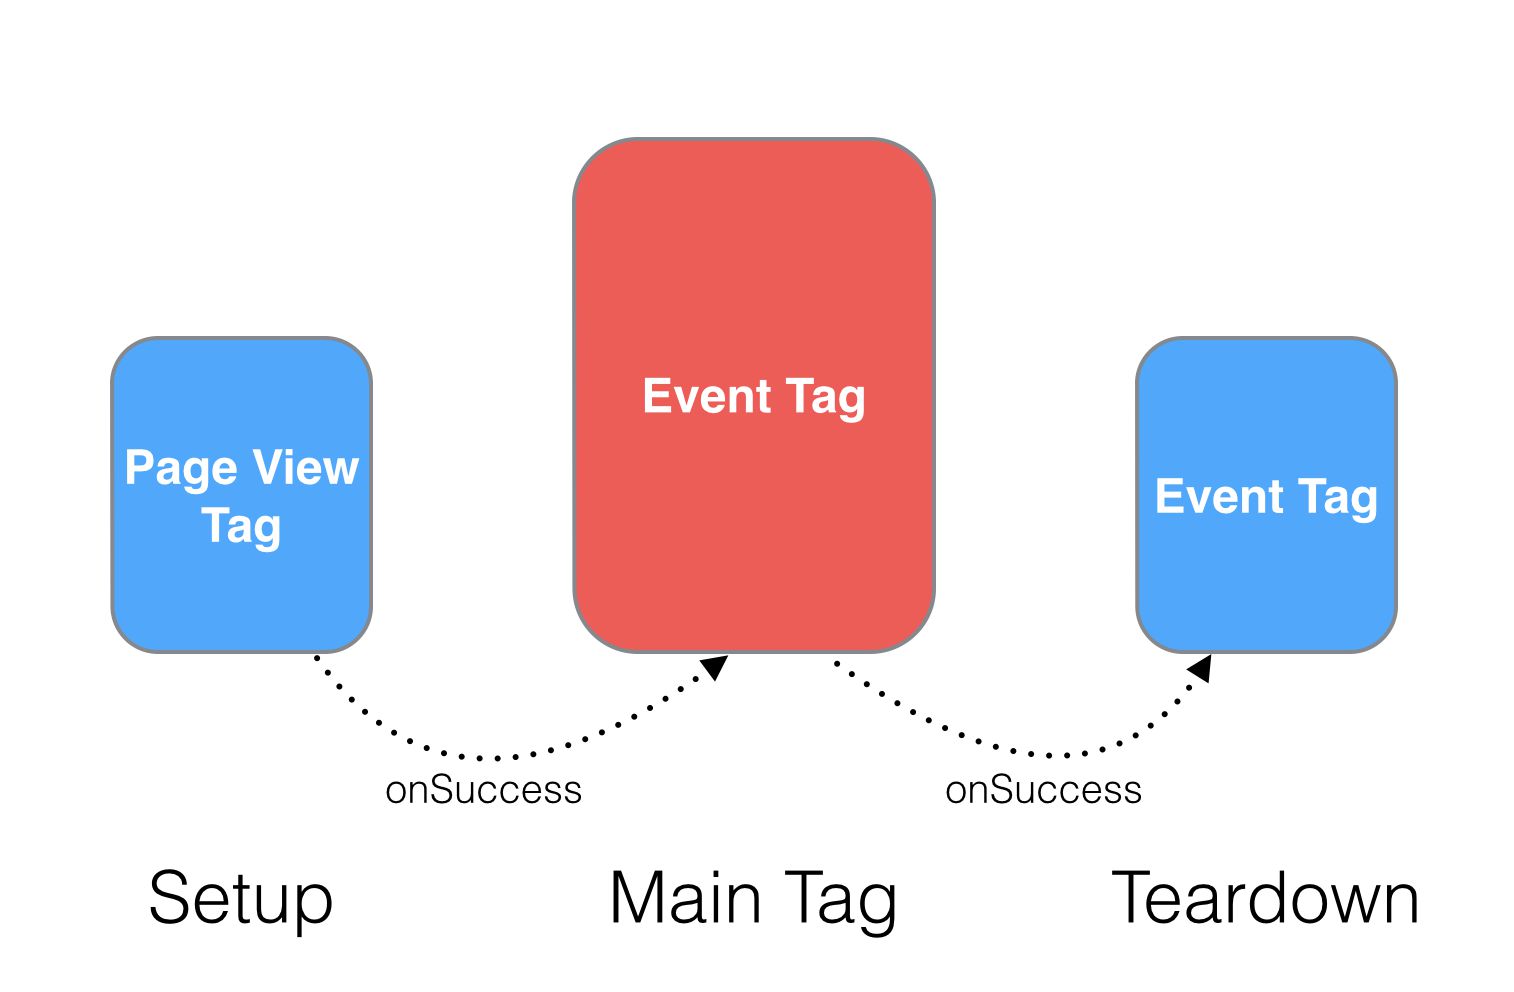
In the sequence above, the Page View Tag (setup) must successfully complete before the Event Tag (main tag) fires. If the Page View Tag fails, the sequence is aborted. Similarly, the Event Tag must successfully complete before the final Event Tag (cleanup) fires. If the main Tag fails, the final Event Tag will not fire.
You can, of course, specify that the Tags fire even if some member in the sequence fails.
The key thing to understand about the sequence is that it’s isolated. Using Tag sequencing lets you specify a sequence of hits that fire when the main tag is triggered. This means that the setup and cleanup Tags will act completely oblivious to any Triggers you might have added to them.
Indeed, no matter what Triggers you have or have not equipped on them, they are completely ignored if the Tag is used as a setup or cleanup. For this reason, it might be prudent to not use setup and cleanup Tags for anything except sequencing, but there is a way to make it work both ways (I’ll get back to this soon).
I emphasize again that this is a difficult concept to grasp. I’m sure the UX / UI could be made more intuitive, but the reason it’s difficult is that it relies on callbacks, which are invisible in actual GTM usage (unless you start debugging on a really granular level).
2. The callbacks
We still have some theory to cover before delving deeper into the practical stuff.
In GTM, each Tag has a callback. With Tag templates, these callbacks depend on how the Tag works. For example, the Google Analytics Tag uses the hitCallback feature as its callback.
So, when you establish a setup, for example, the main tag will not fire until the onSuccess callback of setup is invoked. With the Google Analytics Tag template, the tag will be fired only after the hitCallback of the setup is executed successfully. Similarly, the cleanup will not be fired until the onSuccess callback of the main tag is called.
Phew!
The other callback is onFailure. This is invoked in case the Tag does not successfully complete. In the settings for Tag sequencing, you can specify that the main tag must not fire if setup fails, or you can choose to ignore the failure. Similarly, you can specify that the cleanup must not fire if main tag fails, or you can, again, choose to ignore the failure.
You don’t have to worry about these callbacks when using Tag templates. GTM takes care of calling onSuccess and onFailure for you, and all you need to do is make sure that you’ve checked the correct boxes in the settings (I promise, we’re going to get to the settings very soon!).
3. The Custom HTML Tag
The exception is the Custom HTML Tag. Since you might want to tell Google Tag Manager not to proceed to the next tag until something has happened (e.g. an asynchronous operation has completed), a workaround is required. If you go to the Built-in Variables, you should see a new one: HTML ID:
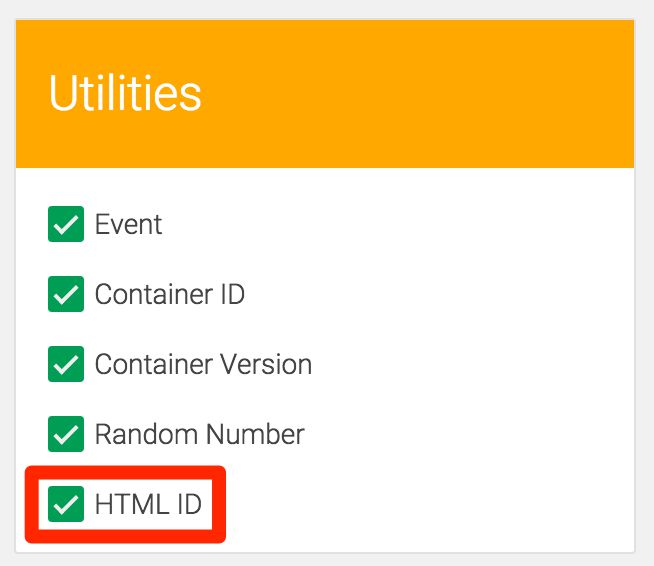
This is used to invoke either the onSuccess or onFailure callback for the Custom HTML Tag.
So, if you want to use a Custom HTML Tag as either the setup or the main tag, and you want to establish a sequence with success and/or failure conditions, you will need the following:
-
The HTML ID Built-In Variable
-
The Container ID Built-In Variable
-
The Custom HTML Tag itself
In the following code example, I’m running some custom JavaScript, and once it’s done, I’m letting the sequence know that onSuccess has been called.
<script>
  (function() {
    var gtm = window.google_tag_manager[{{Container ID}}];
    var el = document.getElementById('content-head');
    try {
      el.innerHTML = 'We have taken over your website!';
      gtm.onHtmlSuccess({{HTML ID}});
    } catch(e) {
      gtm.onHtmlFailure({{HTML ID}});
    }
  })();
</script>
In the first line of the script, you copy a reference to the GTM container interface into the gtm variable. This is a very specific interface into GTM’s mechanisms, so don’t worry about it too much. Suffice to say that this reference allows you to pass the onSuccess and onFailure callbacks, which is why it’s important here.
Next, there’s a try...catch block, where a DOM method is executed. Once it’s completed, the onHtmlSuccess() method of the interface is invoked. The parameter to this method is the new HTML ID Built-In Variable. This way GTM will be able to communicate to the next member of the sequence that it was precisely this particular Custom HTML Tag that just completed.
If there’s an error, then the onHtmlFailure() method is invoked, and information is passed to the sequence that this Tag did not complete successfully.
By now it shouldn’t be too complicated anymore to understand what’s happening. Each Tag template has an onSuccess and onFailure callback, except for the Custom HTML Tag, where you can to provide them yourself.
UPDATE 23 July 2018: Be sure to read my article on Custom HTML tags with tag sequencing for more details on how Custom HTML tags and tag sequencing work together.
4. How to create the sequence
Finally! Some practical information!
Under the Advanced Settings of each Tag template, you will find three new options:
-
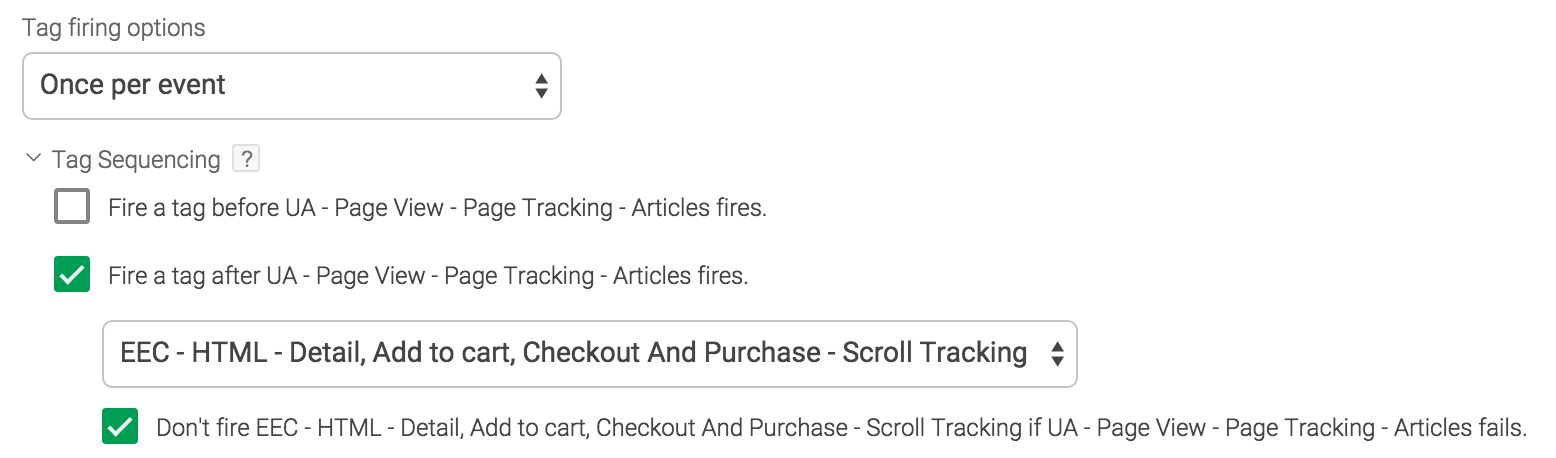
Tag firing options - Lets you delimit the Tag to fire either just Once per event, Once per page, or just let it fire Unlimited times.
-
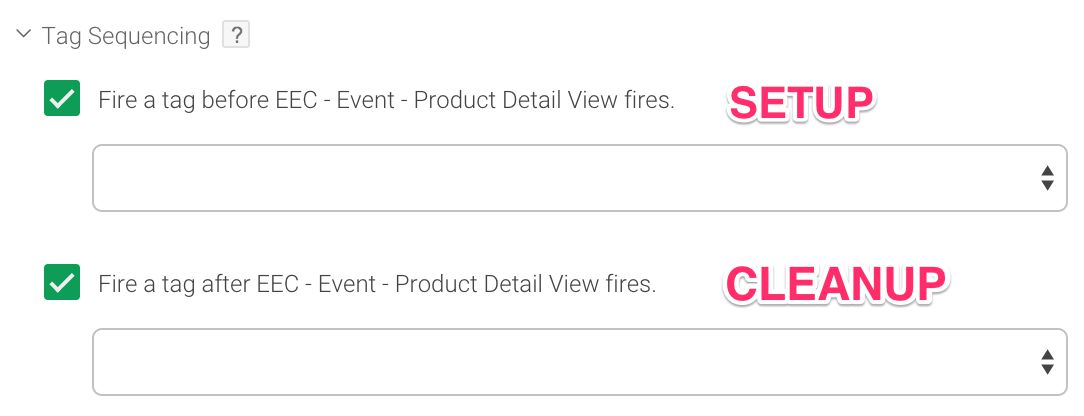
Tag Sequencing -> SETUP - Lets you choose the Tag which must complete before the Tag whose settings you are currently editing. You can specify whether the setup must complete successfully, or if failures should still make this Tag fire.
-
Tag Sequencing -> CLEANUP - Lets you choose the Tag which must fire after the current Tag has completed execution. Again, you can specify whether the current Tag must complete successfully, or if its failure should be ignored, and the cleanup should fire regardless.
That’s how you set up a Tag Sequence.
Now, in the very beginning I mentioned that the sequence works in isolation. This means that the setup you establish for any particular Tag will run the sequence regardless of what other Triggers you might have attached to the setup or cleanup. This also means that a sequence is always bound to the event of the main tag. Thus, if the main tag fires upon the “All Pages” Trigger, for example, then the entire sequence will be completed during this event.
Because you can use a Tag both independently and as part of a sequence, the new Tag firing options are very useful, indeed. For example, if you have Tag A as the setup for some Tag, as well as firing on its own, individual Trigger, you can specify that Tag A must only fire Once per page to prevent multiple hits from being sent. This means simply that after it has fired once, either independently or as part of a sequence, it will not fire again while the user is on the page.
You can also specify Once per event, which means that the Tag will only fire once for any given data layer event. So, you might have Tag A firing on the “All Pages” Trigger, and you might also have it as the cleanup of some Tag which also fires on the “All Pages” Trigger. By using the Once per event setting, Tag A will only fire once during the “All Pages” event.
5. Note about using dataLayer.push() in the sequence
One of the main use cases for using tag sequencing would be to have the setup Tag push something into dataLayer for the main Tag to use.
Hold your horses!
If you know your Google Tag Manager, you’ll know that the Data Layer available to any Tag is fixed for the duration of the Data Layer Event! So any Tags which fire on the initial dataLayer.push() will only be able to access the values in this push. If some Tag tries to modify the values in the Data Layer, these values will not be registered until the next dataLayer.push() with an event.
(UPDATE: Some time after this article was written, GTM’s behavior changed so that variables are resolved separately for every tag in a sequence. This means that you don’t need to use google_tag_manager[...].dataLayer.get() if you want to retrieve a variable that changed from one tag in the sequence to the next. Instead, you can just use regular Google Tag Manager Variables, as their values will update for each tag in the sequence!)
This hampers development a little, since it sounds like dataLayer can’t be used as a messaging medium within a sequence, as the entire sequence operates in the span of a single Data Layer Event (the one which fired the main Tag in the first place).
The developer guide actually has a note about this:

However, at the time of writing this, dataLayer.set() does not exist. I asked the developers, and this seems to be a mistake in the guide. Instead, you need to use the following command to set values in the Data Layer even during the tag sequence:
// To set a value, use set() with the key as the first parameter, and value as the second
google_tag_manager[{{Container ID}}].dataLayer.set('someKey', 'someValue');
Once you use this, any Tag that fires after this one (in the same sequence), will have its Data Layer Variable reference to someKey updated to return someValue.
If you want to retrieve this changed value in the same Tag it was changed in, you can’t use a Data Layer Variable, since it’s resolved before the Tag is executed (and the set() command is run). You’ll need to use this syntax instead:
// To get a value, use get() with the key as the parameter
google_tag_manager[{{Container ID}}].dataLayer.get('someKey');
Remember to enable the Container ID Built-in Variable!
These are fairly advanced use cases, but it’s very good to keep this in mind when working with Tag sequences that are scoped to a single Data Layer event.
6. Why use tag sequencing?
The asynchronous loading of JavaScript is taken for granted these days. It’s a nice way for browsers to ensure a decent browsing experience even with large, bulky linked assets.
However, asynchronous JavaScript makes it difficult to establish order, as you can’t predict when some script or library finishes loading. Order is introduced with callbacks or promises, but these are difficult concepts to manoeuvre around, and the Google Tag Manager UI doesn’t necessarily let you take advantage of them, especially if using templates.
Sequencing lets you tap into callbacks that GTM establishes by default (the tag templates), or that you create manually (Custom HTML Tags). It lets you chain Tags together, which is particularly useful if you want to establish dependencies.
