Track Form Engagement With Google Tag Manager
(Updated 13 August 2017)
A little over a year ago, in April 2014, I wrote the post “Advanced Form Tracking In Google Tag Manager”, and it’s been at the top of my best seller list ever since. Turns out that many people are rightfully passionate about making the web forms on their websites as fluid and intuitive as possible, since a web form is often the only thing that stands between a prospect and their transformation into clienthood.
I thought it was time to update the article to be Google Tag Manager V2 compliant. It’s not a major difference, but I have remodelled some of the JavaScript as well. Furthermore, I’ve pulled together some new ideas explored in other articles, so now it’s all conveniently packaged in this one big blog post.
At the heart of this article is still the methodology of picking up values from form fields. Perhaps you want to send some selection the user made to Google Analytics with the purpose of segmenting the data, or perhaps you want to identify values which most often block a conversion. Whatever the case, remember this: Google Analytics is very harsh towards PII (personally identifiable information) collection, and you need to be very vigilant in sanitizing any values you’re collecting. You don’t want to send anything to Google Analytics that can be used to identify the person who filled the form. The most typical value is an email address, which you should categorically avoid recording.
Table of Contents
Without further ado, let’s get rolling. First, the basics…
XThe Simmer Newsletter
Subscribe to the Simmer newsletter to get the latest news and content from Simo Ahava into your email inbox!
1. Form tracking in Google Tag Manager
In the new version (V2) of Google Tag Manager, form tracking is no longer isolated as its own “Form Listener” Tag type. Instead, auto-event tracking has shifted to handlers embedded in the Triggers you use to fire Tags.
When you create a Form Trigger, it will activate on all pages where the Enable this trigger when… setting is valid. Remember, you only see this setting if either “Wait For Tags” or “Check Validation” is checked in the Trigger settings.
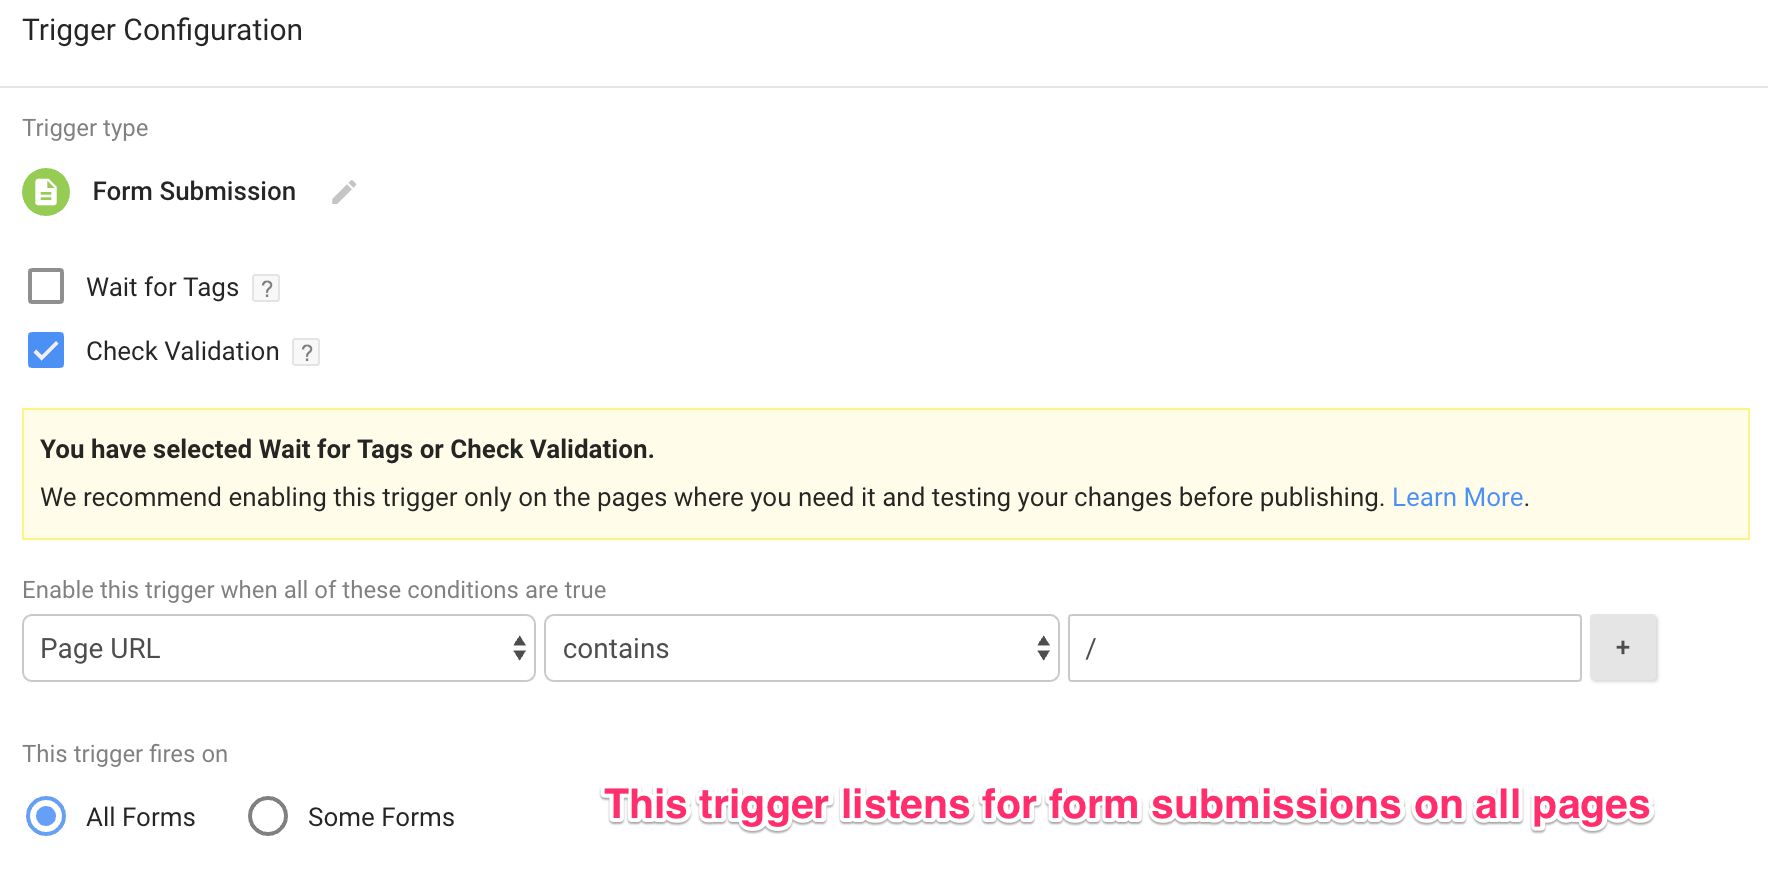
If the Trigger is active on a page, it will actively listen for a form submission. The settings in the Trigger are:
-
Wait For Tags - GTM will pause the form submission for as long as all the Tags that use the Trigger have fired or until the timeout (default 2000 milliseconds) expires.
-
Check Validation - If this is checked, GTM will not fire the Trigger if the default action of the form (submit and redirect) is prevented. If left unchecked, the Trigger will go off whenever a
submitevent is registered, whether or not the default action is prevented. -
Enable this trigger when… - As mentioned above, this condition is for establishing on which pages GTM should listen for form submissions. There’s really no performance penalty in having the listener active on all pages, but there are cases where Wait For Tags interferes with other JavaScript on the page, so you might want to only have the listener enabled on pages you’ve tested it on.
-
Fire this trigger when… - If you select “Some Forms” as the This trigger fires on setting, these conditions that govern when the Trigger makes any attached Tags go off. If you have just one form on the website, using “All Forms” here is justified. But if you want to specify you only want to fire the Tag when a form with
id="contactForm"should fire the Tag, you should add that as a condition here.
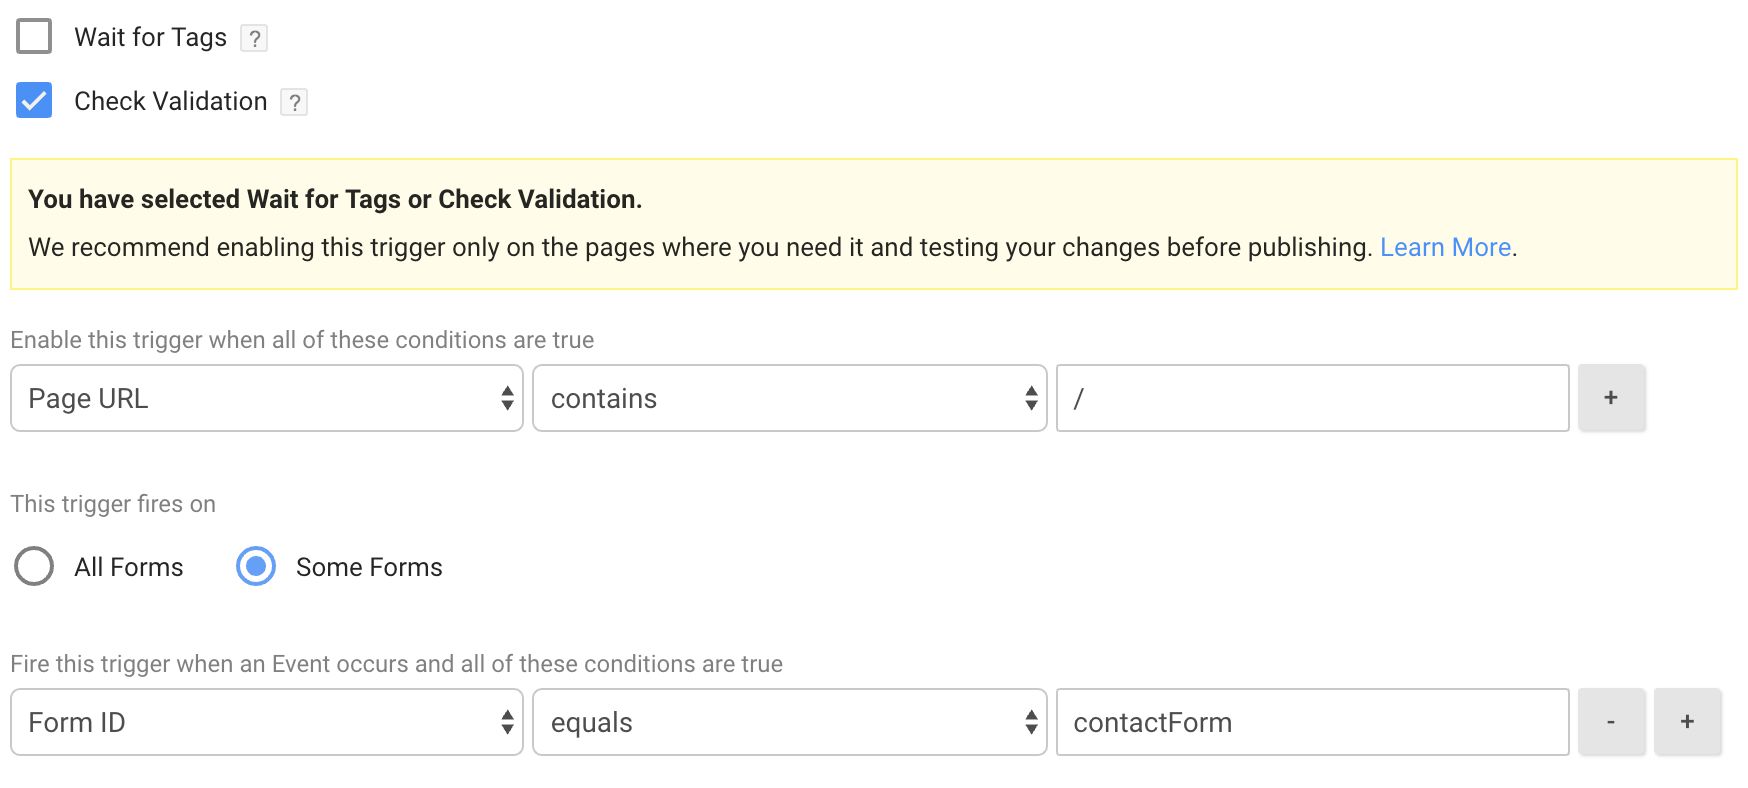
If you don’t see Variables like “Form ID” or “Form Classes” in the Variables drop-down menu, you will need to activate them, as they are Built-In Variables, introduced in Google Tag Manager V2.
However, there might be many reasons why a properly created Form Trigger doesn’t work. So, read on…
2. Why the Form Trigger doesn’t always work
For the Form Trigger to work, the form must dispatch a valid form submit event which also bubbles all the way to the document node. To de-gobbledegookify this statement, it means that:
-
The form must dispatch a valid
submitbrowser event -
This event must not be prevented from propagating to the
documentnode
Those are the conditions. They seem simple enough, but you might be surprised how many forms out there violate either one.
The first means simply that GTM listens for a standard submit browser event, which is most often dispatched when an input or button element is clicked, where element type is submit.

The second means that the submit must be allowed to climb all the way up to the document node, where GTM’s listener is waiting for the event. You see, GTM uses something called event delegation to listen for form submissions. This is much more economical than adding a listener to all the forms on the page individually.
The first condition is most commonly violated when the submit event is either cancelled (see below) or never dispatched in the first place. Many forms send their data with custom-built requests (e.g. jQuery’s $.ajax or the XMLHttpRequest API), and these prevent the submit event from working, since it’s replaced with a custom dispatcher. Since the submit event is never dispatched, Google Tag Manager never records a form submission.
The second condition is violated when event propagation is stopped with return false; in a jQuery handler. Another common way to prevent propagation is to use stopPropagation() instead of preventDefault() on the event object.
I’ve written about this phenomenon a number of times before:
The best way to fix the issue, however, is to open a line of communication with your developers, and tell them that GTM requires a standard submit browser event to propagate all the way to the document node to work.
If this can’t be done, the next best thing is to ask the developer to implement a custom dataLayer.push() into the callback function which is invoked upon a successful submission. The piece of code could be something like:
function onFormSuccess(event) {
  window.dataLayer = window.dataLayer || [];
  window.dataLayer.push({
    event: 'formSubmissionSuccess',
    formId: 'contactForm'
  });
  // Rest of the success callback code
}
This would push formSubmissionSuccess into the dataLayer as the value of the event key. Then, you can create a Custom Event Trigger, which waits for an event named formSubmissionSuccess. Using this Trigger would then fire a Tag when the form is successfully submitted.
There are other workarounds which involve e.g. polling the page until a thank you message is identified, or perhaps using a custom-built DOM Listener. Unfortunately, all workarounds are far less robust than either fixing the form to respect GTM’s Form Trigger requirements or the custom dataLayer.push() method described above.
3. Built-In Variables
Google Tag Manager introduces a number of Built-In Variables you can use to simplify form tracking. Make sure all the “Form” Variables are checked before continuing.

-
Form Element - returns an HTML Object which contains the form element that was submitted. You can use this Variable to dig deep into the object properties of the form itself.
-
Form Classes - returns a string of values in the
classattribute of the form that was submitted. -
Form ID - returns a string with the value stored in the
idattribute of the form that was submitted. -
Form Target - returns a string with the value stored in the
targetattribute of the form that was submitted. -
Form URL - returns a string with the value stored in the
actionattribute of the form that was submitted. -
Form Text - returns the entire text content of the form that was submitted (NOT very useful).
Many of the following solutions rely on these Built-In Variables.
4. Note about scope
All the Variables described below are Custom JavaScript Variables. They are all scoped, by default, to the form that was submitted with {{Form Element}}.querySelector.... If you want to access any form on the page, submitted or not, you need to use the following syntax:
var form = document.querySelector('#someform');
var field = form.querySelector...
Keep this in mind when applying the following solutions to your own measurement plan.
5. Capture field value
This is a simple Custom JavaScript Variable which captures the value user has input into a form field. Do note that items like checkboxes, radio buttons, and drop-down lists work a little differently, which is why they are covered in their own chapters.
Name: {{Field value}}
function() {
  var field = {{Form Element}}.querySelector('#inputFieldId');
  return field ? field.value : undefined;
}
Description: This solution accesses the value attribute of the form field with ID inputFieldId, as long as its found within the form that was submitted. If no such field is found, then undefined is returned instead. Remember, do not collect personally identifiable information!
6. Capture selected radio button value
This solution is for capturing the value of the checked radio button. The default solution is for capturing just one radio button value, i.e. accessing just one group. See chapter 9 for an example of how to access multiple values from similar elements.
Name: {{Checked radio button}}
function() {
  var radioName = "radioName";
  var checked = {{Form Element}}.querySelector('[name="' + radioName + '"]:checked');
  return checked ? checked.value : undefined;
}
Description: Returns the value of the checked radio button in the group with the name radioName. This group must exist within the form that was submitted. If no checked button is found, undefined is returned.
7. Capture selected checkbox value
Returning the value of the selected checkbox within a group is done exactly the same way as how you’d capture a radio button value. Both use the checked property to identify if an element is checked.
So use the solution from the previous chapter to capture checkbox values as well. Just remember that it only returns the value of the first checkbox in a group that was selected. If the user can check multiple checkboxes (as is usually the case), you might want to check chapter 9 for tips on how to do this.
8. Capture selected drop-down list item value
To capture the selected item value in a drop-down list, checking for the value of the list itself will not work, as you’d intuitively expect. Instead, you need to access the option in the list that was selected, and then capture its value.
Name: {{Selected list item}}
function() {
  var selectList = {{Form Element}}.querySelector('#selectListId');
  return selectList ? selectList.options[selectList.selectedIndex].value : undefined;
}
Description: First, the script retrieves the drop-down list with ID selectListId. Next, it returns the value of the selected option in the list. If the list does not exist, the script returns undefined.
9. Capture multiple values
Sometimes you’ll want to capture multiple values of some specified group. A prime example is the checkbox, where you can have multiple checked boxes in a single group. Here are some ideas for how to capture these values.
Return concatenated string of checked item values
function() {
  var groupName = "groupName";
  var elems = {{Form Element}}.querySelectorAll('[name="' + groupName + '"]:checked');
  var vals = [];
  var i, len;
  for (i = 0, len = elems.length; i < len; i++) {
    vals.push(elems[i].value);
  }
  return vals.length ? vals.join(' ') : undefined;
}
Description: This returns a concatenated string of all the checked item values within the group with name groupName. An example would be e.g. “breakfast lunch”, where the user chooses which meals they always eat out of “breakfast”, “lunch”, and “dinner”.
To return just the plain Array, so that you can process it further in the Tag which calls this Variable, change the return statement to:
return vals.length ? vals : undefined;
If you want to get the values in a multiple selection list, use the following script. It returns the results in a concatenated string again, but by following the tip in the previous paragraph you can return an Array instead.
Return selected values in a multiple selection list
function() {
  var selectList = {{Form Element}}.querySelector('#selectListId');
  var options = selectList ? selectList.options : [];
  var vals = [];
  var i, len;
  for (i = 0, len = options.length; i < len; i++) {
    if (options[i].selected) {
      vals.push(options[i].value);
    }
  }
  return vals.length ? vals.join(' ') : undefined;
}
Description: This returns a concatenated string of all the selected options in a multiple selection drop-down list, which has the ID selectListId and which is within the submitted form.
10. Track form abandonment
For ideas on how to track form abandonment, check out this article I wrote a short while ago:
Track Form Abandonment With Google Tag Manager
Bounteous also has a sweet guide on how to achieve the same thing, albeit with a somewhat different approach.
My colleague at Reaktor, Lauri Piispanen, has also improved upon this solution, and you can check out his GitHub repo here.
11. Track form field timings
If you want to track how much time a user spends on your form, segmented by individual fields, check out the following article:
Form Field Timing With Google Tag Manager
It utilizes User Timings in Google Analytics to collect data on how much time users spend in the fields of your form by average.
12. One form element - multiple forms (ASP.NET)
I decided not to dwell on this topic too much, since it’s so hacky and unreliable. The issue is that on e.g. ASP.NET sites, a single master form control wraps the entire page, and individual forms are just groups of elements under this one control.
The method I suggested in the previous guide is still somewhat valid, however. The way it works is that:
-
Fire a Custom HTML Tag when the submit button of the form is clicked
-
In this Custom HTML Tag, push the ID (or other relevant data) of the clicked element into the data layer
-
Create a Form Submit Trigger which looks for this value in the data layer
This way the Form Submit Trigger should only fire when the form is submitted due to a click on the correct submit button.
I’ve noticed this doesn’t always work due to race conditions or just the general fragility of the event chain. Nevertheless, it’s something you might want to try if you can’t get developers to assist you.
If you do have an established line of communications with your developers, the solution is to ask them to create / edit the success callback of each form to push a custom dataLayer object when a form is submitted. This object should contain information about which form was submitted, and you can then create a Custom Event Trigger based on this information. Go back to chapter 2 for an example of such a push.
13. Summary
This guide is a bit leaner than the first edition (at least it feels like so). That’s because the new Form Submit Trigger has made many things easier, and I’ve also rewritten the JavaScript to utilise methods like querySelector and properties like selectedIndex to get the desired result with far less hassle.
Once IE8 and older disappear entirely from the face of this earth (can’t wait!), we can use even simpler language, with e.g. CSS3 pseudo-classes like :checked.
Do you think something relevant is missing from this guide? Let me know. I’m always happy to update this with new solutions. Don’t forget to read the previous version of the guide as well, and check the comments section, too! Lots of great questions and answers there.
