Simple Split Test With Google Tag Manager
Over the last couple of posts I’ve mainly been doing proof-of-concept (POC) tests with Google Tag Manager. The great thing about a POC is that you don’t really need to have any viable results or insight-driving technological innovations. The point is to showcase some feature of the platform on which the experiment was conducted.
In this post, I’ll take a care-free step into the world of POCs again. My goal is to do a simple split test in order to identify which variant of a landing page (or key element thereof) produces the most conversions.
This isn’t a replacement for any of the REAL A/B testing tools out there. Rather, this is a way for me to showcase yet another way to utilize the wonderful complexity of GTM’s JavaScript wizardry.
Anyway, this is what you’ll (hopefully) take with you after reading this post:
-
How to modify a DOM element
-
How to set a cookie
-
How to show a different variation to 50 % of users
Combine these and you have a split test in the making!
XThe Simmer Newsletter
Subscribe to the Simmer newsletter to get the latest news and content from Simo Ahava into your email inbox!
The end result
This is how it’s going to go down. Exactly 50% of people viewing the experiment page will see the following button:
This is also the control variant. It’s the one I’ve used for years and years to make millions upon millions to my faithful followers (just kidding). However, I want to see if a more nonchalant approach to click baiting would work (and I want to appeal to the younger, less critical demographic), so this is the test variant shown to the other 50%:
So I’ll be measuring just how many clicks each of these buttons collect. In the end, I should see it in my reports both as events and as a Custom Dimension. Here’s what a goal conversion report would look like for the two variations.
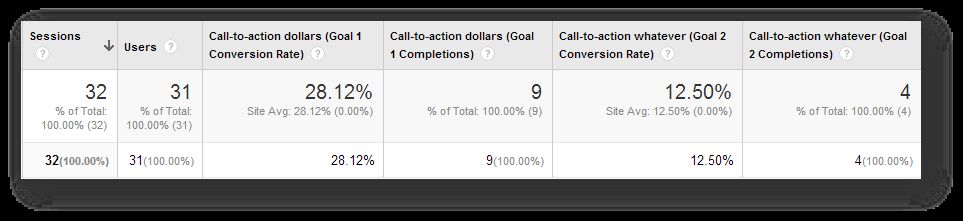
It’s not exactly hard science, but it got the job done. Surprisingly, the control variant was stronger, producing more conversions (who would’ve guessed?!).
Setting up GTM
For this experiment, you’ll need the following:
-
1st Party Cookie Macro {{Split Variation Cookie}}
-
Random Number Macro {{Random Number}}
-
Custom HTML Tag
-
Custom Dimension
-
Universal Analytics Event Tag
1st Party Cookie Macro
You’ll need a 1st party cookie to make sure the same user sees the same variant every time s/he visits the page. So when the variant is first assigned to the user, this cookie is also written. The cookie will return the value of the variant, which is important for the Event Tag and Custom Dimension as well.
-
Create a new 1st Party Cookie Macro
-
Name it Split Variation Cookie
-
Set Cookie Name to splitVar
So something like this:
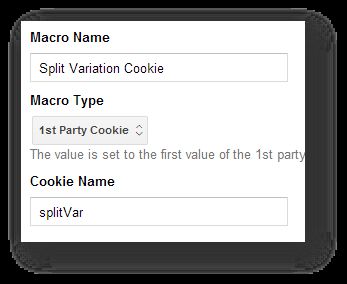
This macro will return the value of cookie splitVar which, as we will soon learn, stores the variant the user should see during the experiment.
Random Number Macro
I’ll use the Random Number Macro to sample 50 % of my visitors. It’s a nice trick, and I first saw it on Dan Russell’s blog.
-
Create a new Random Number Macro
-
Name it Random Number
Here we go:
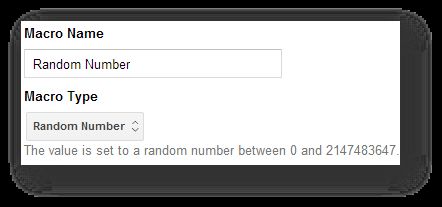
So every time this macro is called, it returns a value between 0 and 2147483647. Can you see how useful this is for sampling? If I check if {{Random Number}} < 0.5*2147483647, it should return true 50 % of the time.
Custom HTML Tag
This is where the magic happens. You’ll need a Custom HTML Tag to perform a wide variety of things: modify the DOM element, identify the user’s preferred variant, set and read a cookie, etc…
Let’s start with the code itself. This is what the tag should have. Remember to have it fire on all pages on which the experiment is run.
<script>
  function testVariant() {
    controlElement.style.backgroundColor="#000099";
    controlElement.innerHTML="**Click here if you want, whatever**";
    return variantTwo;
  }

  var controlElement = document.getElementById("call-to-action"), // Set ID of control element
      variantOne = "clickDollars", // Variation 1 name
      variantTwo = "clickWhatever", // Variation 2 name
      variant = variantOne,
      randomNumSample = 1073741824;

  if(!{{Split Variation Cookie}} && controlElement) { // If cookie isn't set run code
    if({{Random Number}} < randomNumSample) {
      variant = testVariant(); // For 50 % of hits, fire Variation 2
    }
    var d = new Date(); // Create cookie
    d.setTime(d.getTime()+1000*60*60*24*730);
    var expires = "expires="+d.toGMTString();
    document.cookie = "splitVar="+variant+"; "+expires+"; path=/";
  } else if({{Split Variation Cookie}} == variantTwo && controlElement) { // If user has only seen Variation 2
    variant = testVariant();
  }
</script>
Let’s go over this code.
Lines 2–6 contain the code which modifies a pre-set DOM element. Thus this function operates the actual split test, showing a different variation of the landing page for 50 % of users. This function returns the name of variation 2.
Lines 8–12 set up some variables for this script to work. Change call-to-action in getElementById(“call-to-action”); to match the ID attribute of the HTML element you want to dabble with on the page. Change string values for variationOne and variationTwo to match how you want to name or two variants. These values will be used in your GA reports. Finally, the variable randomNumSample contains a numerical value exactly 50 % of the maximum the Random Number Macro can return.
Lines 14–21 first test if you’ve already been assigned a variation by checking your cookies. If no cookie is found, you’re a new user, and a variation must be assigned to you. In this case, the script randomly assigns you either the control variant (the default, “clickDollars”) or the test variation (“clickWhatever”). Next, it writes this information in a cookie which will stay with you for a long time.
Lines 22–24 are executed if the cookie is found. In this case, if the variant that was assigned to you was the test variation, the DOM altering function from the beginning (see lines 2–6) is run again to make sure you always see the same variation of the landing page. If the variant that was assigned to you was the control variation, nothing happens, since that’s the default version of the landing page.
Some things to note. First of all, the cookie is set for two years, so it mimics the _ga cookie. The point is that the user should always see the same variation (provided they’re using the same browser). For some split tests this isn’t necessary, so you can change the code to forgo the cookie check. Also, all the functions test for undefined values (both of the cookie and the control element), so I didn’t see the need to add unnecessary try…catch blocks or anything else.
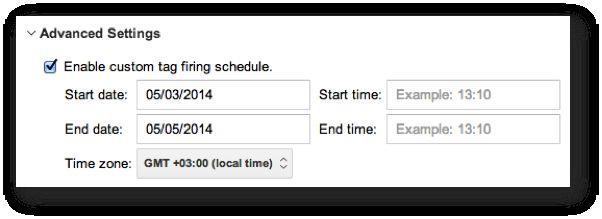
Pro tip - Make use of the rarely utilized custom firing schedule for this tag to make sure your experiment only runs a certain time:
Custom Dimension
You’ll need to create a new user-scope Custom Dimension, so that you’ll have one additional segment to play around with in your data.
-
Go to Google Analytics admin, and choose the property you’ll be tracking these hits to
-
Choose Custom Definitions > Custom Dimensions, and create a new user-scope CD
-
Give it a descriptive name (I named mine just Test variation)
-
Make note of dimension index
So something like this:
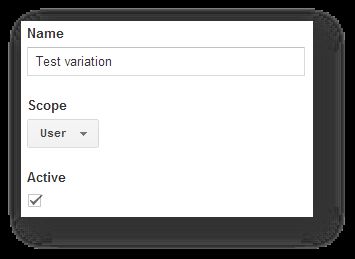
You could also use a session-scope or even a hit-scope dimension, depending on the scope of your test. However, even though I’m not a professional CRO practitioner (far from it!), I see the benefit of observing interactions on a multi-visit, user-level rather than the relatively tiny realm of a single visit or hit. However, some web design questions can probably be answered on a more limited scope, I guess.
Universal Analytics Event Tag
The last bit you’ll need is some event that’s firing and sending your data to Google Analytics. Because I’m observing a button (that I’ve encased in an <a href...> element), I’m also using a Link Click Listener. If that says nothing to you, be sure to check out my guide on auto-event tracking.
So anyway, I’ve got a Link Click Listener firing on the test page. What I want to know is just what variant the user was seeing when they clicked the button. This is how I’ll count my conversions and determine which variant was the winner. I’ll also send the Custom Dimension with the event, so that the user is properly annotated with the variant name. I’m sending the CD with the event simply because it’s convenient for the scope of this article. You should definitely send it with the pageview, so that you can segment your visitors properly (e.g. out of people who saw the control variant, how many clicked the button; out of people who saw the test variant, how many clicked the button).
My Event Tag looks like this:
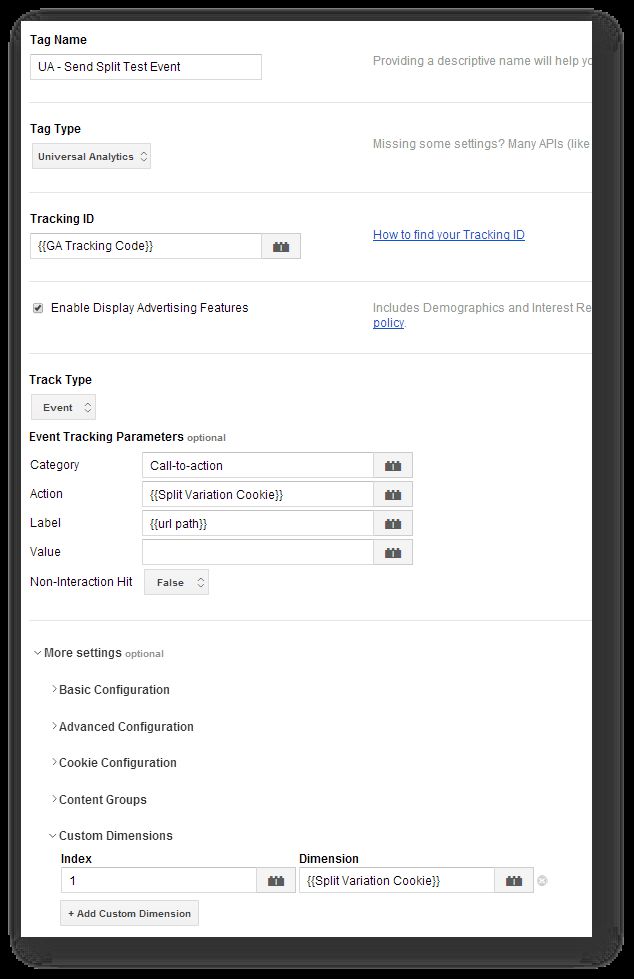
As you can see, I’m using the cookie value (“clickDollars” or “clickWhatever”) to annotate the event and the Custom Dimension! What a nice way of saving time and resources. So when someone clicks on the default variation, for example, the Event Tag will send something like this to GA servers:
Event Category: Call-to-action
Event Action: clickDollars
Event Label: /call-to-action-page/subscribe/
Dimension 1: clickDollars
Remember to change the index number of the dimension to match the CD you created in the previous chapter!
The firing rule I’m using is simply:
{{event}} equals gtm.linkClick
{{element id}} equals call-to-action-link
This rule will thus only fire when a click occurs on an element with ID “call-to-action-link”. Conveniently, this just happens to be my control element.
Conclusions
Well here it is. A simple split test done solely with GTM and some JavaScript magic. Now let me reiterate: this is hardly the best way to do split testing (we’re still waiting for Content Experiments to make their way to GTM + Universal Analytics..) but it does showcase the power and might of a tag management system. I am, after all, directly manipulating an on-page element without touching server-side or front-end code! That’s amazing…and scary.
Before you start fiddling with your DOM (wow, that sounded dirty), make sure you know just what you’re doing and to which element. This is crucial, because you don’t want to accidentally set off a full-scale website redesign without actually, you know, intending to.
Note also that because you’re changing the element in an asynchronously loading tag, it’s more than possible that the user will see the control variant before the script overwrites it with the test variant. This isn’t a good thing, as if the control group realizes they’re participating in an experiment, it will hurt the reliability of the results.
There are a couple of nice things to snag from this to your other scripts. Make use of the set-cookie function I wrote in the Custom HTML tag. It’s a versatile solution, and I’ve actually used it before as well. The random number sampling is simply genius, and I love how easy it is to operate!
