Macro Magic For Google Tag Manager
(Last updated June 2014) This post is an attempt at a whole new level of interaction. These words will transcend the barriers of time and space, bridging together the physical world and its digital counterpart. You see, in an undisclosed number of hours after the publishing of this blog post, I will be talking at the MeasureCamp unconference on this very subject. Or, I hope I will. The whole unconference thing is somewhat confusing, and it involves lighting-fast reflexes and street smarts for slot selection; traits which I sadly lack.

However, if you DO see me speak at MeasureCamp, this post is meant as a companion to that talk. And if you do not (or did not, this transcendental approach is really confusing), perhaps this post will inspire you with some ideas for your own day-to-day Google Tag Manager use.
In this post, my fair friends, I’ve outlined a number of cool ways in which you can use macros to make your data collection woes a thing of the past. If you don’t know what macros are or how they operate, be sure to check my macro guide. Almost all of my Google Tag Manager posts in this blog revolve around macros in one way or another, so while you’re at it, check out some of my other GTM articles as well. And sorry for this shameless self-promotion, I can’t help it.
XThe Simmer Newsletter
Subscribe to the Simmer newsletter to get the latest news and content from Simo Ahava into your email inbox!
Introducing Macro Magic

So what is Macro Magic? Well, to put it simply, it’s what follows when you accept that macros, not tags, are what make GTM the time- and effort-saver that it is. Sometimes macros make your tag setups a lot sleeker and leaner, since the flexibility that they introduce to tags greatly reduces the need to capture every single variation of tracking in its own, unique tag. Sometimes they open doors to data collection methods you didn’t think were possible with traditional, on-page tracking. And sometimes they’re just little helper functions, which make operating GTM so much easier.
The examples below fall into these categories nicely, and I’m sure there’s something for everyone.
By the way, I am really, really looking forward to a Google Tag Manager which is accompanied by a resource library similar to Google Analytics’ solution gallery. Just imagine how cool it would be to have a library of tags and macros you can just download and insert into your container? Well, as long as it’s just a utopian dream of mine, posts like this will probably be in demand.
Note that not all of these are my own inventions. It would be ridiculous to claim intellectual property for some of the macros, but where prudent, I’ve added a link to the source of the macro. If you feel like I’ve stolen your ideas, please let me know and I’ll see if I can pass credit where it is due.
1. Client time
Macro Type: Custom JavaScript
Use for: To get local time of client as opposed to the the time of the web server hosting the site.
Example return value: 11
Instructions and description:
-
Create new Custom JavaScript Macro
-
Add the following code:
function() {
  var now = new Date();
  return now.getHours();
}
Well it’s easy to credit where I got the idea for this one. Google uses a version of this as an example of the Custom JavaScript Macro:
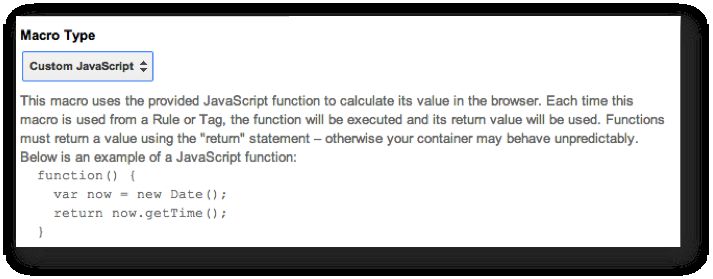
The idea behind this macro is that it returns the time (hours) of the client as opposed to the time of the website (i.e. server), which is what’s measured by default.
So if you’re interested in what the local time (in hours) is of the visitor, use this macro and store it as a custom dimension, for example.
2. Random number for sampling
Macro Type: Random Number
Use for: To fire a tag only for every 10th visitor, for example
Example return value: 647156
Instructions and description:
- Create Random Number Macro
OK, so the macro isn’t difficult at all to create, nor is it anything magical (YET!). But this is a beautiful scenario for something as simple as the Random Number macro (which, I’m sure, is often very neglected). This idea comes directly from Dan Russell, and you can read about this in his original blog post
Sampling a percentage of your users with Google Tag Manager.
The sweetness is not in the macro but in the rule which you’ll use to fire your tags. If you want to fire a tag for every 10th visitor, you’d add a rule with the following condition:
{{Random Number Macro}} ends with 3
If you want to fire a tag for every 100th visitor, you’d edit the rule so that it’s:
{{Random Number Macro}} ends with 01
It’s so simple and beautiful. Because the Random Number macro returns a random number, you can assume that there’s roughly a 1/10 chance that the number will end in 3, and roughly a 1/100 chance that it will end in 01.
How’s that for pre-sampling your data before Google Analytics gets to work on it with its brutal thresholds?
3. Return file extension of clicked link
Macro Type: Custom JavaScript
Other requirements: Macro for Auto-Event Variable of type Element (named {{element}} in this example)
Use for: Rules, event fields
Example return value: pdf
Instructions and description:
-
Create Custom JavaScript Macro
-
Add following code:
function() {
  var ext = {{element}}.pathname.split(".");
  return ext.length > 1?ext.pop():'html';
}
This macro came from Stéphane Hamel, in another inspiring, “crowd-sourced” Google+ discussion. The idea is that when a Link Click Listener is activated, this macro will return the file extension of the clicked link, and if one doesn’t exist, it returns just html. So if the link was to http://www.mydomain.com/brochure.pdf, this macro will return pdf.
You can use this in your tags either as a rule or as a value for a specific field. For example, here’s an event tag which sends the extension of the clicked link as one of the parameters:
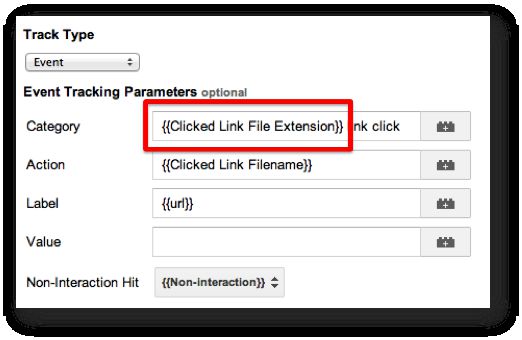
If the link were to http://www.mydomain.com/brochure.pdf, this tag would fire with:
Event Category “pdf link click”
Event Action “brochure.pdf” (more on this in the next chapter)
Event Label “url of page where brochure.pdf was downloaded from”
4. Return file name of clicked link
Macro Type: Custom JavaScript
Other requirements: Macro for Auto-Event Variable of type Element (named {{element}} in this example)
Use for: Event fields
Example return value: brochure.pdf
Instructions and description:
-
Create Custom JavaScript Macro
-
Add following code:
function() {
  var filepath = {{element}}.pathname.split("/");
  var filename = filepath.pop();
  return filename.indexOf(".") > -1?filename:'n/a';
}
This macro is very similar to the previous one, except now it returns the whole file name. If the downloaded link is not an asset with a file extension, the script returns the ambiguous “n/a” string, which can be used in blocking rules, for example.
Use this macro to make your link click event tags more dynamic. In the best case scenario, you’ll just need one event tag for all your link clicks, because variable value macros like this are what make your tags the dynamic vessels they should be.
5. Check if clicked link is internal
Macro Type: Custom JavaScript
Other requirements: Macro for Auto-Event Variable of type Element URL (named {{element url}} in this example), macro for URL of type URL Hostname (named {{url hostname}} in this example)
Use for: Firing rules
Example return value: true
Instructions and description:
-
Create Custom JavaScript macro
-
Add following code within:
function() {
  return {{element url}}.indexOf({{url hostname}}) > -1;
}
This returns true if the clicked element URL contains the hostname of the current page, and false, if the clicked element URL contains some other hostname.
You can use this in your firing rules, e.g. fire an “Outbound link” event only when the clicked link is not internal:

6. Get clientID using _ga cookie
Macro Type: 1st Party Cookie, Custom JavaScript
Other requirements: Universal Analytics property
Use for: Offline measurement, stitching client data
Example return value: 475226310.1380715146
Instructions and description:
-
Create 1st Party Cookie macro
-
Set cookie name to _ga
-
Create Custom JavaScript macro
-
Add following code within:
function() {
  try {
    var cookie = {{ga cookie}}.split(".");
    return cookie[2] + "." + cookie[3];
  } catch(e) {
    console.log("No Universal Analytics cookie found");
  }
}
First you create a new 1st Party Cookie macro, which returns the value of the _ga cookie. It might be something like GA1.2.475226310.1380715146. Next, the Custom JavaScript macro parses this string, and returns the third (client ID) and fourth (timestamp) elements of the cookie value (475226310.1380715146), which combine to make the complete clientID of the user.
You can then add this as a session-level custom dimension, for example, to identify which clientID committed to what actions on your site during their session. You could then use the Measurement Protocol to work all sorts of offline-online data stitching magic with your database tools!
Note that I use a very rudimentary try-catch block for error handling. Feel free to handle errors in any way you want (as long as you do handle them!).
7. Get clientID using ga.getAll()
Macro Type: Custom JavaScript
Other requirements: Universal Analytics property
Use for: Offline measurement, stitching client data
Example return value: 475226310.1380715146
Instructions and description:
-
Create Custom JavaScript macro
-
Add following code within:
function() {
  try {
    var tracker = ga.getAll()[0];
    return tracker.get('clientId');
  } catch(e) {
    console.log("Error fetching clientId");
  }
}
This is Google’s recommendation for fetching the client ID (rather than parsing the cookie). You basically access the ga object using the function getAll(). This would normally retrieve all named trackers, but you’re only interested in the first one (which is the one GTM sets). Finally, it uses the get method of the tracker object to retrieve the value of the property clientId, which is, coincidentally, the clientId.
NOTE! This macro will not work if it fires before a page view is sent. The tracker is created during the page view call, so you’ll either have to use a callback function (see the next section) or have the tag which fetches the client ID fire upon {{event}} equals gtm.load.
8. hitCallback with a Universal Analytics tag
Macro Type: Custom JavaScript
Use for: Imposing a tag firing order
Instructions and description:
-
Create Custom JavaScript macro
-
Add following code within:
function() {
  return function(){dataLayer.push({'event': 'pageViewFired'});}
}
The Universal Analytics tag doesn’t have a callback field that you can use (yet). So you’ll have to resort to the “Fields to set” option, and add the callback function manually.
Anyway, the idea with hitCallback is to do something as soon as the tag has fired. In my example, I push an event called ‘pageViewFired’, which I can then use in some other tag to make sure it fires only after the page view has been sent. You’d need to add the macro to your tag like this:
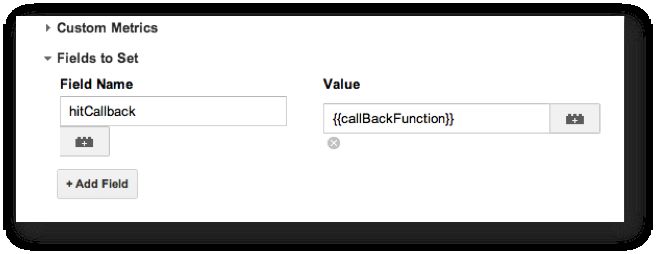
The field to set is called hitCallback and its value should be the macro you just created.
If you look at the code, you’ll see a funny thing. You’re returning the function which does all the work. Why, you wonder? Simple. When the event tag is fired, it will go through all the fields that have been set for the tag, performing all the actions within. If you didn’t have the function returning another function, the callback would fire twice: first when the event tag’s firing begins, and again when the tag has completed (when the callback function is actually called).
This might be a bit difficult to fathom, but it’s just how GTM and JavaScript work. hitCallback is expecting a function, so the function in your callback tag has to return a function, because macros need to always return something.
Messy. But it works!
9. Return URL path + query string
Macro Type: Custom JavaScript
Use for: Working with the query string
Example return value: /analytics/?internal=true
Instructions and description:
-
Create Custom JavaScript macro
-
Add following code within:
function() {
  return location.pathname+location.search;
}
This is a very simple macro. There’s no predefined macro for you to use if you want to return the url pathname with query parameters. This macro does just that.
10. Property ID lookup with hostname
Macro Type: Lookup Table
Other requirements: Macro for URL of type URL Hostname (named {{url hostname}} in this example)
Use for: To have the same tracking tag for different property IDs on different domains
Example return value: UA-12345-1
Instructions and description:
-
Create a Lookup Table macro
-
Add some tracking code as the Default Value (optional)
-
In the first column, choose {{url hostname}} as the macro that is evaluated
-
In the first column, add all the different hostnames you want to assign a property ID to
-
In the second column, add the respective property ID for each hostname
This is a very useful macro if you have multiple domains with different property IDs tracked by the same container. Whenever you have the same tags running on all the different domains, using a lookup like this means you don’t have to create a separate tag for each ID.
The macro should look like this:
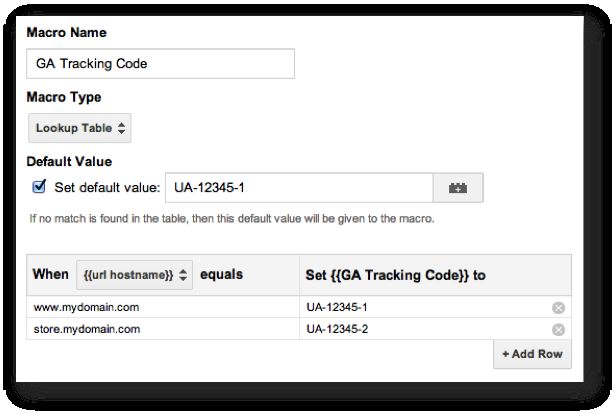
This macro will return the correct property ID depending on which domain the user is browsing on.
11. Track debug hits to different property ID
Macro Type: Lookup Table, Debug Mode
Use for: When using GTM’s debug mode, track your hits to a different property ID (e.g. test account)
Example return value: UA-12345-1
Instructions and description:
-
Create a Debug Mode macro (named {{debug mode}} in this example)
-
Create a Lookup Table macro
-
Add some tracking code as the Default Value (optional)
-
In the first column, choose {{debug mode}} as the macro that is evaluated
-
In the first column, add rows for true and false
-
In the second column, add the respective property ID for when debug mode is true and when it is false
This is very similar to the previous macro, but it uses the Debug Mode macro as well. Sometimes you’ll notice yourself doing so much debug work that you’ll want to track these hits on a different account altogether. This is a really simple way to do it.
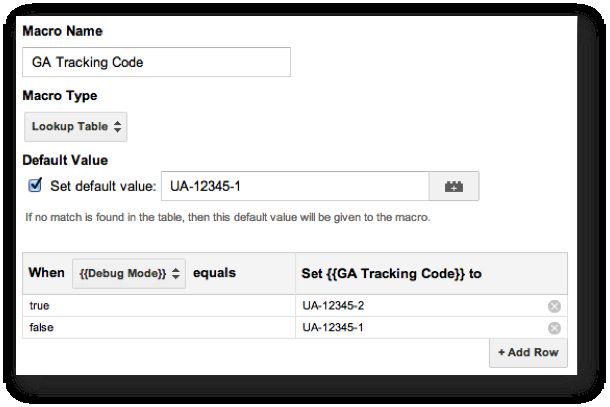
The Debug Mode macro returns “true” if debug mode is on, and “false” if it’s off. Use these values to assign a different property ID as the return value of the Lookup Table macro.
12. Get title attribute of document
Macro Type: JavaScript Variable
Use for: Retrieving and using the document title attribute
Example return value: Macro Magic For Google Tag Manager - Simo Ahava’s Blog
Instructions and description:
-
Create JavaScript Variable macro
-
Set field Global Variable Name to document.title
This macro retrieves the HTML title attribute of your document. A great use case for this is if you want to process tags on a 404 page differently. You’d then create a rule like this:
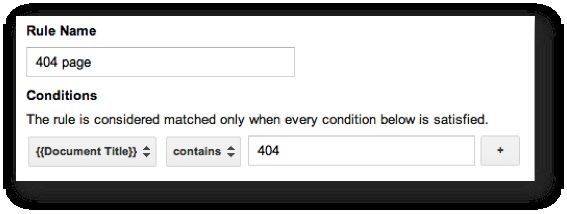
Another use case could be for content grouping. Use the title macro to group your content logically in your tags.
13. Check if browser has cookies enabled
Macro Type: JavaScript Variable
Use for: Checking if user has cookies enabled, filter some bot traffic
Example return value: true
Instructions and description:
-
Create JavaScript Variable macro
-
Set field Global Variable Name to navigator.cookieEnabled
The navigator.cookieEnabled property returns a boolean value (true/false) determined by whether or not the browser allows websites to write cookies. You can use this in your rules to make sure tags only fire for browsers with cookies, or to filter non-cookie data to a different view.
You could also use this to block tags from firing for search engine bots, since there’s some consensus that a majority of them do not accept or use cookies (see this test for Googlebot from February 2013).
14. A bunch of useful Auto-Event Variable extensions
Macro Type: Data Layer Variable Use for: Making the most of auto-event tracking
Here’s a list of extensions for your auto-event tracking. By creating Data Layer Variable macros, you can use them in your rules to make your event tracking and whatnot even more detailed. In the “What it does” sections, the element refers always to the element which was clicked / submitted and thus stored in dataLayer as gtm.element.
Data Layer Variable Name: gtm.element.nodeName
Example return value: IMG
What it does: Returns the tag name of the element (well, strictly node name but in most cases it’s the same thing)
Data Layer Variable Name: gtm.element.value
Example return value: Simo Ahava
What it does: Returns the value of the element. This is useful if you’re tracking input elements on your forms (with e.g. blur, focus, or change), and you want to send an event every time a form field has been filled.
Data Layer Variable Name: gtm.element.hash
Example return value: #chapter1
What it does: Returns the hash (if any) of the element href. So if the link was to /this-page/?internal=true#chapter1, gtm.element.hash would return #chapter1
Data Layer Variable Name: gtm.element.pathname
Example return value: /this-page/
What it does: Returns the path in the element href. If the link was to /this-page/?internal=true#chapter1, gtm.element.pathname would return /this-page/
Data Layer Variable Name: gtm.element.search
Example return value: ?internal=true
What it does: Returns the full query string of the element. If the link was to /this-page/?internal=true#chapter1, gtm.element.search would return ?internal=true
Data Layer Variable Name: gtm.element.parentElement
Example return value: (object), extend further with some property of the parent element
What it does: Returns the direct parent of the element, and you should extend this macro further to access its properties (e.g. gtm.element.parentElement.id returns the value stored in the ID attribute of the parent tag)
Data Layer Variable Name: gtm.element.firstChild
Example return value: (object), extend further with some property of the child element
What it does: Returns the first direct descendant of the element, and you should extend this macro further to access its properties (e.g. gtm.element.firstChild.className returns value stored in the CLASS attribute of the child tag)
Data Layer Variable Name: gtm.element.nextSibling
Example return value: (object), extend further with some property of the sibling element
What it does: Returns the next element in the DOM tree which is on the same hierarchical level as the element, and you should extend this macro further to access its properties (e.g. gtm.element.nextSibling.nodeName returns the tag name of the sibling tag)
So here’s a bunch of extensions for you to play with. There’s still a huge amount of stuff out there you can try, especially with forms, so I suggest that you set up a click listener on your site and play around with the DOM.
15. Detect mobile browser
Macro Type: Custom JavaScript
Use for: Mobile-specific tracking
Example return value: true
Instructions and description:
-
Create Custom JavaScript macro
-
Copy-paste the code from the attached TXT file
I had to add the code in an attachment, because it’s such a long and ugly piece of RegEx that it makes my eyes water. Sorry about that.
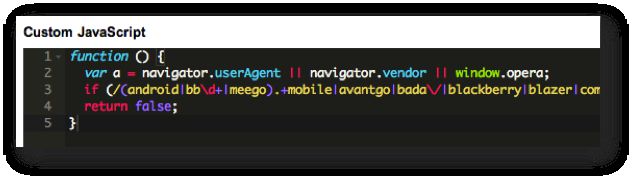
It’s dirty, I know. This script checks the browser user agent string and returns true if it matches a mobile device user agent. If it doesn’t, the script returns false.
This script is provided by (with slight modifications to fit GTM infrastructure) detectmobilebrowsers.com.
Conclusions
There’s so much you can do with macros. I truly believe that the goal of all GTM implementations should be to achieve the elusive compromise between complexity and eye candy. It’s important to keep a clean house when tag management is concerned, especially since Google Tag Manager doesn’t, as of yet, provide us with too much to work with in terms of taxonomies, hierarchies and categories.
I wasn’t kidding when I wrote in the beginning how I really want to see a solution gallery for GTM. I appreciate the fact that it will make posts like this obsolete (unless you enjoy my banter or the educational twist I hopefully succeed in conveying). Nevertheless, being able to share, store, and search for the amazing tags and macros that our vibrant community has produced would be the best thing since sliced bread.
