Improve Google Analytics Bot Detection With reCAPTCHA
There are thousands upon thousands of bots, crawlers, spiders, and other creepy-crawlies out there doing nothing but crawling through websites and harvesting the content within for whatever purposes they have been fine-tuned to. While Google Analytics provides a bot filtering feature to filter out “spam” and “bot traffic” from views, this is far from comprehensive enough to tackle all instances of bot traffic that might enter the site.
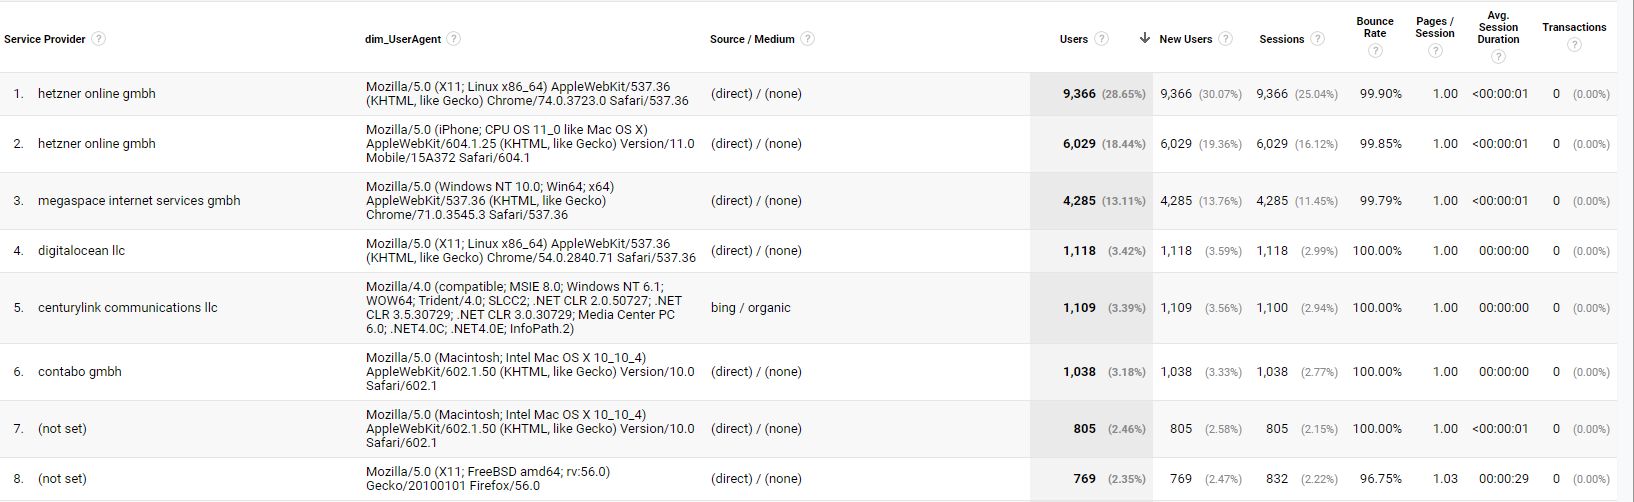
You might have noticed bot traffic in your data even if you have bot filtering toggled on. For instance, such traffic could be characterized as follows:
- Traffic without a discernible source/medium
- Average Session Duration under <00:00:01
- Same / outdated user agent
- Non-converting traffic / high bounce rate
- Network location a known cloud host (e.g. AWS)
Luckily, there are better ways to identify this traffic than looking at noisy Google Analytics data. Google has introduced reCAPTCHA v3 which lets you verify traffic without any user interaction required. This is done with a simple JavaScript API combined with a server-side verification endpoint.
In this article, Sebastian Pospischil and Philipp Schneider from Resolution Media will share the solution with you. They’ll show you how to build a simple PHP API on your Apache web server to handle the requests from reCAPTCHA.

I’ll contribute by building the same thing with Node.js. Remember that you can have both (Apache and Node.js) running in Google Cloud using e.g. the App Engine standard environment. This is helpful if you do not have the resources or capabilities to run something like this on your own web servers.
Huge thanks to Philipp and Sebastian for sharing this nugget of wisdom with this blog!
XThe Simmer Newsletter
Subscribe to the Simmer newsletter to get the latest news and content from Simo Ahava into your email inbox!
Getting started
To start with, you’ll need to generate a (free) site key and a (free) secret key for your reCAPTCHA API use. Head on over to https://www.google.com/recaptcha/admin/create, and register a new site to use with reCAPTCHA v3. Make sure you enter all the domains from which these verification requests will be sent.
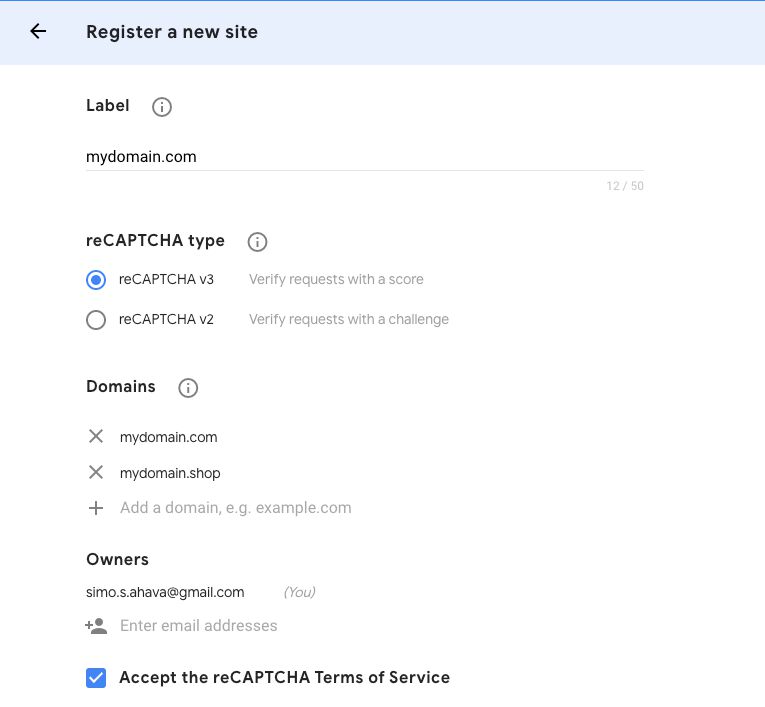
Once you’ve added everything and checked all the necessary boxes, click SUBMIT to get your keys.
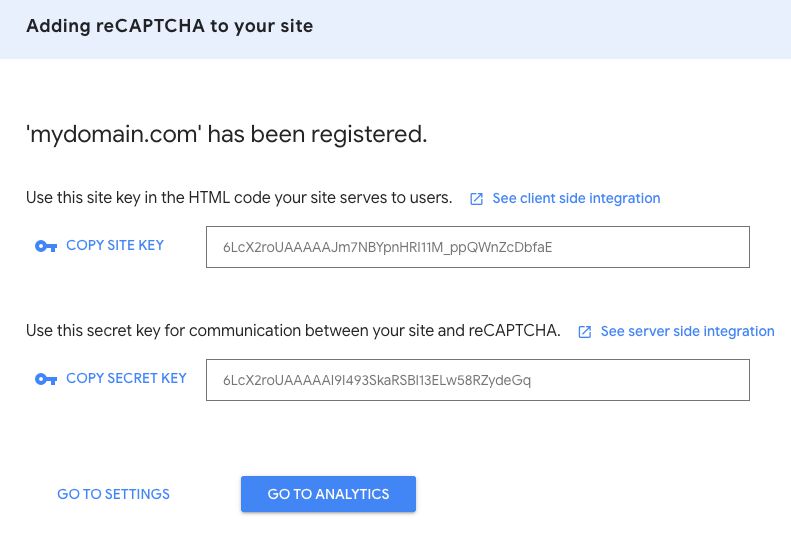
Copy the keys, as you’ll need them soon when configuring the Custom HTML tag in Google Tag Manager as well as the server-side endpoint.
PHP endpoint
In this chapter, Philipp and Sebastian will walk you through the steps of creating a PHP endpoint for verifying the reCAPTCHA requests. They’ll also show you how to create the Custom HTML tag in Google Tag Manager for loading the reCAPTCHA JavaScript API and ascertaining the “bot-ness” of the user.
Custom HTML tag
First things first - let’s setup Google Tag Manager. In GTM, create a new Custom HTML Tag.
<style>
  /* hides the recaptcha badge */
  .grecaptcha-badge {
    visibility: hidden !important;
  }
</style>
<script src="https://www.google.com/recaptcha/api.js?render=_reCAPTCHA_site_key_"></script>
<script>
  grecaptcha.ready(function() {
    grecaptcha.execute('_reCAPTCHA_site_key_', {
      action: 'homepage'
    }).then(function(token) {
      var xhr = new XMLHttpRequest();
      xhr.onload = function() {
        if (xhr.response !== 'noChange') {
          var greResult = JSON.parse(xhr.response);
          window.dataLayer.push({
            event: 'recaptcha',
            recaptchaAnswer: greResult.success,
            recaptchaScore: greResult.score
          });
        }
      };
      xhr.open('POST', '/gtm/recaptcha.php', true); //replace this with URL to your PHP fil
      xhr.setRequestHeader('Content-type', 'application/x-www-form-urlencoded');
      xhr.send('token=' + token + '&action=homepage');
    });
  });
</script>
You can set this tag to fire on whatever trigger you wish, though a trigger that fires when the page loads (e.g. All Pages, DOM Ready, or Window Loaded) is recommended.
Make sure you edit the following:
- The
_reCAPTCHA_site_keystring on lines 7 and 10 with the actual site key you copied from the reCAPTCHA admin console in the previous chapter. - The URL of your PHP endpoint on line 24.
This block of code runs the reCAPTCHA JavaScript API in the user’s browser, and sends the tokenized result to the PHP endpoint you’ll configure in the next chapter. When it gets a response, the score and success state are pushed into dataLayer.
The very first code block in the tag hides the reCAPTCHA badge from showing up on the site. Remember to read this part of the FAQ to learn how to modify your site to allow the hiding of the badge.
PHP file for your server
Create a file recaptcha.php with the following code, and upload it to all the domains you wish to validate reCAPTCHA requests on. Place it in a subdirectory named /gtm/.
NOTE! You can use whatever path and filename you want for the PHP file - just remember to update the Custom HTML tag’s HTTP request endpoint URL accordingly.
<?php
	// reCaptcha info
    $url = 'https://www.google.com/recaptcha/api/siteverify';
    $secret = "_reCAPTCHA_secret_key_";
	$remoteip = $_SERVER['REMOTE_ADDR'];
	// Form info
	$action = $_POST['action'];
	$response = $_POST['token'];
	// Botscore
	$botscore = $_COOKIE['_rbs'];

	// Curl Request
	$curl = curl_init();
	curl_setopt($curl, CURLOPT_URL, $url);
	curl_setopt($curl, CURLOPT_POST, true);
	curl_setopt($curl, CURLOPT_RETURNTRANSFER, 1);
	curl_setopt($curl, CURLOPT_POSTFIELDS, array(
		'secret' => $secret,
		'remoteip' => $remoteip,
		'action' => $action,
		'response' => $response
	));
	$curlData = curl_exec($curl);
	curl_close($curl);
	$curlJson = json_decode($curlData, true);

	//defining the answer
	$answer = $curlData;

	//refresh the cookie
	setcookie('_rbs', $curlJson['score'], time()+1800, '/','', 0);

	// only fire $answer if botscore cookie is not set or different from acutal score
	if ($botscore != $curlJson['score']) {
		echo $answer;
	} else {
		echo "noChange";
	}
?>
Again, make sure you replace the _reCAPTCHA_secret_key on line 4 with the secret key you got from the admin console.
This PHP code takes the response sent by Google Tag Manager, validates it against the reCAPTCHA verification API, and then sends the result object in the response, which will, in turn, be pushed into dataLayer for your tags to use.
The code also writes a cookie in the HTTP response. This cookie is named _rbs and contains the score of the reCAPTCHA action. The results are only returned if the reCAPTCHA score has changed in the last 30 minutes. If the results have not changed, the response will be "noChange", which blocks the dataLayer.push() from taking place.
Node.js endpoint
In this chapter, Simo will show you how to do the same as above by using a Node.js application instead.
Custom HTML tag
The main difference (apart from the tech stack) to the PHP solution is that we’ll log errors as well. They are sent as the value of the recaptchaScore key in dataLayer, so in your report you’ll end up with a mix of valid scores and error texts, but this should be easy to filter in your tables.
This is what the Custom HTML tag looks like:
<style>
  /* hides the recaptcha badge */
  .grecaptcha-badge {
    visibility: hidden !important;
  }
</style>
<script src="https://www.google.com/recaptcha/api.js?render=_reCAPTCHA_site_key&onload=__recaptchaCallback" async defer></script>
<script>
  window.__recaptchaCallback = function() {
    if (window.grecaptcha) {
      window.grecaptcha.execute('_reCAPTCHA_site_key', {action: 'homepage'}).then(function(token) {
        var url = 'https://mydomain.com:3000/recaptcha/';
        var xhr = new XMLHttpRequest();
        xhr.open('GET', url + '?g-recaptcha-response=' + token, true);
        xhr.onreadystatechange = function(data) {
          if (this.readyState === XMLHttpRequest.DONE && this.status === 200) {
            var responseJson = JSON.parse(xhr.response);
            window.dataLayer.push({
              event: 'recaptcha',
              recaptchaAnswer: responseJson.status,
              recaptchaScore: responseJson.recaptcha.score
            });
          }
        }
        xhr.send();
      });
    }
  };
</script>
Remember to change the _reCAPTCHA_site_key on lines 7 and 11.
The url variable on line 12 needs to point to your Node.js application.
This setup is different from the PHP request. Here, we use a GET request, and we parse the response, pushing both the success and error into dataLayer using a success callback for the HTTP request.
Also, since we load the JavaScript API asynchronously, we create a global callback method __recaptchaCallback, whose name we pass in the script loader as a parameter (&onload).
The end result is the same as with the PHP endpoint - a dataLayer.push() event with the reCAPTCHA status and score.
Node.js application
The Node.js application example here is the simplest possible thing you can build. For it to work, you need to have Node.js installed on in the environment where you want to run the endpoint (for example, a web server running on your site or in the cloud).
Create an empty directory, and initialize a new npm project with npm init. After following through the setup steps, run:
$ npm install express express-recaptcha cookie-parser --saveThis installs the required dependencies to run a simple express.js web server as well as the files required to run the reCAPTCHA middleware and some cookie parsing logic.
Then, create a file named server.js, open it for editing, and add the following code within:
const express = require('express');
const cookieParser = require('cookie-parser');
const Recaptcha = require('express-recaptcha').RecaptchaV3;

const app = express();
app.use(cookieParser());

const siteKey = '_reCAPTCHA_site_key';
const secretKey = '_reCAPTCHA_secret_key';

const recaptcha = new Recaptcha(siteKey, secretKey, {action: 'homepage'});

app.get('/recaptcha/', recaptcha.middleware.verify, (req, res) => {
  const botCookie = req.cookies._rbs;
  res.header('Access-Control-Allow-Origin', '*'); // Set this to the actual domain that will be sending the requests
  if (!req.recaptcha.error) {
    const recaptcha = req.recaptcha.data;
    const score = recaptcha.score;
    res.cookie('_rbs', score, {path: '/', maxAge: 30 * 60 * 1000});
    // Only send response if cookie does not exist or does not match the latest score
    if (botCookie !== score) {
      res.send({status: '1', recaptcha: req.recaptcha.data});
    }
  } else {
    const score = req.recaptcha.error;
    res.cookie('_rbs', score, {path: '/', maxAge: 30 * 60 * 1000});
    res.send({status: '0', recaptcha: {score: score}});
  }
});

app.listen(3000, () => console.log('App listening on port 3000!'));
Edit lines 8 and 9 with the actual site key and secret key, respectively.
Edit line 15 to allow requests only from your site (so if your site is running on https://mydomain.com, that’s what you would add as a valid origin instead of *).
This application runs on port 3000 of whatever hostname is configured for your web server. It creates a simple GET request endpoint to /recaptcha/, where a piece of middleware will inspect the incoming request for a reCAPTCHA token.
If the token is encountered, it is validated and the recaptcha results are written to dataLayer as well as a cookie named _rbs.
If the validation fails, the “score” will be the error message instead of the actual score.
Rest of the setup
Google Analytics Custom Dimensions
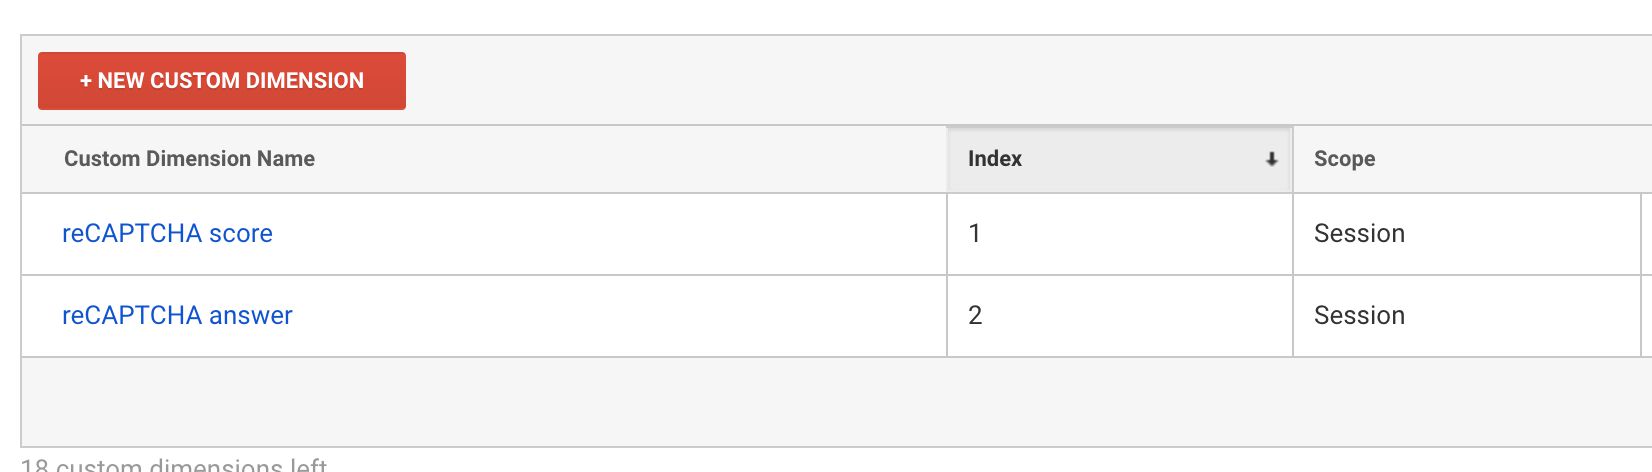
In Google Analytics, create two new Custom Dimensions:
- reCAPTCHA score (session scope)
- reCAPTCHA answer (session scope)
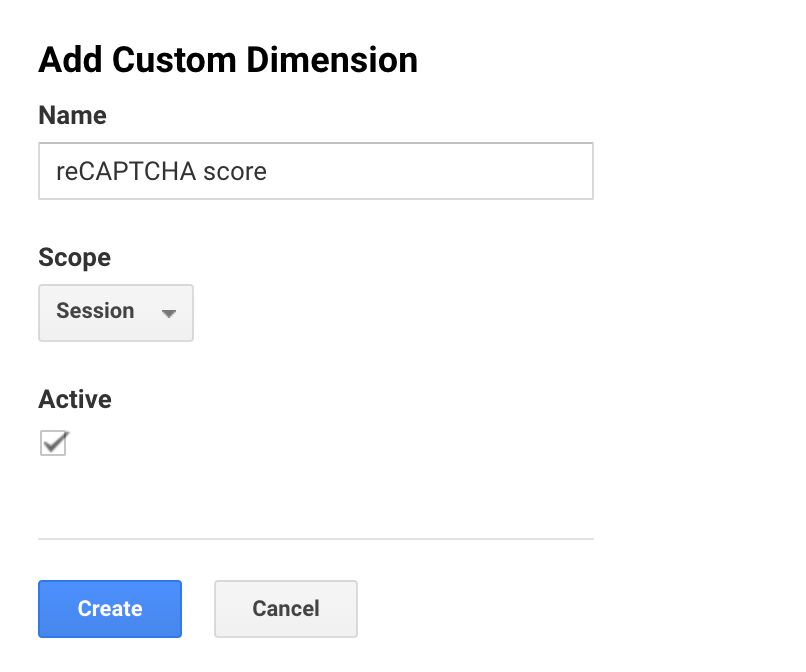
These two Custom Dimensions allow us to permanently filter out bot traffic from our Google Analytics production views.
Note that the Google Analytics tags are only fired if the score changes (or if the score was previously an error). That way you won’t constantly send the same reCAPTCHA score to Google Analytics while the session is active.
The Custom Dimensions are sent with an event tag.
Google Tag Manager setup
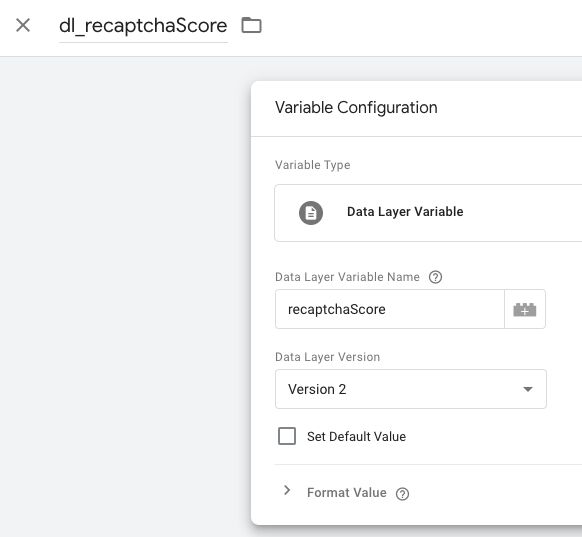
First, let’s create two new Data Layer variables.
Data Layer Variables
The first variable is named dl_recaptchaAnswer, and should have its Data Layer Variable Name field pointing to recaptchaAnswer.
The second variable is named dl_recaptchaScore, and should have its Data Layer Variable Name field pointing to recaptchaScore.
Here’s what the latter would look like:
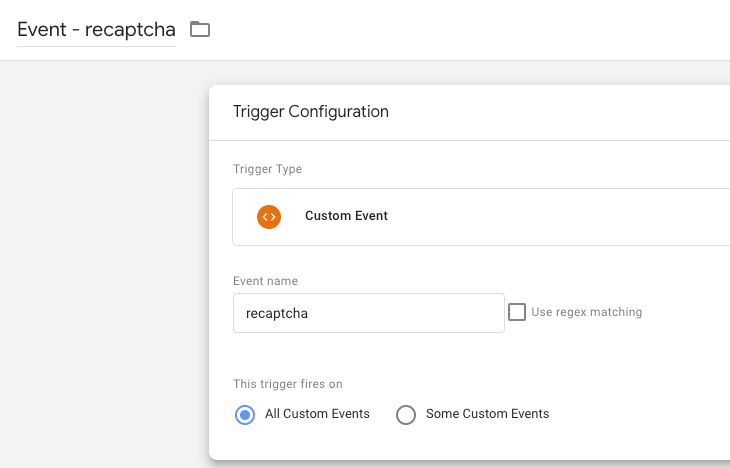
Trigger
The trigger is a simple Custom Event trigger that looks like this:
Event tag
The main function of the event tag is to send the Custom Dimensions. You can arrange the other fields however you like. This is what a sample Universal Analytics event tag might look like:
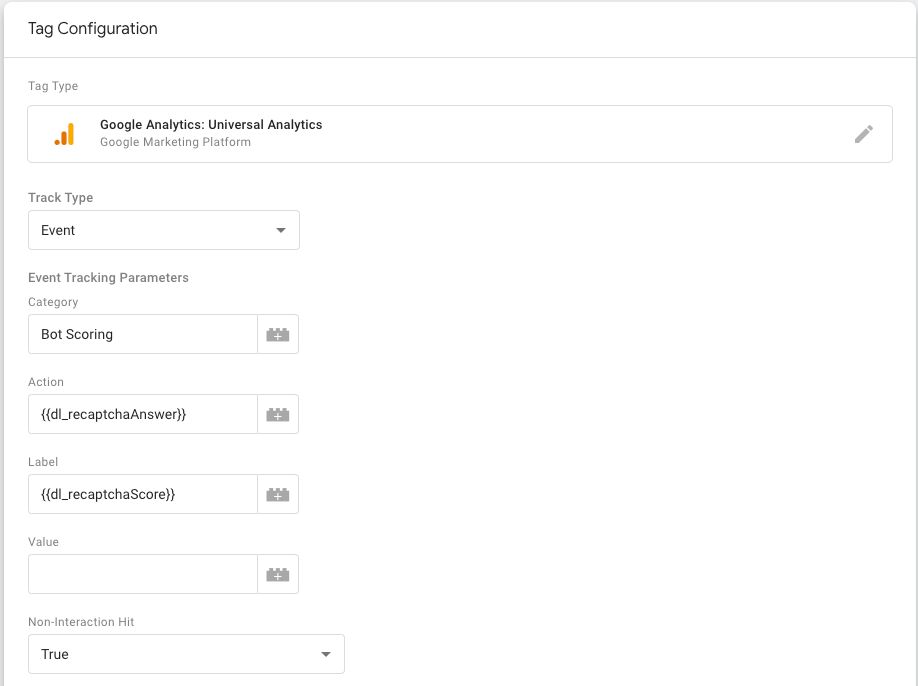
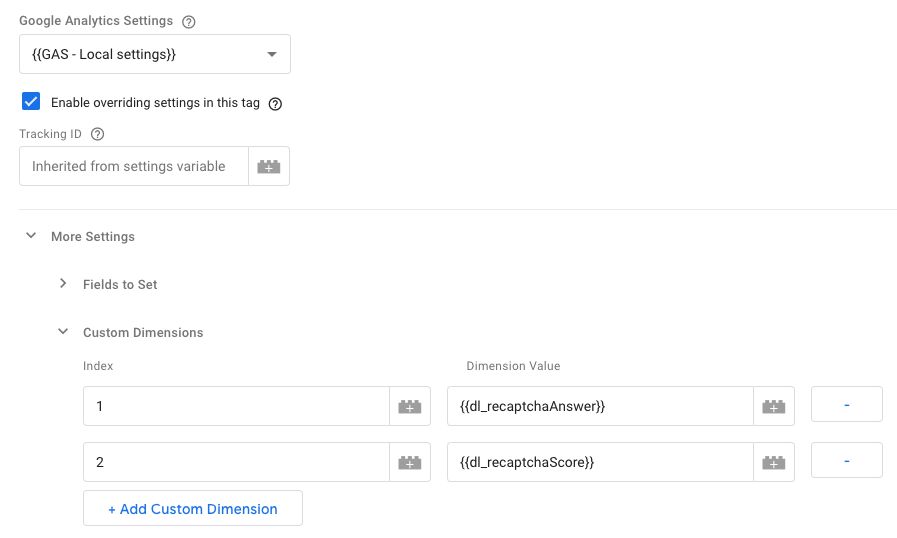
Just make sure you have the Custom Dimension index and value settings correct per what you configured in Google Analytics admin earlier.
NOTE! One enhancement would be to set the Custom Dimensions only if
recaptchaAnsweris1(success), so that you don’t end up overwriting a valid score for the session with an errant error message.
Analyze the results
When you set the whole thing up, all users on your page will be vetted in the background for their probability to be a bot. The script fires if the user hasn’t been validated with a proper score within 30 minutes since the last validation. This ensures that you don’t flood Google Analytics unnecessarily with events that just have the same score sent with each one.
Here’s what the custom dimensions will end up populated with:
| Key | Google Analytics fields | Explanation | Sample value |
|---|---|---|---|
recaptchaAnswer |
Event Action, Custom Dimension | Whether or not the validation worked. 1 for success, 0 for failure. |
1 |
recaptchaScore |
Event Label, Custom Dimension | Score between 0.0 and 1.0 (where 1.0 is most likely to be human and 0.0 most likely to be bot). If the validation fails, the error message is sent instead. |
0.9, or invalid-input-response |
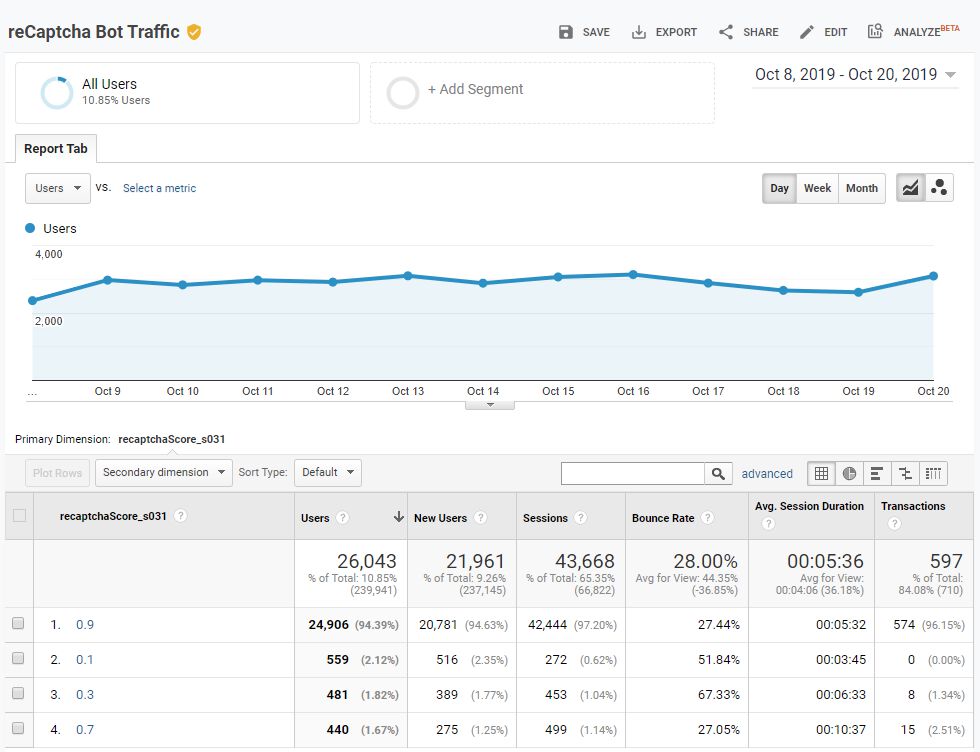
You can drill down to the 0.1 score to identify idiosyncrasies in this low-score traffic.
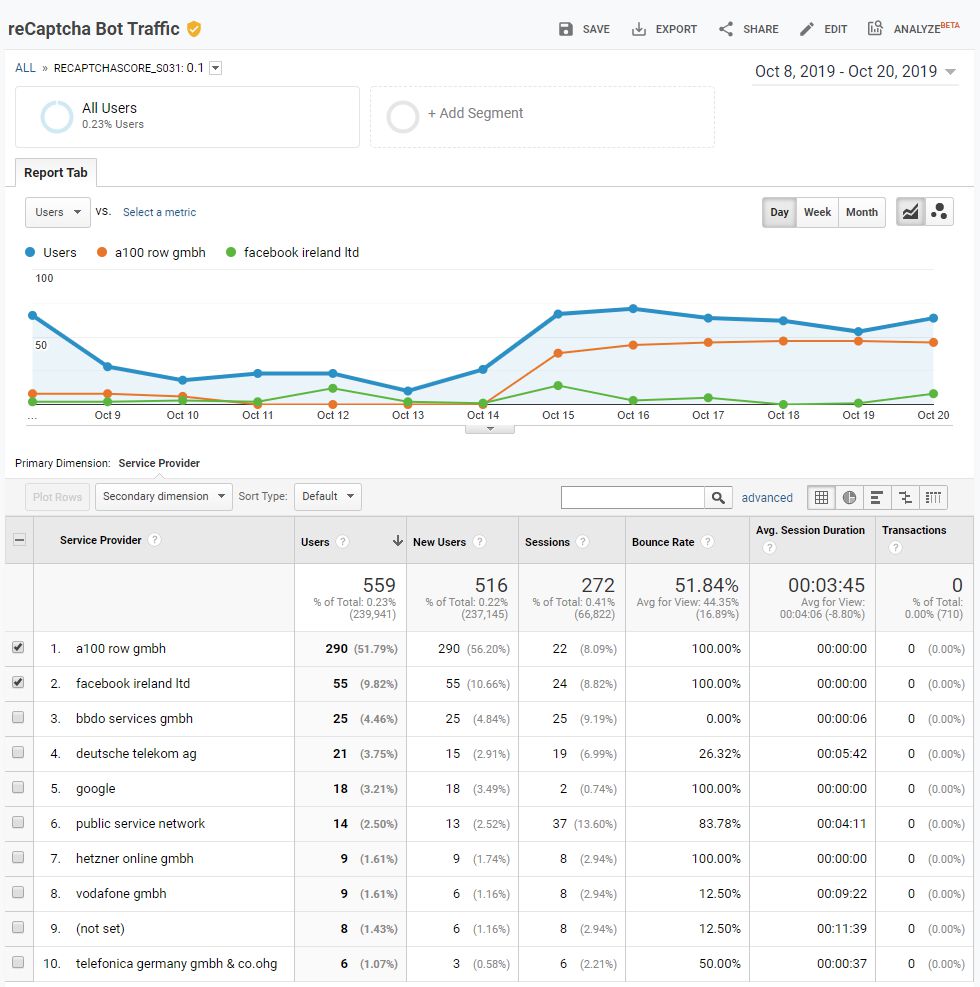
To get a better understanding of the amount of bot traffic, create segments based on reCAPTCHA score. After a few weeks, you’ll have enough data in order to:
- Determine the ratio of bot traffic on your site.
- Decide whether you should permanently filter out flagged bot traffic from you Google Analytics production views.
Summary
Thank you so much to Philipp and Sebastian for sharing their amazing idea here. Since reCAPTCHA v3 calculates the score based on user interactions on the site, it’s a perfect candidate for measuring with Google Analytics, since we can surreptitiously collect the “bot-ness” of the visitor and leverage GA’s custom dimensions to collect the data.
It’s not trivial to implement, as it requires a web service to poll for the reCAPTCHA score. Perhaps someone could do the world a service and create a free, public API for polling this information? Until then, you’re stuck with an on-premise solution or, better yet, leveraging the cloud for setting up the API endpoint.
This solution should serve well to uncover the complexity of bot traffic on any given website. Bots and crawlers come in different shapes and sizes - there are malicious agents as well as services that aim to do good. Regardless, bot traffic is most likely not your target traffic when building your website, so being able to segment it out in Google Analytics is a major win for data quality indeed.
Let us know in the comments what you think of this solution, and whether you have ideas for improving it!
