Form Field Timing With Google Tag Manager
The inimitable Craig Sullivan gave me an idea for a continuation to my latest post on form abandonment tracking. In this short tutorial, I’ll show you how to track the time users spend on your form fields. We’re going to use the User Timings hit type, and we’ll send the data for just one form. With small modifications, you can expand the script to cover multiple forms on a page.
This simple solution tracks the time the user spends on each form field by measuring the distance between the focus event and the blur or change event. The first one occurs when a form field is entered, and the latter depends on if a value changed (change) or no change was registered (blur).
The timing object that is sent to GA looks like this:
Timing Category - Comment Form Field Timing
Timing Variable - Form field name attribute value
Timing Label - ‘blur’ or ‘change’ depending on how the field was exited
Timing Value - Time spent in the field in milliseconds
Note! Timings are counted against the 500 hits / session limit in Google Analytics. That’s why you have to be careful when implementing this. I suggest you only implement it on one form and for a short time, and then see if users’ sessions are getting miscalculated thanks to them surpassing the 500 hit limit. There are some additional limitations per property as well, but they only count towards the timing hits and not all hits in the session.
XThe Simmer Newsletter
Subscribe to the Simmer newsletter to get the latest news and content from Simo Ahava into your email inbox!
The Custom HTML Tag
The Custom HTML Tag looks like this:
<script>
(function() {
  var form = document.querySelector('#commentform');
  var fields = {};

  var enterField = function(name) {
    fields[name] = new Date().getTime();
  }

  var leaveField = function(e) {
    var timeSpent;
    var fieldName = e.target.name;
    var leaveType = e.type;
    if (fields.hasOwnProperty(fieldName)) {
      timeSpent = new Date().getTime() - fields[fieldName];
      if (timeSpent > 0 && timeSpent < 1800000) {
        window.dataLayer.push({
          'event' : 'fieldTiming',
          'timingCategory' : 'Comment Form Field Timing',
          'timingVariable' : fieldName,
          'timingLabel' : leaveType,
          'timingValue' : timeSpent
        });
      }
      delete fields[fieldName];
    }
  }

  if (form) {
    form.addEventListener('focus', function(e) { enterField(e.target.name); }, true);
    form.addEventListener('blur', function(e) { leaveField(e); }, true);
    form.addEventListener('change', function(e) { leaveField(e); }, true);
  }
})();
</script>
To fire this Tag, I suggest you create a Page View Trigger which only fires this Tag on pages where your form exists.
Next, change the very first variable var form = document.querySelector('#commentform'); to select the form you want to track. On my site this happens to be a form with ID #commentform.
Whenever a focus event is detected, a hash table is updated with the form field name and the time when the field was entered.
Then, when the field is exited, and either a blur or change is recorded, the time spent in the field is calculated, and then the field name is deleted from the hash table. If you don’t delete the field, a change event would send the timing twice, because when the user edits the value of a field and leaves it, a change is dispatched first, and then a blur.
Anyway, feel free to change the value of the ‘timingCategory’ variable in the dataLayer.push(). I use ‘Comment Form Field Timing’, as that’s what I’m doing here.
Finally, if the form selector you use in the very first variable declaration of the script works, the three listeners are attached to the form with their respective callbacks.
This is the script itself. We’ll wrap up the setup in the next chapter.
Timing Tag, Trigger, and Data Layer Variables
To make the setup work, we need a Timing Tag, a Custom Event Trigger and four Data Layer Variables.
Data Layer Variables
Create the Data Layer Variables first. You need four Variables with the following settings:
Name: {{DLV - timingCategory}}
Data Layer Variable Name: timingCategory
Name: {{DLV - timingVariable}}
Data Layer Variable Name: timingVariable
Name: {{DLV - timingLabel}}
Data Layer Variable Name: timingLabel
Name: {{DLV - timingValue}}
Data Layer Variable Name: timingValue
Custom Event Trigger
The Trigger is a Custom Event Trigger with the following settings:
Name: Event - fieldTiming
Fire On / Event name: fieldTiming
Timing Tag
Finally, you need to create the Timing Tag. Create a new Tag of type Google Analytics, and set the following settings:
Name: UA - Timing - Form Field Timing
Tracking ID: UA-XXXXXX-Y (substitute with your property ID)
Track Type: Timing
Var: {{DLV - timingVariable}}
Category: {{DLV - timingCategory}}
Value: {{DLV - timingValue}}
Label: {{DLV - timingLabel}}
Attach the Trigger you created in the previous section to this Tag.
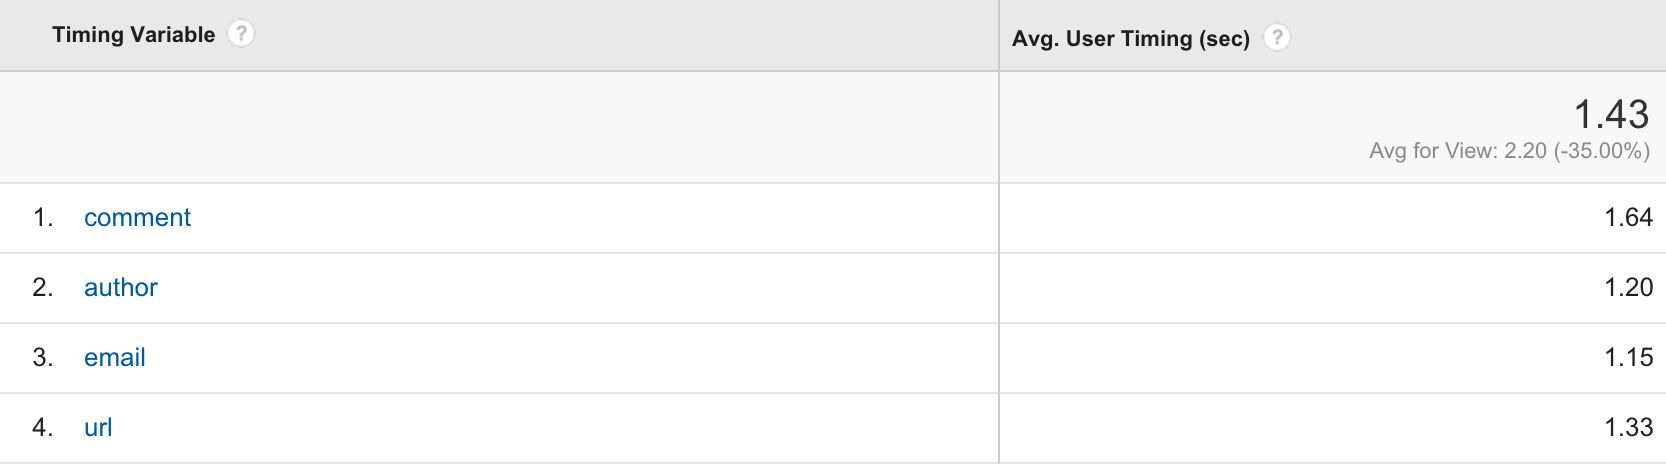
And now you’re set to go! Each interaction with the fields in your form should now send the Timing hit. You can find the results in Google Analytics, by going to Behavior -> Site Speed -> User Timings.
Summary
Like I mentioned, this is a very simple solution. It just measures the time spent on each form field, and reports this as a User Timing hit to Google Analytics. You might want to tweak it a little to be more robust, and you have to be mindful of the 500 hits / session limitation that GA imposes on sessions.
You can do some cool stuff with the data, such as building a histogram where it’s easier to visualize the problematic fields. It would be also interesting to see if long time spent on a field correlates with form abandonment.
