Enhanced Ecommerce Tips And Learnings
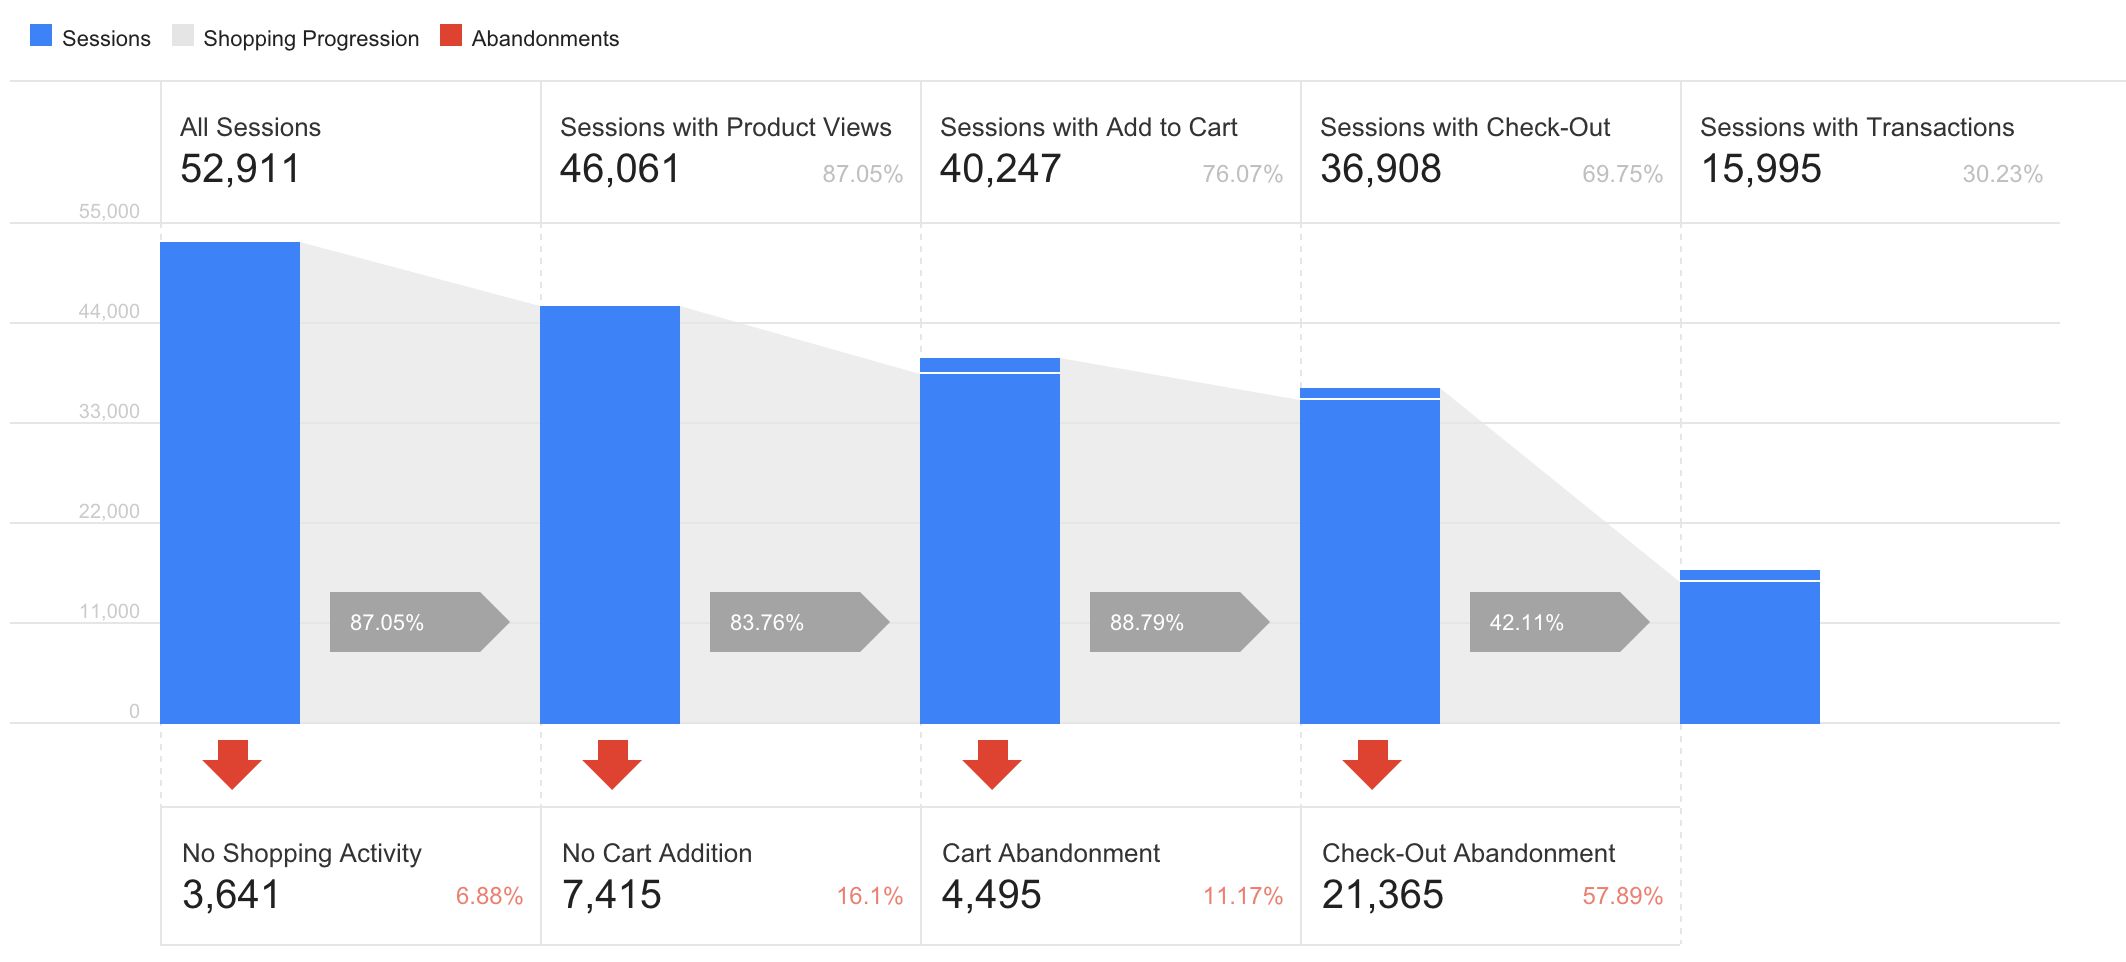
Enhanced Ecommerce is undoubtedly an excellent feature of Google Analytics. It provides us with a set of reports that truly extend the capabilities of funnel-based website analysis. As I’ve shown before, it’s also very useful for tracking other transactional events on your site, such as content engagement.
However, here’s the thing. It’s not very easy to implement. Even if you get everything right according to the documentation, there are still quite a number of pitfalls, and many of the learnings emerge only through experience. This is where I want to help out, so I composed this post with some of my key findings about Enhanced Ecommerce implementation and use.
It’s well worth learning this stuff, as a fully functional Enhanced Ecommerce implementation might well be the key to finally coming up with a useful report to plaster across your vanity dashboards.
XThe Simmer Newsletter
Subscribe to the Simmer newsletter to get the latest news and content from Simo Ahava into your email inbox!
1. Implementation via Google Tag Manager
As a self-proclaimed Google Tag Manager fanatic number 1, I do all my implementations with GTM. There are some quirks you need to consider, though, when implementing Enhanced Ecommerce through GTM. Here they are, in no particular order.
The fleeting ecommerce object
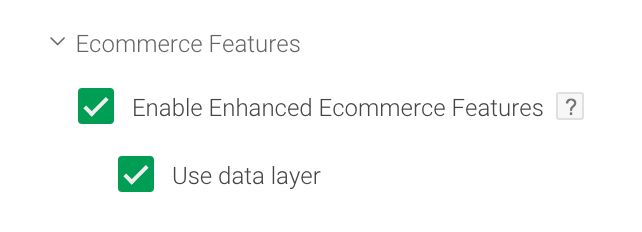
If you use the Enable Enhanced Ecommerce / Use Data Layer option in your Tags, there’s one very important thing to understand.
Only the most recent ecommerce object is included in the hit!
In other words, if you do two consecutive dataLayer.push() commands with their own ‘ecommerce’ objects, any Tag which fires after the latter push will only have access to the latter ‘ecommerce’ object.
This is because the “Use Data Layer” option uses version 1 of the Data Layer, which doesn’t have fancy things like recursive merge of objects. In practice, this means that an ‘ecommerce’ object will always overwrite the previous ‘ecommerce’ object in the data layer, if the version 1 interface is used.
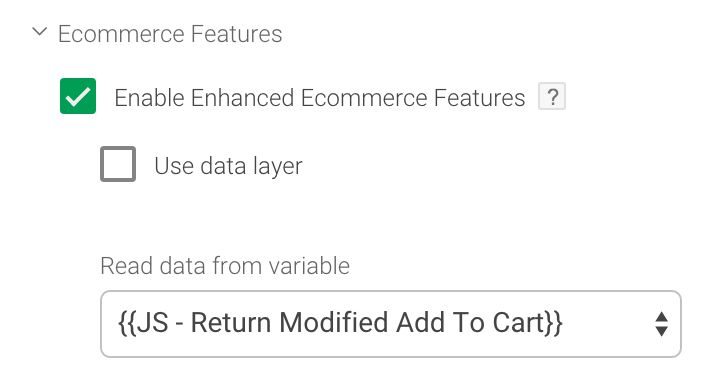
If you do want to recursively merge ‘ecommerce’ objects, you will need to use the “Read data from variable” option which becomes available when you uncheck the “Use Data Layer” option. Read on…
Custom JavaScript Variable to the rescue
I’ve written about this before, and these days I actually only use this option to send the payloads. When you use the Custom JavaScript option (see the developer guide for further information), you can create, parse, and delete parts of the ‘ecommerce’ object until it’s to your liking. This is an incredibly powerful tool, letting you pull in data from multiple sources to compile the object, or allowing you to access the full ‘ecommerce’ object stored in the data model, and not just the stunted version 1 object available if you use the “Use Data Layer” option in your Tags.
function() {
  var ecom = {'ecommerce' : {
    'impressions' : pageData.productImpressions,
    'detail' : {
      'actionField' : {'list' : 'Related Products'},
      'products' : pageData.productDetailView
    }
  };
  return ecom;
}
The example above pulls together both product impressions and product detail view in a single object, sending the complete payload to Google Analytics with the Tag.
To access a recursively merged ecommerce object, you will need to create a new Data Layer Variable which accesses the ‘ecommerce’ object pushed within. Instructions for this can be found in this article.
You can combine multiple data types in a single payload
This is pretty vaguely covered in the developer guide, but combining data types in a single payload can be very useful if you want to keep the number of requests to Google Analytics down. So, if you want to send multiple ‘ecommerce’ objects in one single payload, you can, but only if you send one of each object type (promoView, promoClick, impressions, action). An action is any Enhanced Ecommerce data type which has the products Array. In other words, these are the available action objects:
click, detail, add, remove, checkout, purchase, checkout_option, refund
Also, you can’t combine a promoClick with a promoView or an action object. These are, thus, the valid combinations:
-
impressionswith one ofpromoView,promoClickor action -
impressionswithpromoViewand action -
promoViewwith one ofimpressionsor action -
promoViewwithimpressionsand action -
promoClickwithimpressions -
action with one of
impressionsorpromoView -
action with
impressionsandpromoView
In any case, combining objects into a single payload can truly save a lot of time and make the whole thing more efficient, but don’t forget that Google Analytics has a character limit in the payload!
There is an 8KB limit in the payload
The analytics.js library refuses to send a hit if the full payload size is larger than 8192 bytes. This does require quite a lot of data to be stuffed within, but it only takes some dozens of product impressions to clog up the channel.
Eivind Savio has written an excellent post about how to manage this overflow, so I suggest you head on over to take a look!
2. Consistency is key
Enhanced Ecommerce is comprised almost entirely of hit-level interactions. This means that every Enhanced Ecommerce payload sent to Google Analytics is unique, and does not persists its information across subsequent hits.
This, in turn, basically means that the products Array needs to be consistent throughout the funnel. For example, if you have a product which has the category ‘T-Shirts’, you will need to have this information in all the payloads the product is sent in if you want to query for it across the entire funnel. GTM or GA will not persist this information.
You’ll want to be very careful when designing and developing the Data Layer for your Enhanced Ecommerce payloads. The developers need to understand how important it is to have the product details be identical throughout the funnel process.
This has implications for queries as well. For example, let’s say you send the following two payloads to Google Analytics:
dataLayer.push({
  'ecommerce' : {
    'detail' : {
      'products' : [{
        'id' : 'A12345',
      }]
    }
  },
  'event' : 'ecommerce'
});
dataLayer.push({
  'ecommerce' : {
    'add' : {
      'products' : [{
        'id' : 'A12345',
        'name' : 'My T-Shirt'
      }]
    }
  },
  'event' : 'ecommerce'
});
In this case, querying for product SKU ‘A12345’ will return a result when queried against product detail views and product adds to cart. However, product name ‘My T-Shirt’ will only return a result when queried against product adds to cart. Since this product name was missing from the ‘detail’ payload, you won’t be able to query for this information.
Many times when working with an Enhanced Ecommerce implementation which uses client-side methods to populate some of the data (e.g. scraping from the page), this consistency requirement has become a serious issue. I’ve been forced to persist full product information throughout the funnel using solutions like HTML5 Storage and cookies.
This is not the recommended approach.
The best way is to render product details in dataLayer as the page loads, making sure your developers add them consistently in all steps of the funnel. Once the products are in dataLayer, you can use the Custom JavaScript Variable method to pull them out and parse them into a valid ecommerce object.
Note that checkout is a bit exceptional in terms of consistency. It’s enough to send the ‘products’ Array with just the first step. This is because Enhanced Ecommerce only has an aggregate productCheckouts metric, which increases by one when a product is sent with the first checkout step. The checkout option and the rest of the checkout steps need not, and thus perhaps should not include product information.
3. Product-scoped custom dimensions and metrics
Product-scoped custom dimensions and metrics are a wonderful way to extend the rather limited set of information you can send with each product.
To send a product-scoped dimension or metric in Google Tag Manager, you need to include the dimensionX and/or metricX key in the respective product in the payload you want to send the dimension/metric in. Again, as in the previous chapter, product-scoped dimensions and metrics do not persist, so you will need to include them consistently in the payloads.
For example, to send a dimension with details about the T-shirt size, and a metric with the tax-free value of the shirt, the dataLayer.push() would look like this:
dataLayer.push({
  'ecommerce' : {
    'detail' : {
      'products' : [{
        'id' : 'A12345',
        'name' : 'My T-Shirt',
        'dimension3' : 'Large',
        'metric2' : 11.99
      }]
    }
  },
  'event' : 'ecommerce'
});
Naturally, a payload like this will only let you query for this information with product detail view queries, and for this particular product only. These dimensions do not persist across funnel payloads, nor do they cover multiple products. They’re per product, per hit.
I’ve written about product-scoped custom dimensions and metrics before, so remember to check out this article as well.
4. Product categories
The ‘category’ field has been available in “traditional” Ecommerce as well, but it’s been slightly revamped in Enhanced Ecommerce.
First of all, the consistency requirement applies here as well. If you want to make full-funnel queries against a product category, you will need to send the category with every single product in all steps of the funnel you want to query against. The field does not persist.
The other thing about categories is that you can send five levels of categories, resulting in some sweet segmentation in your reports. These levels are sent by using the slash (/) between levels, where level 1 is the first item in the string, level 2 the second, etc. So, a full five-level product category string would look like this in a payload:
dataLayer.push({
  'ecommerce' : {
    'detail' : {
      'products' : [{
        'id' : 'A12345',
        'category' : 'Clothes/T-Shirts/Men/Sleeveless/Used'
      }]
    }
  }
});
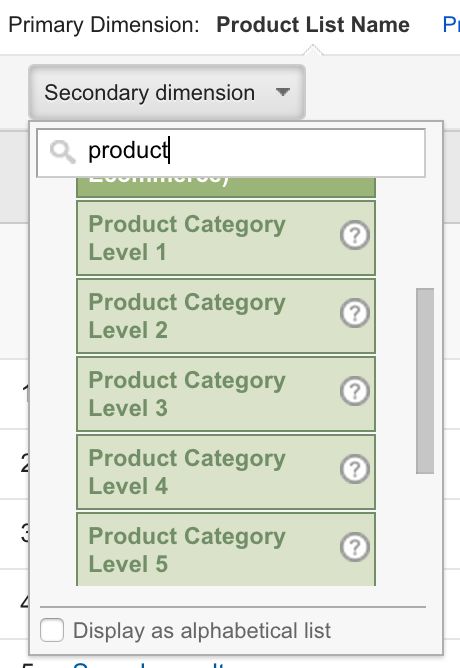
This way, you can query for individual category levels with the following Google Analytics dimensions:
Product Category Level 1: Clothes
Product Category Level 2: T-Shirts
Product Category Level 3: Men
Product Category Level 4: Sleeveless
Product Category Level 5: Used
These aren’t available in the default reports, but you can create custom reports easily, or use them as secondary dimensions.
If your category names contain the character ‘/’, you will need to write this in a different way, as there’s no way to encode the slash without it being interpreted as a category delimiter.
5. Product list attribution
Not everything about Enhanced Ecommerce is hit-level, though. Product lists and promotions have an attribution mechanism, where the last list or promotion that the user interacted with before a purchase within the same session is the one which gets full credit for the purchase. In other words, you don’t need to persist list information throughout the funnel. It’s enough to send it only where the list interaction takes place, and the attribution will take care of the rest.
Remember to check the developer guide for a description of this attribution mechanism.
6. Summary
This short list of tips includes a number of things that are either vaguely described in the developer guides, or are difficult to grasp without concrete examples.
If there’s one thing that stands out, it’s the consistency requirement. It’s very important to keep product details consistent across the funnel. A single change in the product name, for example, can make reporting extremely difficult, as you’ll need to consolidate multiple product names under a single SKU in your reports.
Did I miss some important tip / learning? Do you have something to add? Sound off in the comments!
