
Debug Guide For Web Analytics And Tag Management
One of the key skills for anyone working with web analytics and tag management is understanding how to identify where things went wrong, why they went wrong, and ideally how to fix them.
There are plenty of excellent browser extensions for helping you debug, and we’ll discuss these in the guide, too. But most of all we’re going to use browsers’ own developer tools, as they are always the best source of truth for anything that happens within the browser window.
In the guide, we’ll use Google Analytics 4 and Google Tag Manager as examples. However, the guide’s topics can be extended to any web analytics tools and tag management solutions out there, because the use cases are universal.
XThe Simmer Newsletter
Subscribe to the Simmer newsletter to get the latest news and content from Simo Ahava into your email inbox!
Browser developer tools
Your best friend in debugging issues with your web analytics and tag management systems in the web browser are the browsers’ own developer tools.
Developer tools are a suite of utilities that you can use to investigate various different aspects of the dynamic web page the user is inspecting.
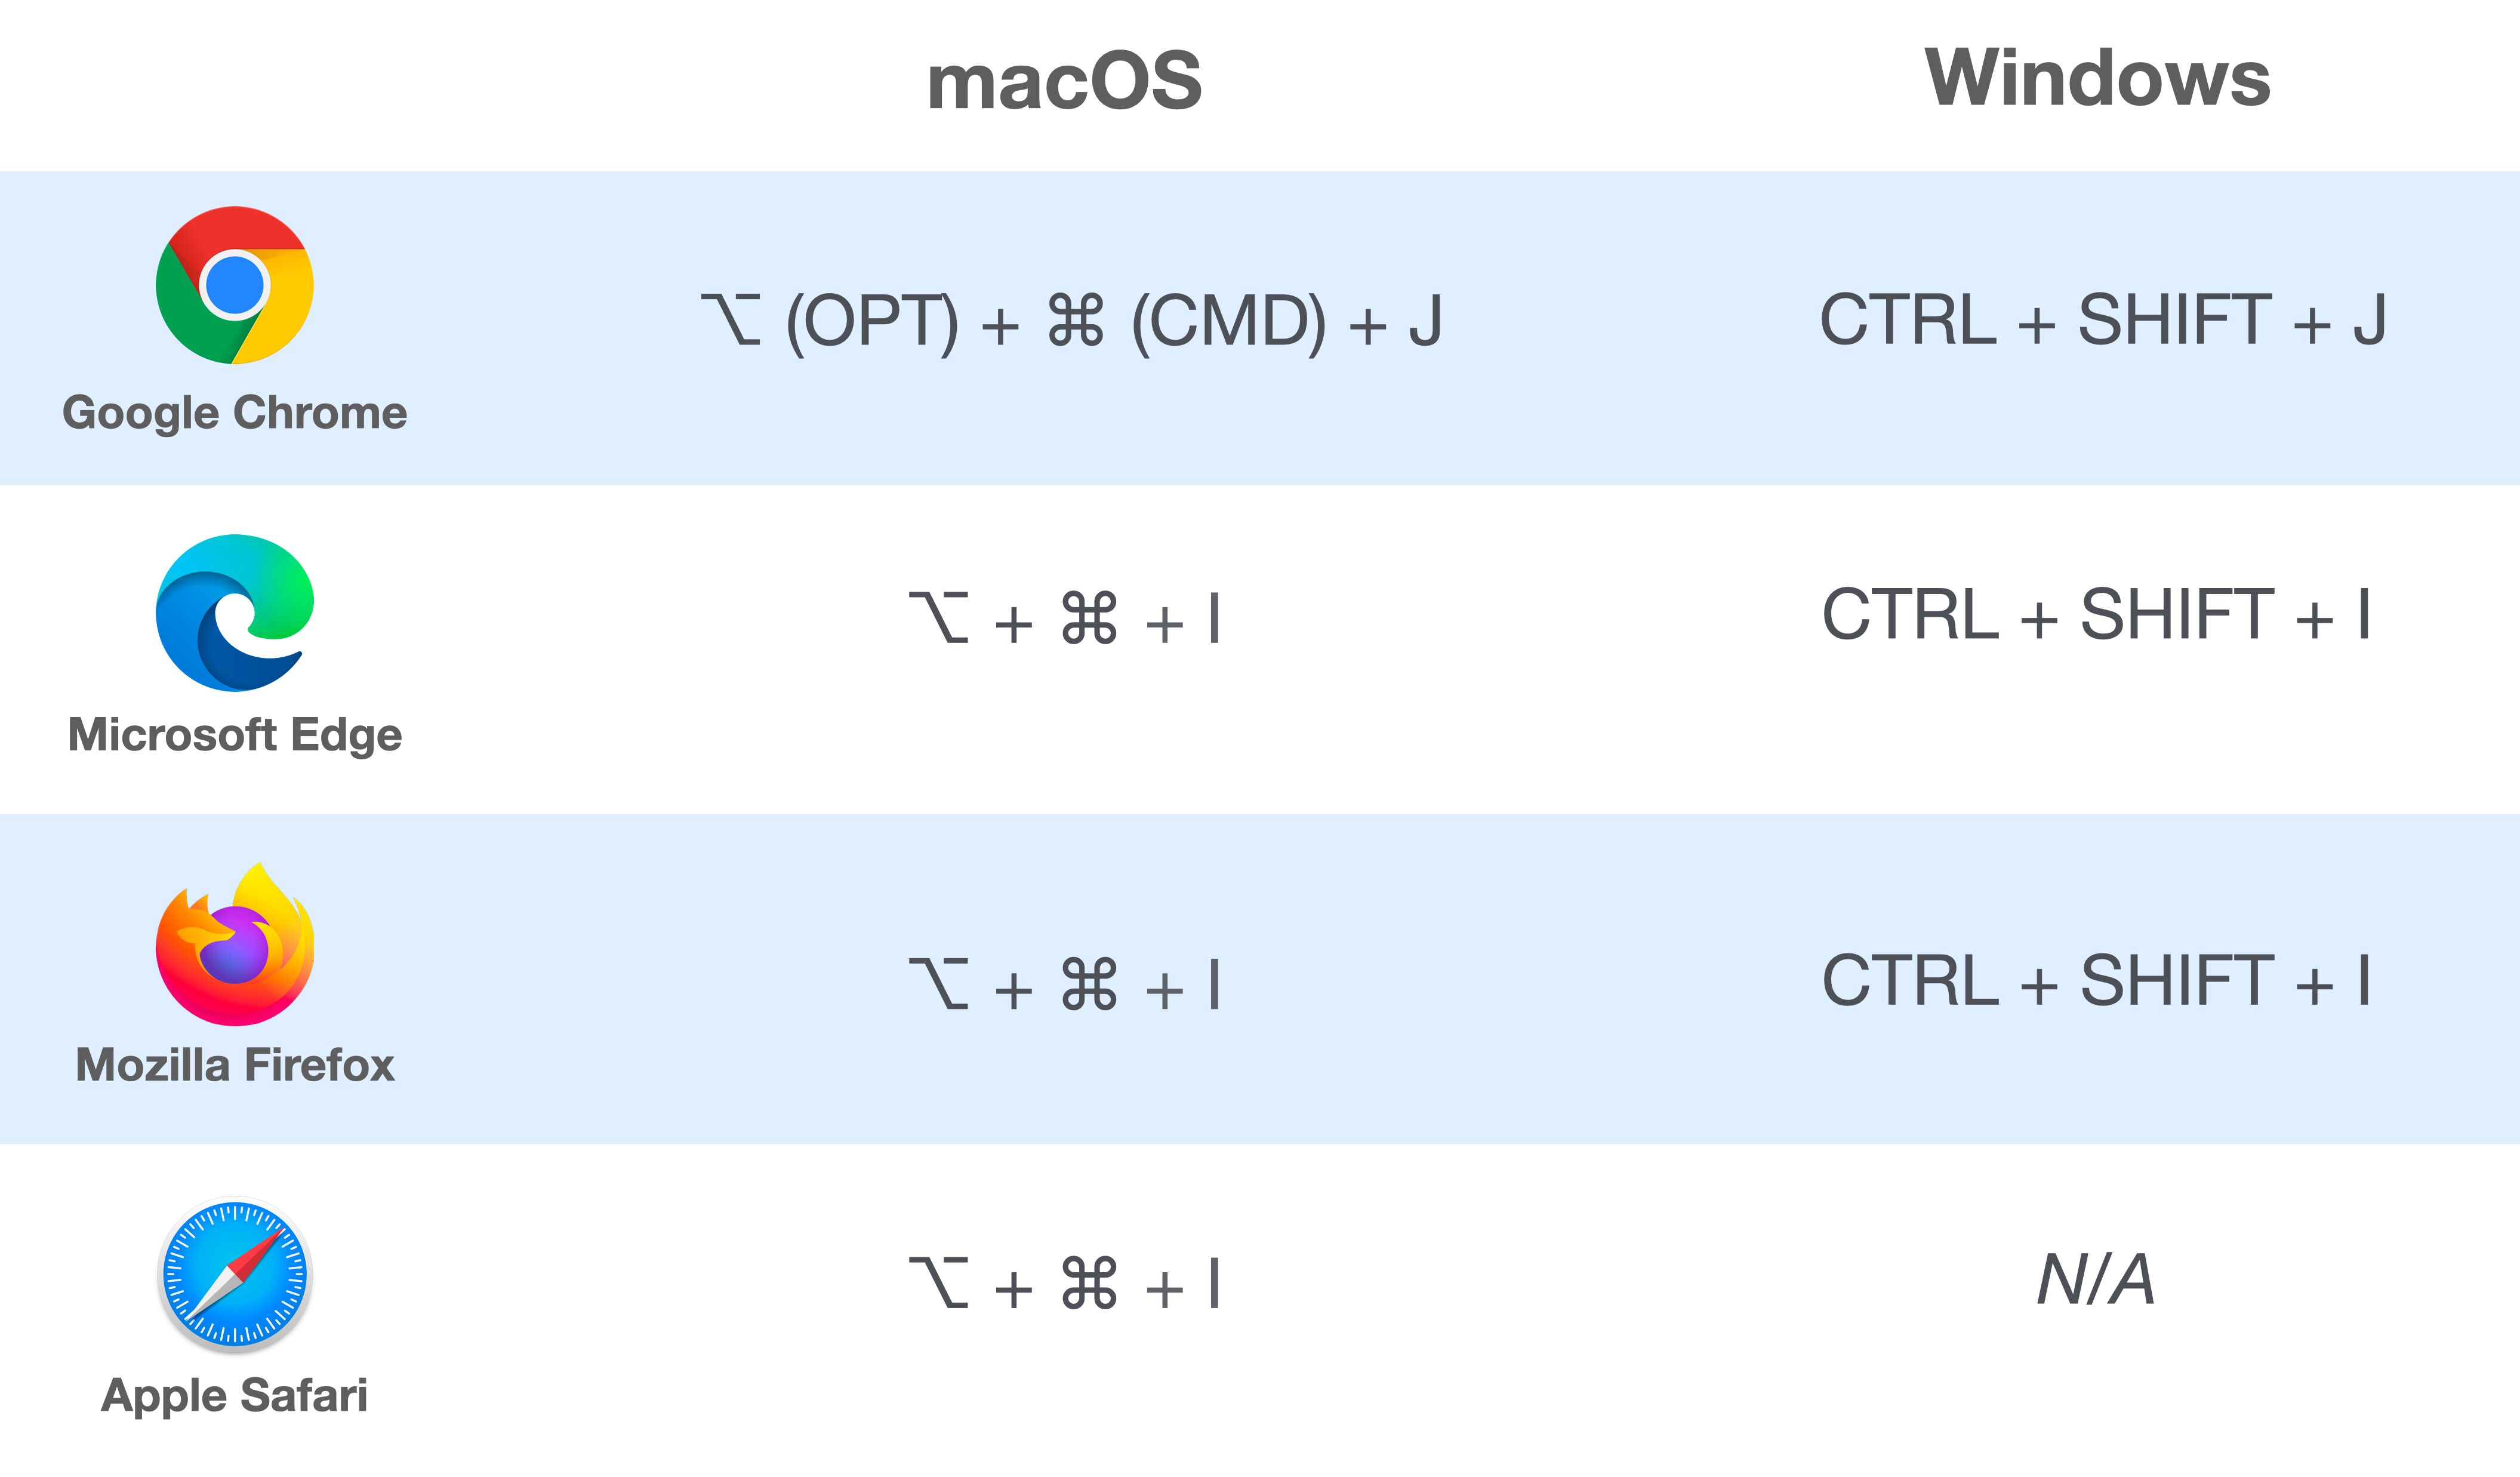
The image above lists the keyboard shortcuts for opening the developer tools in various browsers and operating systems.
Note that on Safari, you’ll want to open Safari -> Preferences -> Advanced and check the button next to Show Develop menu in menu bar.
All of the browsers above utilize a similar set of developer tools with just small differences in the UI and the chosen semantics. The most useful tools we’ll focus on are:
-
The element inspector, which lets you look at the dynamic representation of the web page (Document Object Model). This is particularly useful for inspecting injected tracking scripts and custom HTML elements added by tag management solutions.
-
The network debugger, which lets you inspect and analyze outgoing HTTP requests sent from the page (or embedded frames). This is one of the most important tools for you, as it will tell you the truth about what is actually sent from the user’s browser.
-
The JavaScript console, which lets you run JavaScript code in the context of the current page (or embedded frame). Vital for recognizing issues with the JavaScript implementations of your analytics scripts.
-
The sources browser, which lets you browse through the JavaScript resources loaded on the current page (or embedded frames). Great for identifying mismatches between what you expected the JavaScript file to contain vs. what’s actually contained within.
-
The application storage, which lets you investigate the browser storage (cookies,
localStorage, etc.) utilized on the current page (or embedded frames). Instrumental for understanding why some trackers might not be able to persist data consistently.
In this section, we’ll walk through these different tools with more detail, so that you’ll have a better understanding of how to use them to unravel some of the more complicated debugging cases you run into.
Note! This section uses mainly Chrome’s developer tools in examples. It’s possible the actual actions are (slightly) different in other browsers.
Element inspector
The element inspector lets you analyze the DOM (Document Object Model) of the page.
When the browser loads the HTML source it retrieves from the site’s web server, it renders it into a dynamic tree model, accessible via JavaScript. This dynamic representation is the DOM.
Whenever an analytics snippet or a tag manager interacts with the page, such as by loading a third-party JavaScript library or adding a click listener somewhere, they modify the DOM.
Thus, if you have problems with your implementation, it’s useful to search through the element inspector to find what the issue could be.
The element inspector is also extremely useful when you’re building triggers or variables in your tag management system with the purpose of scraping some information from the page or adding listeners to and injecting elements into the document.
Here are a couple of cool tricks you can try in the element inspector.
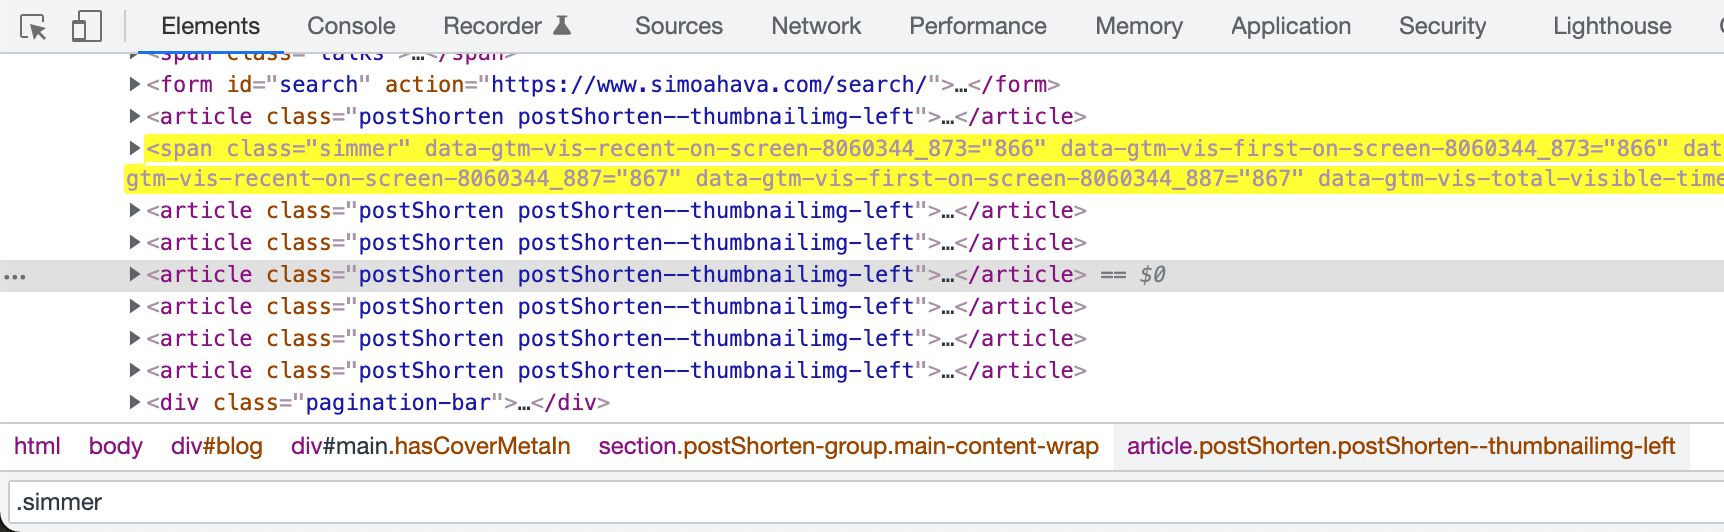
Search for a specific element in the inspector
Hit CMD + F / CTRL + F to open a search bar. You can then search for a string (e.g. text content) or a CSS selector to have the inspector locate a specific element.
For example, to search for all elements with the class name simmer, you can type .simmer into the search bar and the inspector will return all the matches.
If you’re unsure whether Google Tag Manager actually added the Google Analytics 4 script on the page, for exampled, you could search for gtag/js to find all elements that have that particular string somewhere in them. Since GA4 is loaded from the /gtag/js?id=G-... URL, the inspector should find the GA4 script element, unless it’s actually missing.
Select a specific element on the page itself
You can also do the reverse. If you click the little element selector icon (this differs from browser to browser) in the developer tools panel, you can actually select an element on the page to reveal it in the element inspector.
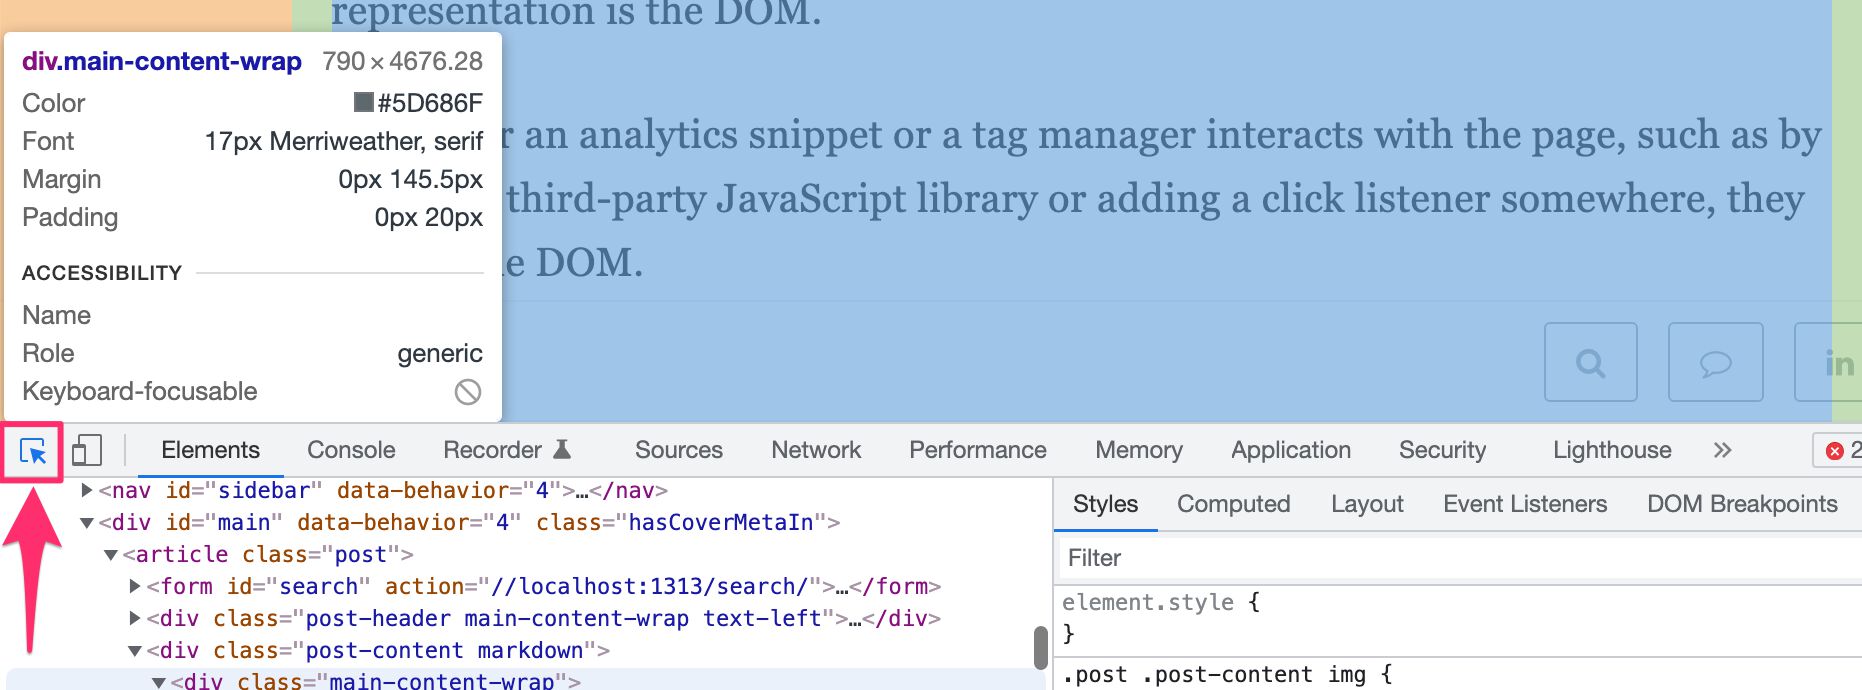
In addition to pinpointing it in the element inspector, the tool also displays some useful information about the element in question.
Interact with the element context menu
When you select an element in the inspector with the right mouse button, you’ll see a context menu.
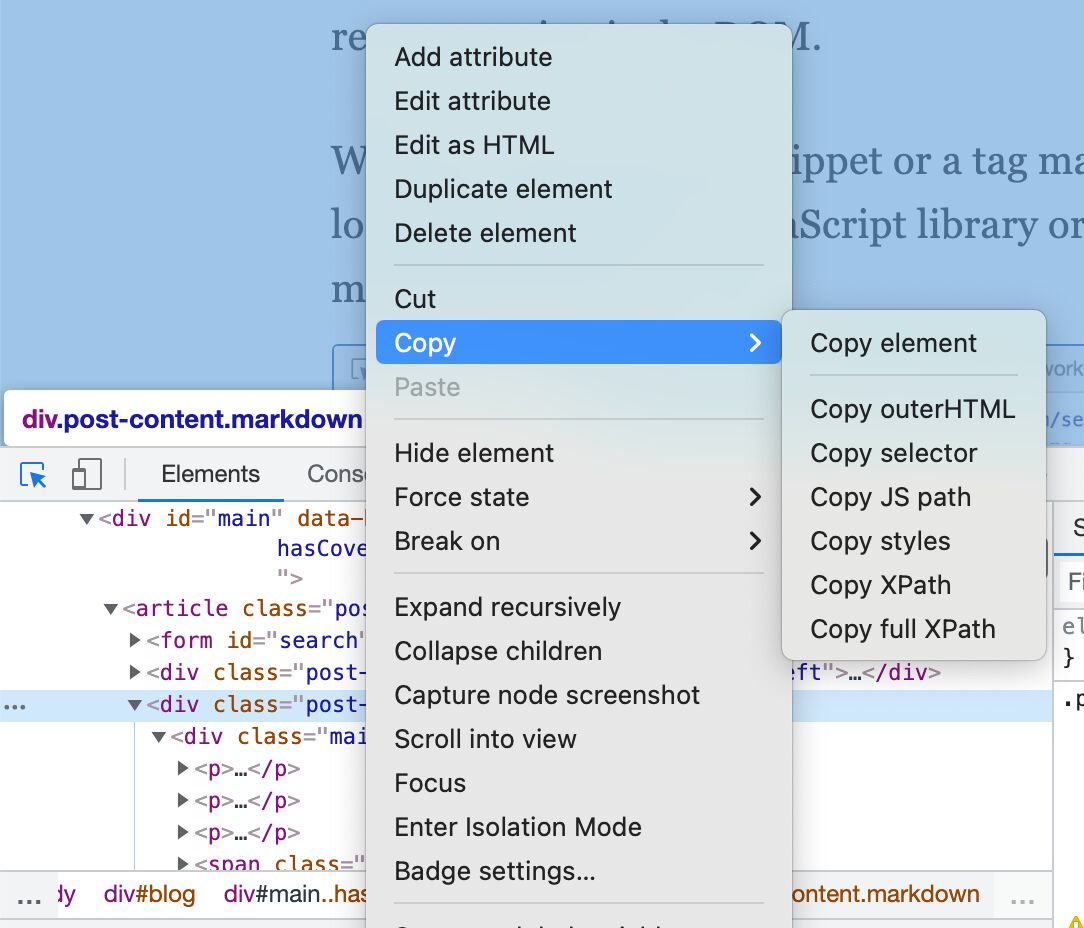
You can do a lot of cool stuff with this, such as:
-
Add / edit the element’s attributes. I use this a lot to change link URLs to something else, when I want to test a specific outgoing link, for example.
-
Edit / delete the element itself. Sometimes it’s useful to just delete an element entirely (e.g. an overlay that hides the page underneath). And sometimes you’ll want to edit the entire HTML structure of an element when you want to add new contents to it for testing a click listener, for example.
-
Copy selector, as this lets you copy a CSS selector path to the element itself. Extremely useful when configuring triggers in Google Tag Manager, for example. Just note that the CSS selector path is usually needlessly complex, and you can trim it down to be more generic in order to avoid subtle changes in the DOM from breaking your triggers.
-
Break on… lets you pause the page whenever the element or its subtree (nested elements) changes. This is pretty useful when you want to inspect what happens when an element becomes visible or when an element’s content is dynamically changed (think form validation error messages, for example).
Change element styles
When you’ve selected the element, you can change the associated styles with the developer tools.
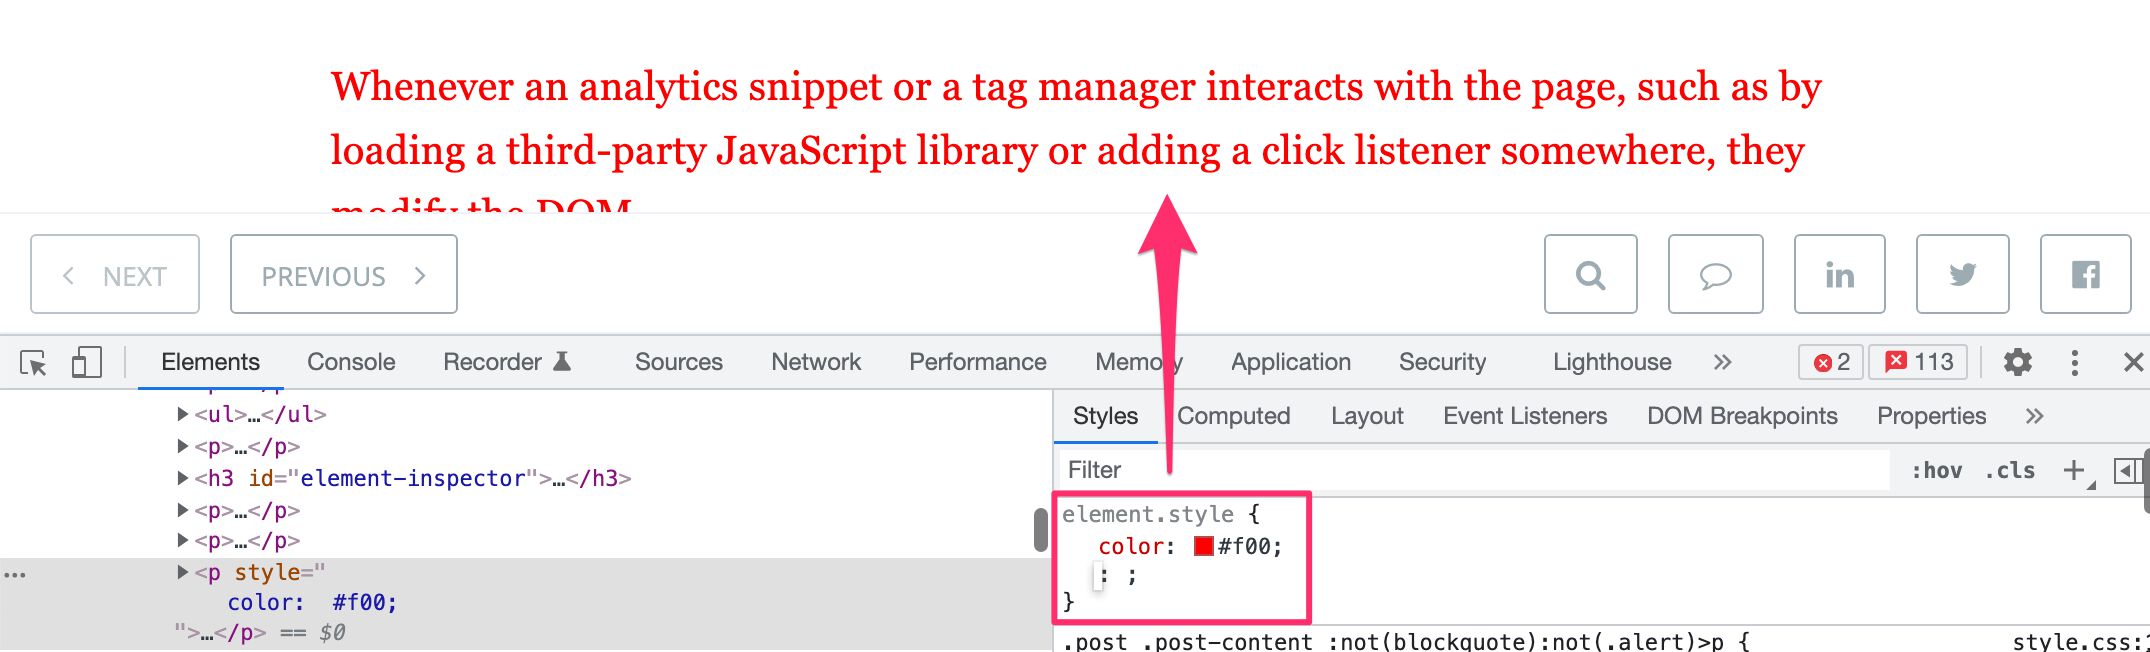
This might have marginal use for analytics debugging, but occasionally you might use it to make an element visible or move it around when you can’t find it in the actual page.
Network debugger
Often you’ll find that your tag management system and/or your analytics debugger extension claims that your hit has fired, but no data is collected into the vendor endpoint.
At this point, you need to open the Network tab in the developer tools, as this lists all the HTTP requests sent from the browser.
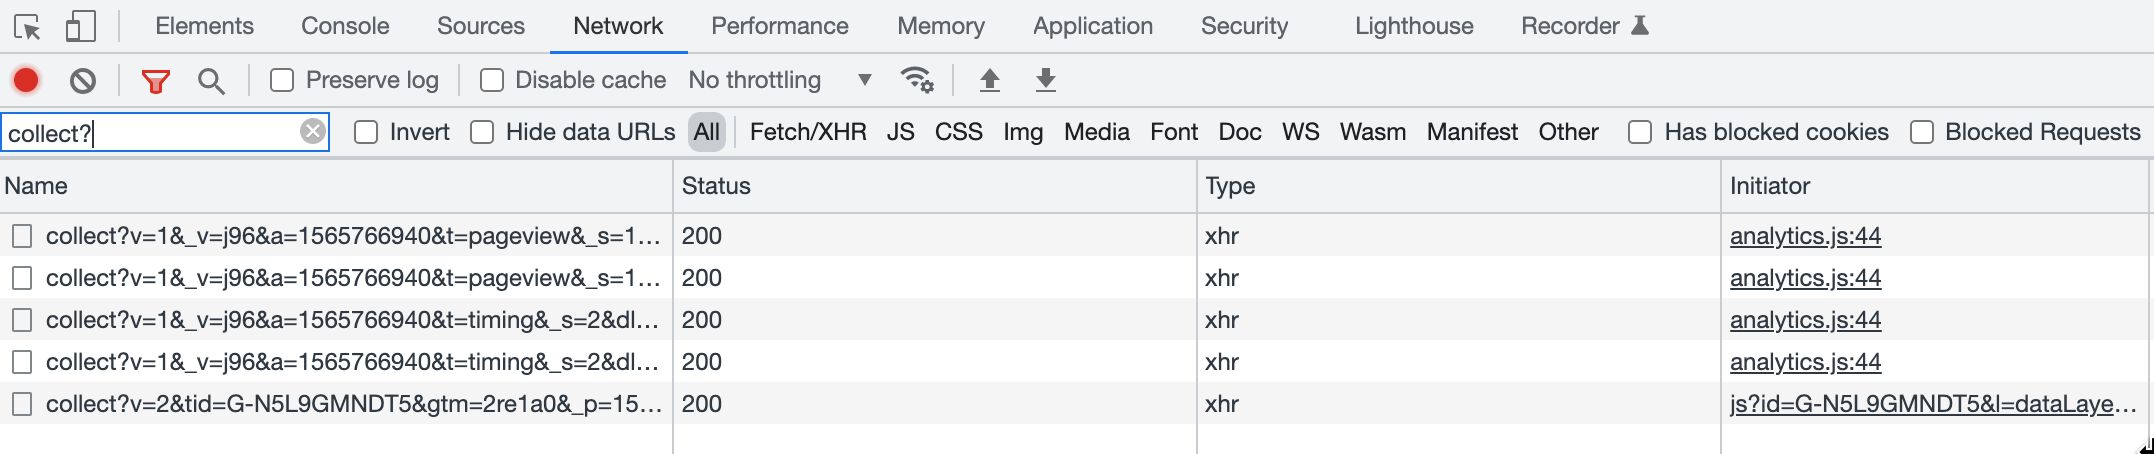
The network debugger is the ultimate truth. If a request doesn’t appear here, then the browser has not sent it. So if your tag management system says that a GA4 hit has fired but you see no evidence of a collect?v=2 request in the network debugger, then the hit has not been sent.
It might be useful to check the Preserve log option, as this doesn’t clear the log of requests between page loads. This is very useful when you want to debug what happened on a previous page.
For a more detailed walkthrough of the network debugger, check out this excellent resource.
Here are some of the things you can do with the network debugger.
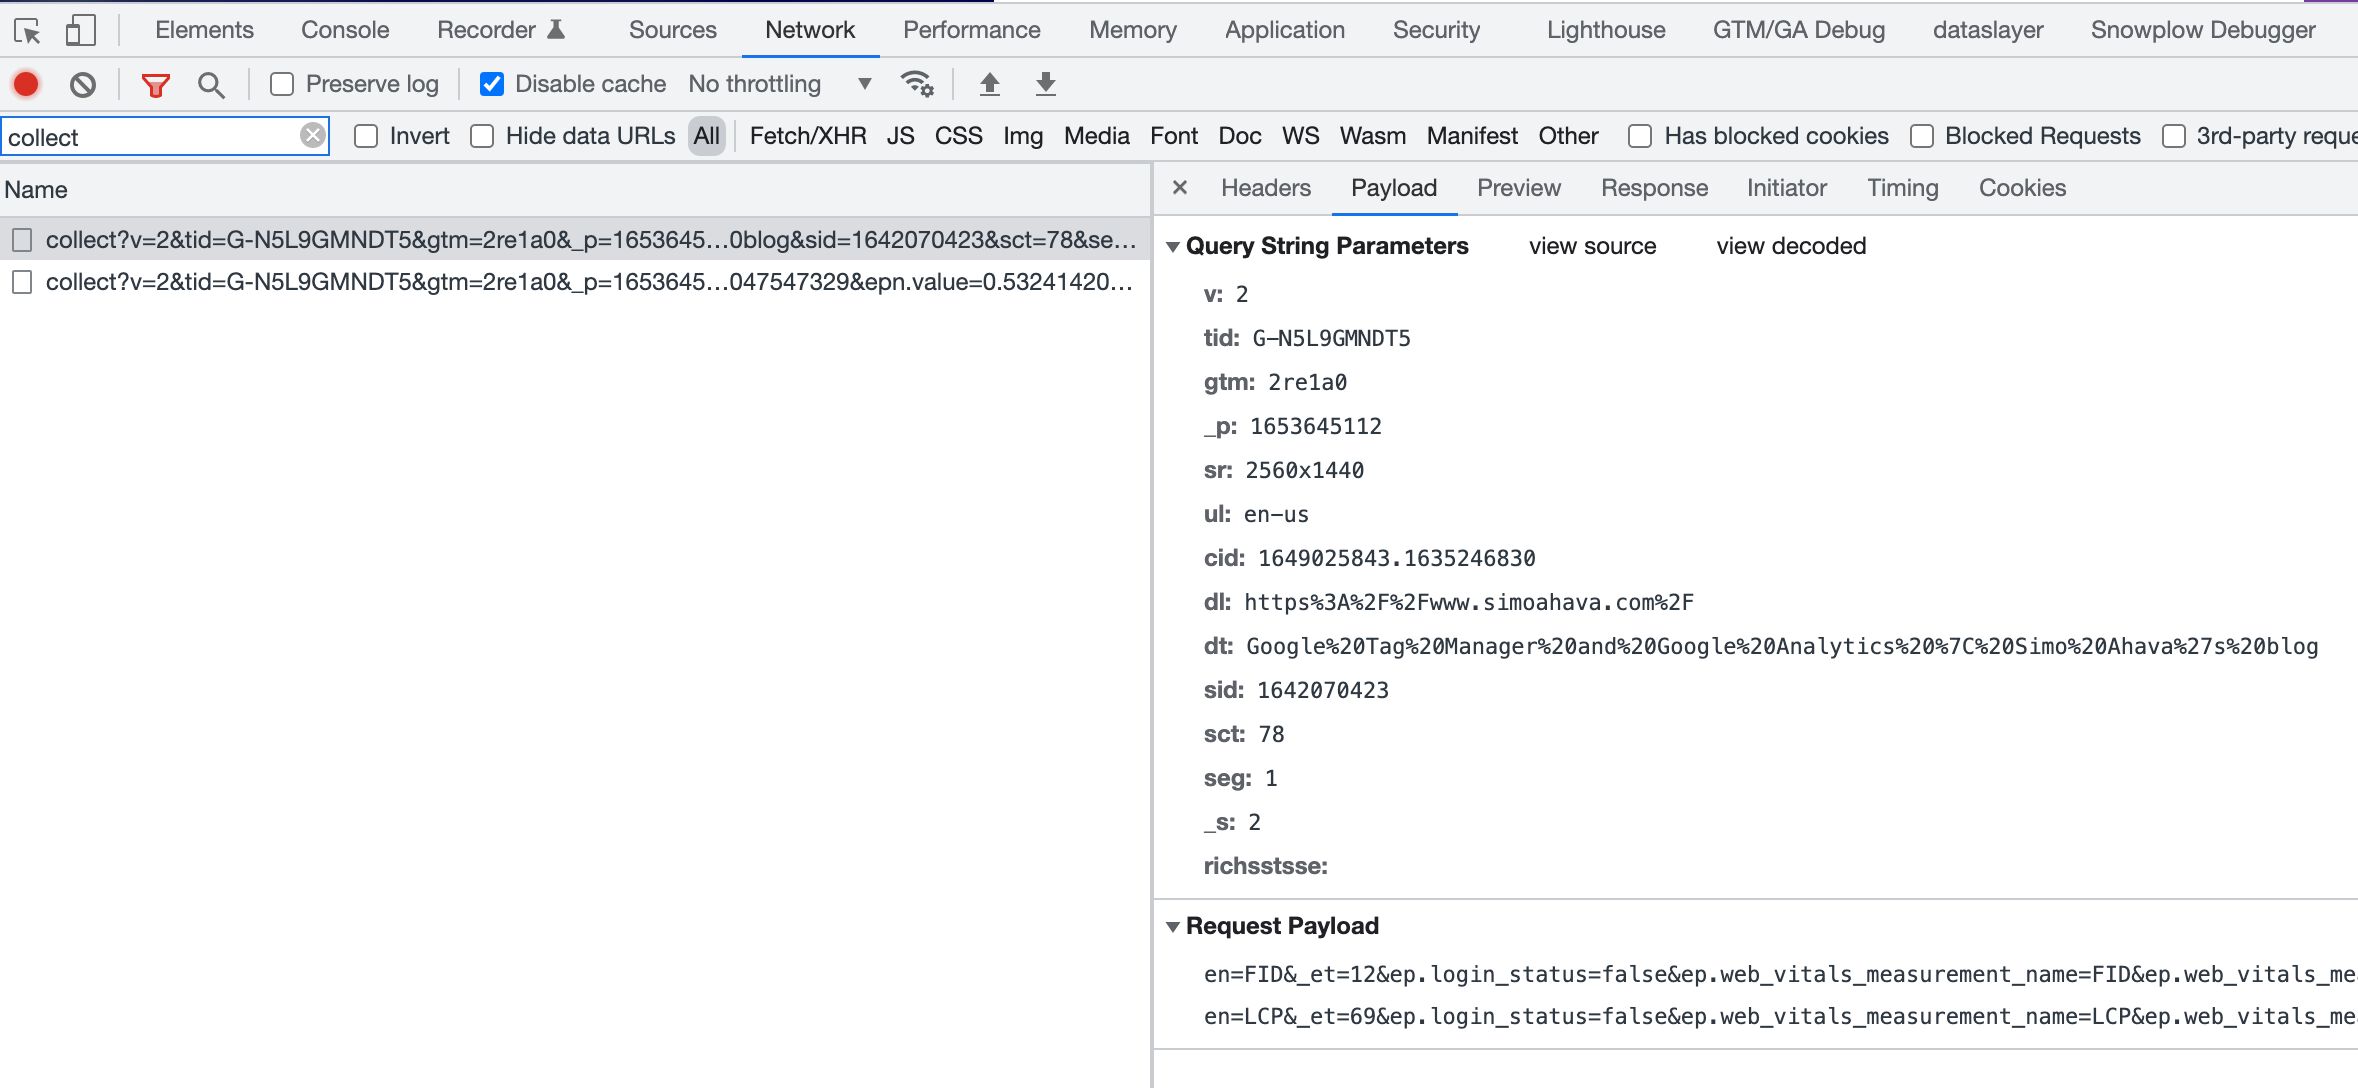
Filter for specific requests
By typing something into the filter field, you can show only the HTTP requests that match the filter.
The filter searches through the request URL and the request body.
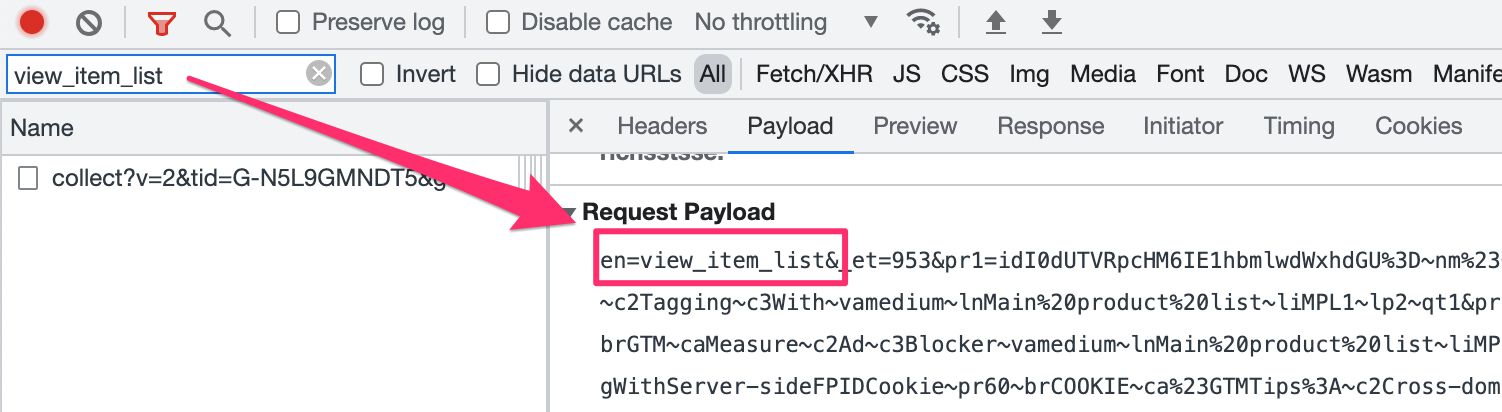
When you select a request in the debugger, a small overlay opens with various tabs.
-
Headers includes all the HTTP headers of the request and the response. This is useful for debugging things like cookies, referrer values, and where the request was actually sent.
-
Payload contains the query parameters and the request body. Extremely important when analyzing what was actually sent to the analytics platform.
-
Response shows what the web server actually responded with. This is often empty or nonsensical with pixel requests, but it’s useful when analyzing API responses or JavaScript files.
-
Cookies lists all the cookies that were sent with the request and set in the response.
Block a request from future loads
You can right-click any request in the list and choose Block request URL or Block request domain to prevent the page from being able to send the request until the block is removed.
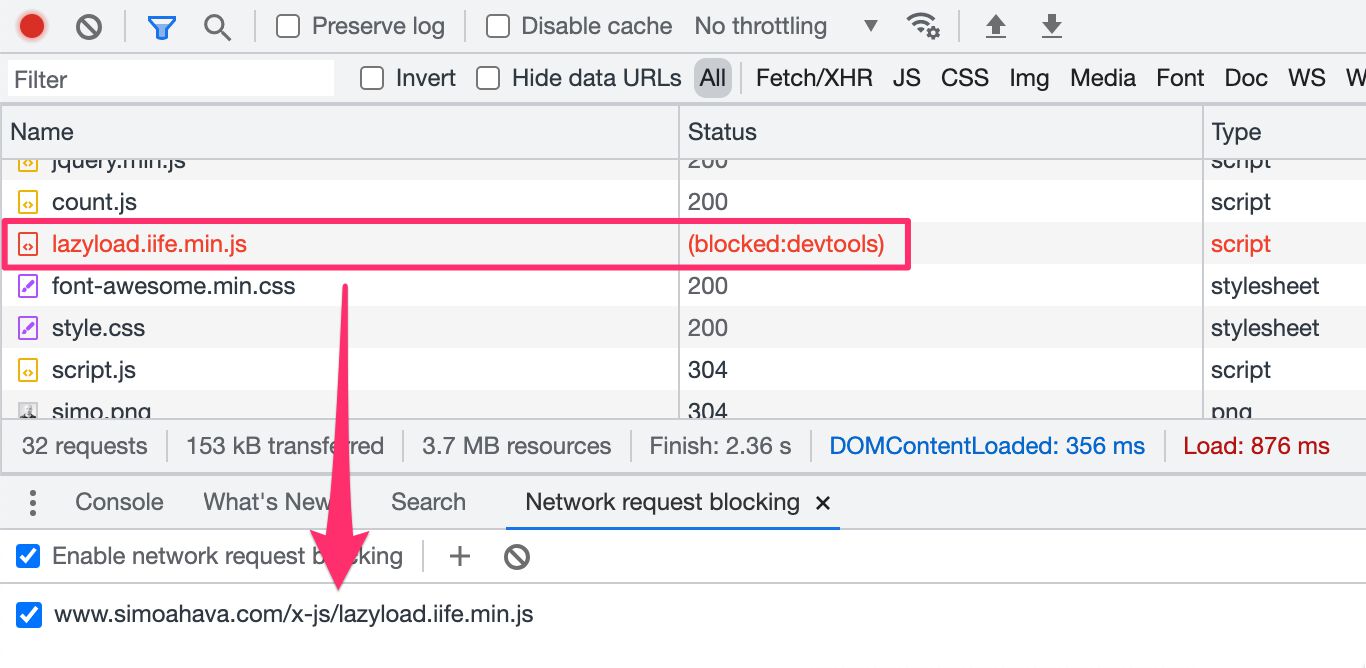
When the resource URL (or domain) is blocked, then any requests that match the URL (or domain) will be blocked in future requests.
This is extremely useful when you want to figure out which JavaScript resource is causing conflicts on the page. By blocking each one-by-one and then reloading the page, you’ll be able to pinpoint the file that causes issues.
To unblock a resource, press the ESC key to toggle the Drawer, select the Network request blocking tab and uncheck the box next to the request (or delete it from the respective buttons). If you don’t see the tab, you can select it by clicking the Drawer menu (the three vertical dots) in the top-left corner of the Drawer.
You can also right-click the blocked resource in the network debugger and choose Unblock….
Manually throttle the page speed
If you want to test how the page loads like on a slower connection (might be useful every now and then), you can choose a throttling speed from the network tools.

Remember to switch back to No throttling when done, though, or you’ll have to continue suffering with slowly loading pages.
Pinpoint the initiator of the request
In the Initiator column, you can see the resource or process that caused the redirect to fire.
By clicking the resource in the column, it will jump to the relevant part of the developer tools to show what process initiated the request.
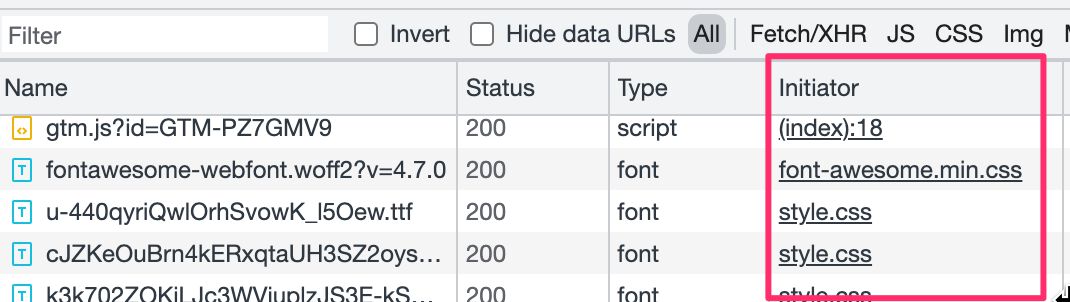
If the initiator is (index), it means the request originated from a resource injected into the DOM, which means clicking it will open the element inspector with the element selected.
If the initiator is a JavaScript file or a CSS file, for example, then developer tools will open the Sources tab with the relevant part of the source file code selected. This might not be very useful in itself, but you can use the Sources panel to add a breakpoint to the injection moment in order to replay through the stack after a page reload (more on this below in the Sources section).
JavaScript console
The JavaScript console lets you execute any JavaScript commands in the context of the current page.
The context of the page is the DOM, and you can use DOM methods to interact with page elements.
Here are some use cases for the JavaScript console.
Inspect logs
Many tools output debug messages to the JavaScript console, so the first course of action whenever you run into trouble is to open the JavaScript console to see if there are any relevant errors shown.
It’s a good idea to add some console.log(msg) calls in whatever code you add yourself via a tag management system, for example. That way you can debug the log output in the JavaScript console – often this is the easiest way to debug code execution.
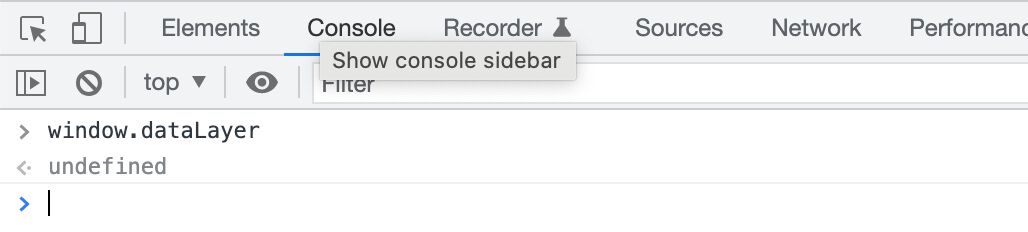
Check the value of global variables
In browser JavaScript, global variables are stored in the window object.
If you want to check whether a global dataLayer array exists, you can simply type window.dataLayer and press enter. If the console shows undefined, it means that dataLayer does not exist in global scope.
You can also set new global variables simply by initializing them in the window object:
window.myGlobalVariable = "Hello, I am a global variable.";
Add an event listener with a breakpoint
This is a cool trick. Whenever any JavaScript that runs on the page uses the debugger; keyword, the page will pause and you will be diverted to the Sources tab where you can then walk through the stack (more on this below).
If you want to try this out, you can add a click listener on the page with debugger; in the callback. Then, when you click anywhere on the page, the execution will pause and you’ll be taken to the Sources tab.
window.addEventListener('click', () => { debugger; })
Change the context to an iframe
The JavaScript console is initially bound to the context of the top frame (the URL the user is currently navigating).
If the page embeds other content in iframes, you can use the frame selector in the console to change context to the iframe.
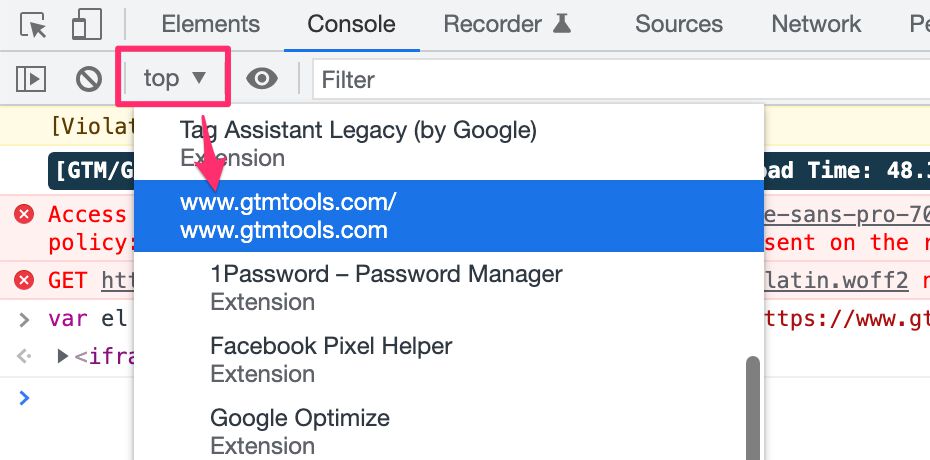
This is, of course, particularly useful when debugging embedded content such as third-party shopping carts or widgets.
Note that the frame selector is confusingly in different parts of the developer tools across different browsers. The screenshot above is from Chrome (and it’s the same on Edge). With Firefox the context picker is in the top-right corner of the developer tools, and with Safari it’s in the bottom-right corner of the developer console.
Sources
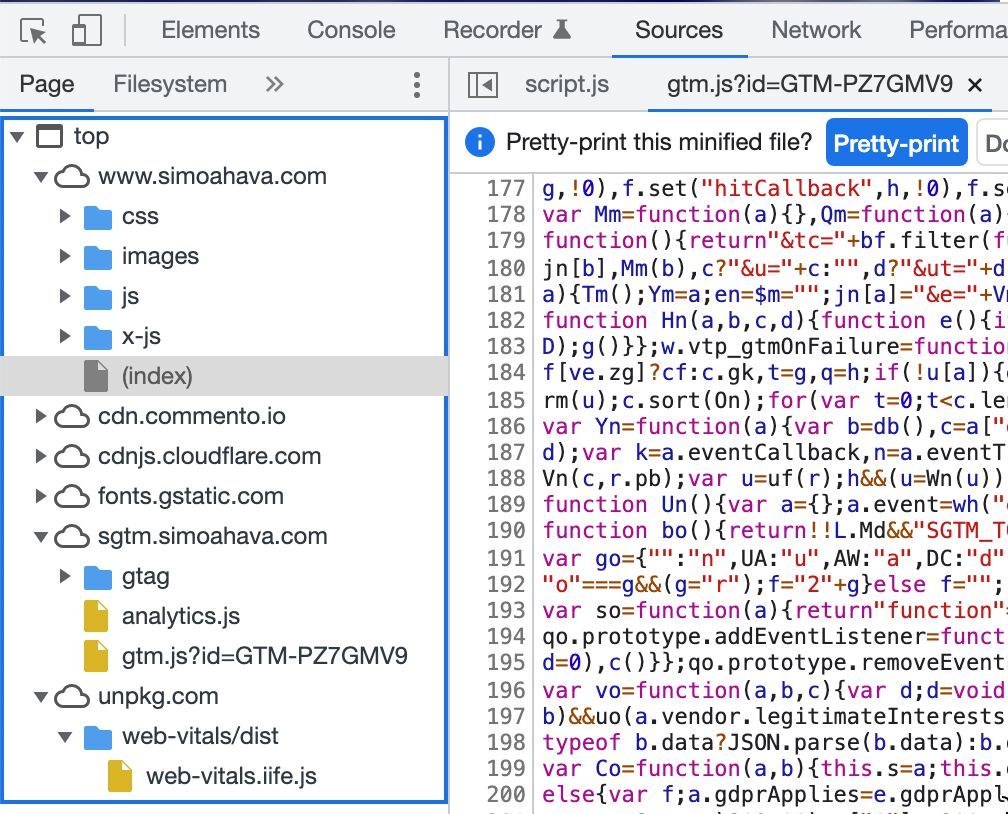
The sources panel can be game-changing but it can also be very overwhelming to use.
The panel lists all of the subresources (images, scripts, frames, etc.) loaded on the current page.
The list is sorted by URL, starting with the origin and then drilling own to paths and files.
The sources panel would deserve a separate article in itself due to the many, many different things you can do with it. However, here I’ve listed some of the most useful things you can tamper with.
Open a file, pretty-print it, and search through it
When you open a minified JavaScript file (as they tend to be in order to save space and bandwidth), the panel prompts you if you want to pretty-print the file.
Always do this.
By pretty-printing the file, the code is displayed in a more readable format, even if the code itself is still minified.

You can then hit CMD + F (or CTRL + F) to open the search bar. The search will look through the formatted file for all references to the searched string.
Add a breakpoint to the file
A breakpoint is an instruction for the brower to halt page execution and allow the user to see the exact state of the page at the time of the breakpoint.
To add a breakpoint, open a file in the Sources panel, right-click the row number you want to halt execution on and choose Add breakpoint.
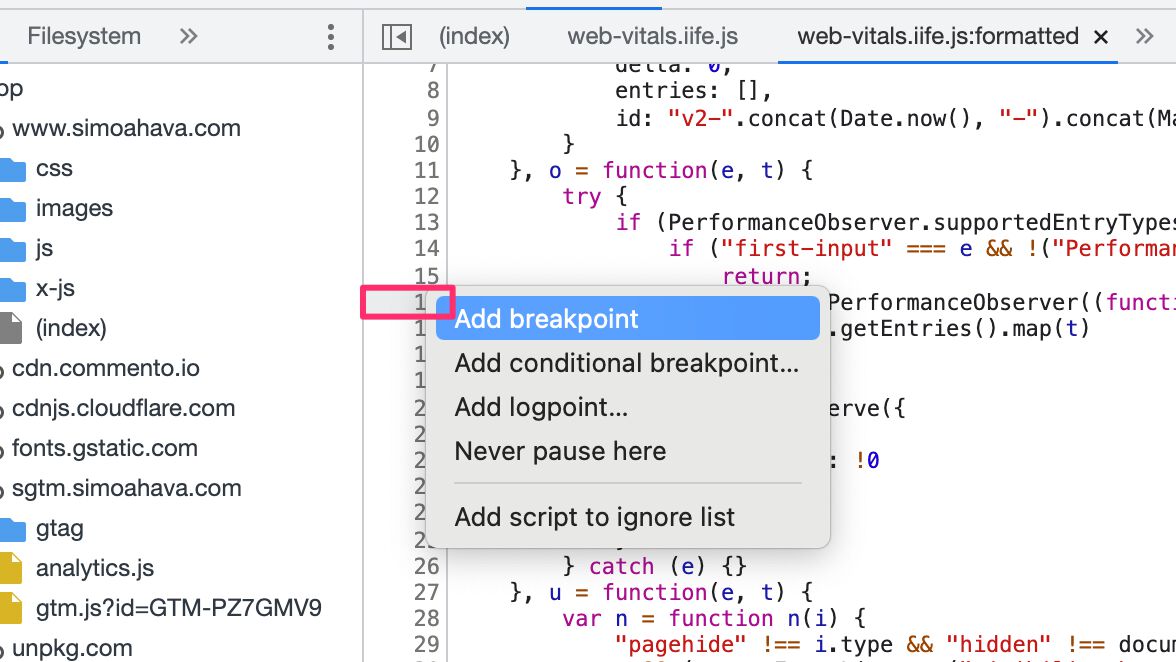
When you then reload the page (or cause the code to be evaluated some other way), the browser will stop at the breakpoint and give you bunch of options how to proceed.
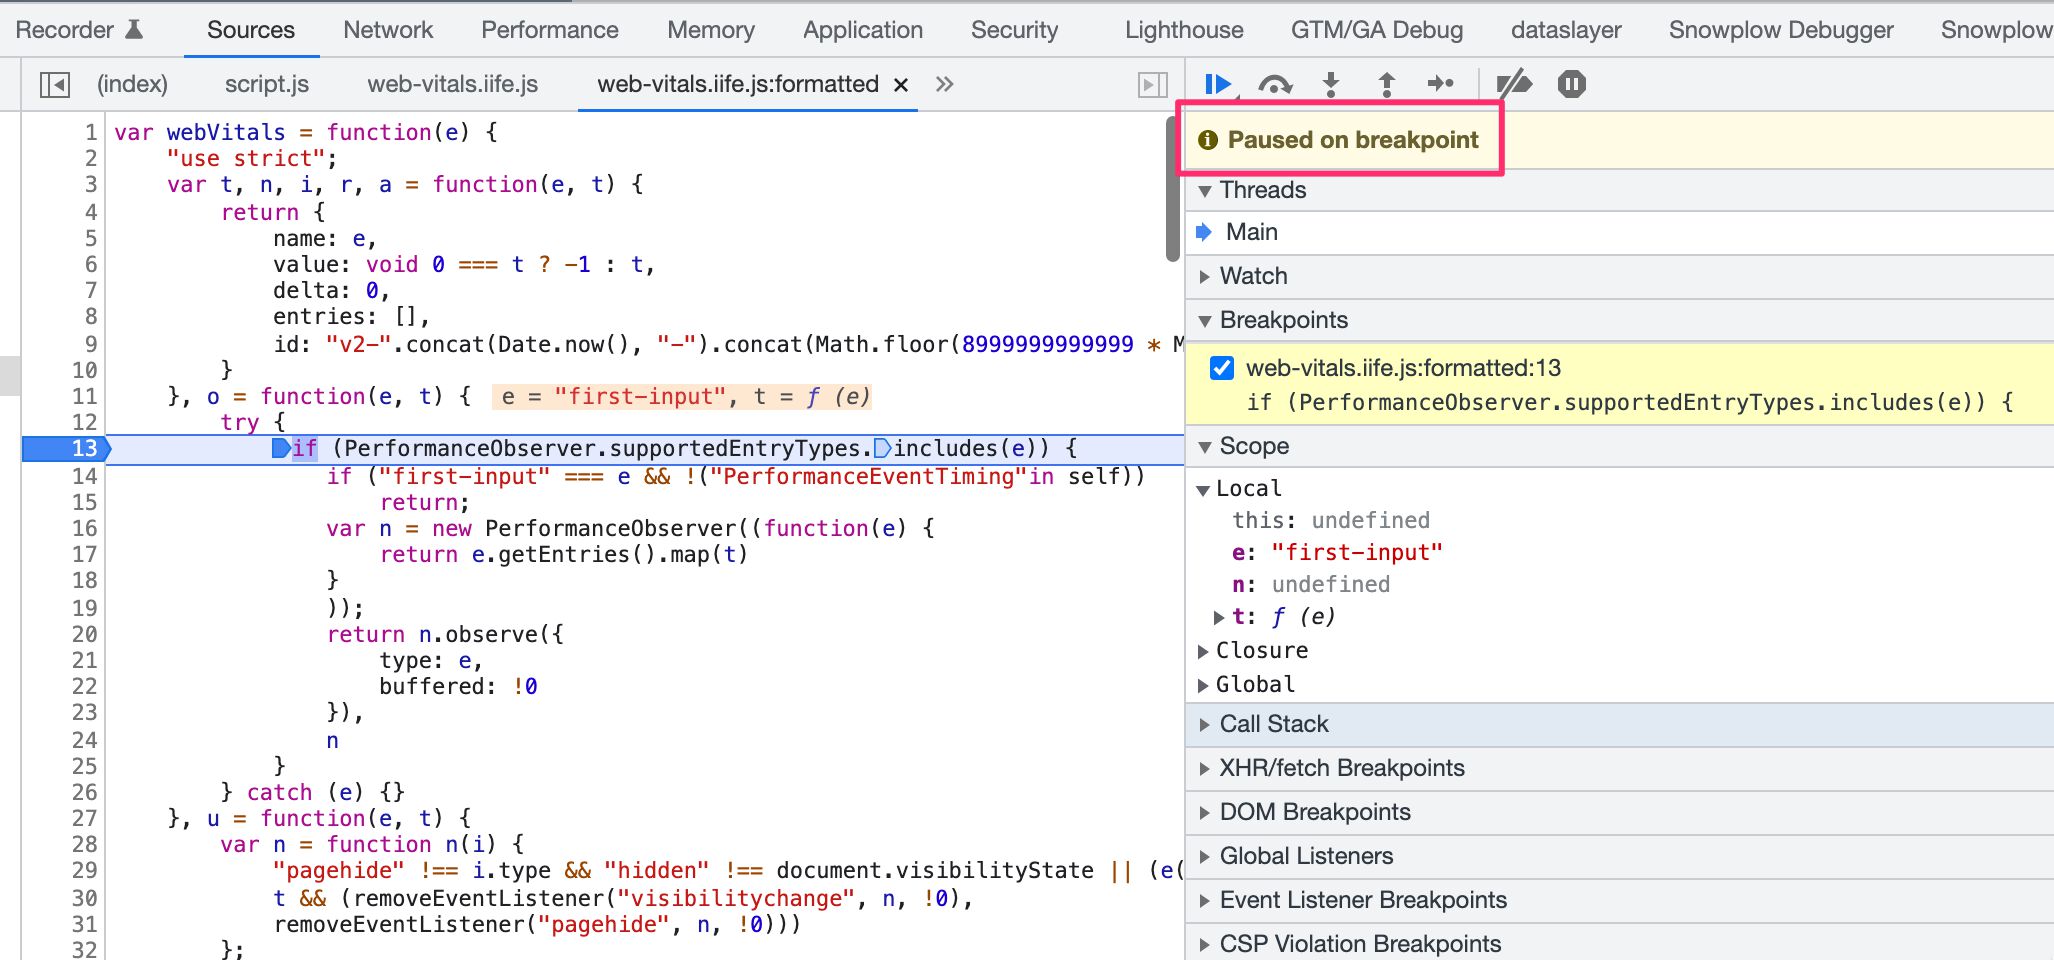
Some useful tools here include:
-
Look through the Scope list. Here are listed all the variables in Local (current function context) scope, Closure (scope of the function that initiated the closure code), and Global scope.
-
Walk back through the Call Stack menu, as this will let you inspect the full execution thread all the way to where it was initialized. This is a great way to find just where the JavaScript started breaking down.
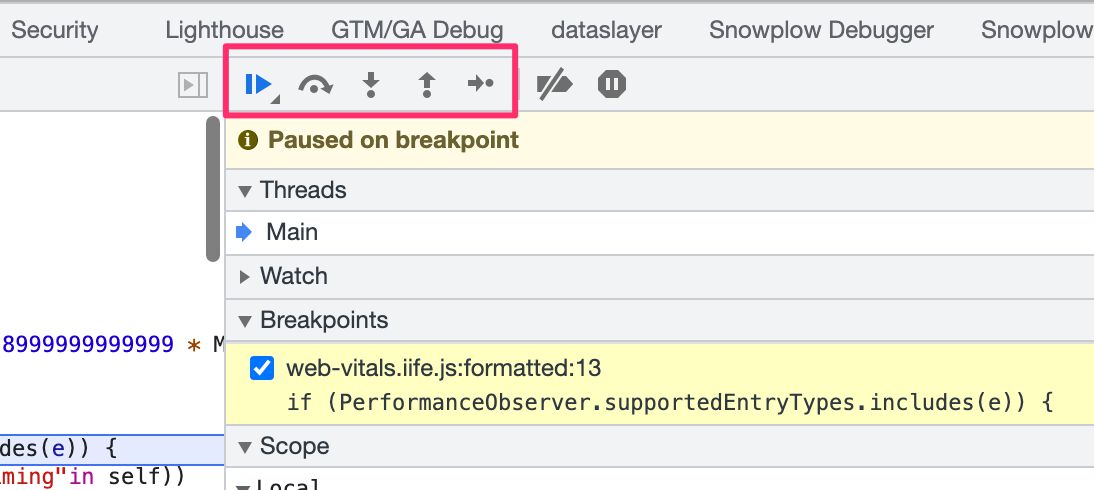
-
Use the step methods (see screenshot below) to continue progressing through the code, pausing after every line.
To remove the breakpoint (good idea once you’re done debugging), expand the Breakpoints list and uncheck the breakpoints you want to deactivate.
Search through the sources
Sometimes it can be useful to simply do a string search through the sources. For example, if you find GTM’s dataLayer is overwritten, you could even search for something as simple as dataLayer= in order to find if it’s been overwritten by custom code in some other file.
You can find the search tool by opening the Drawer (press ESC) and selecting the Search tab. Here, you can do a string search and developer tools will search through all the source files for a match.
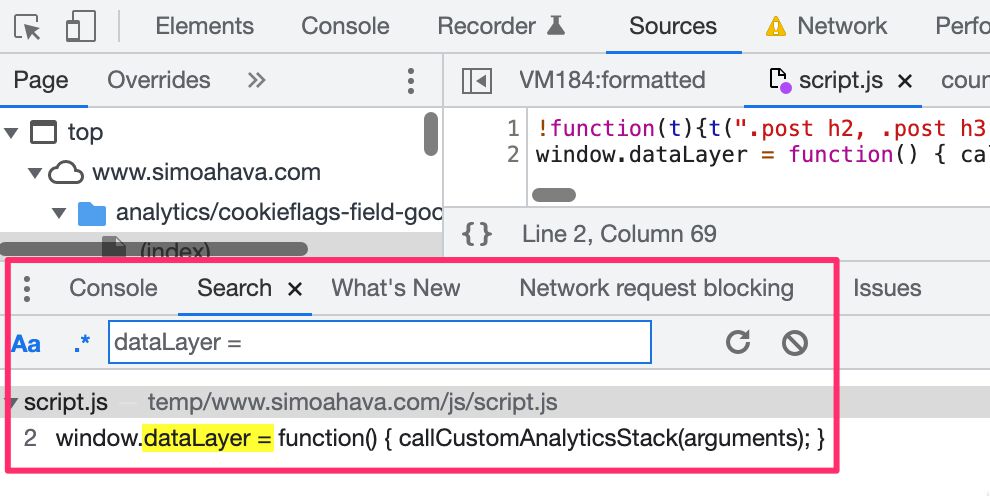
If you do find a match, you can click it to jump to the relevant part of the source file.
Add local overrides
This can be extremely helpful in testing your page. You can actually edit / add / remove things in the page HTML or the linked JavaScript resources by adding local overrides.
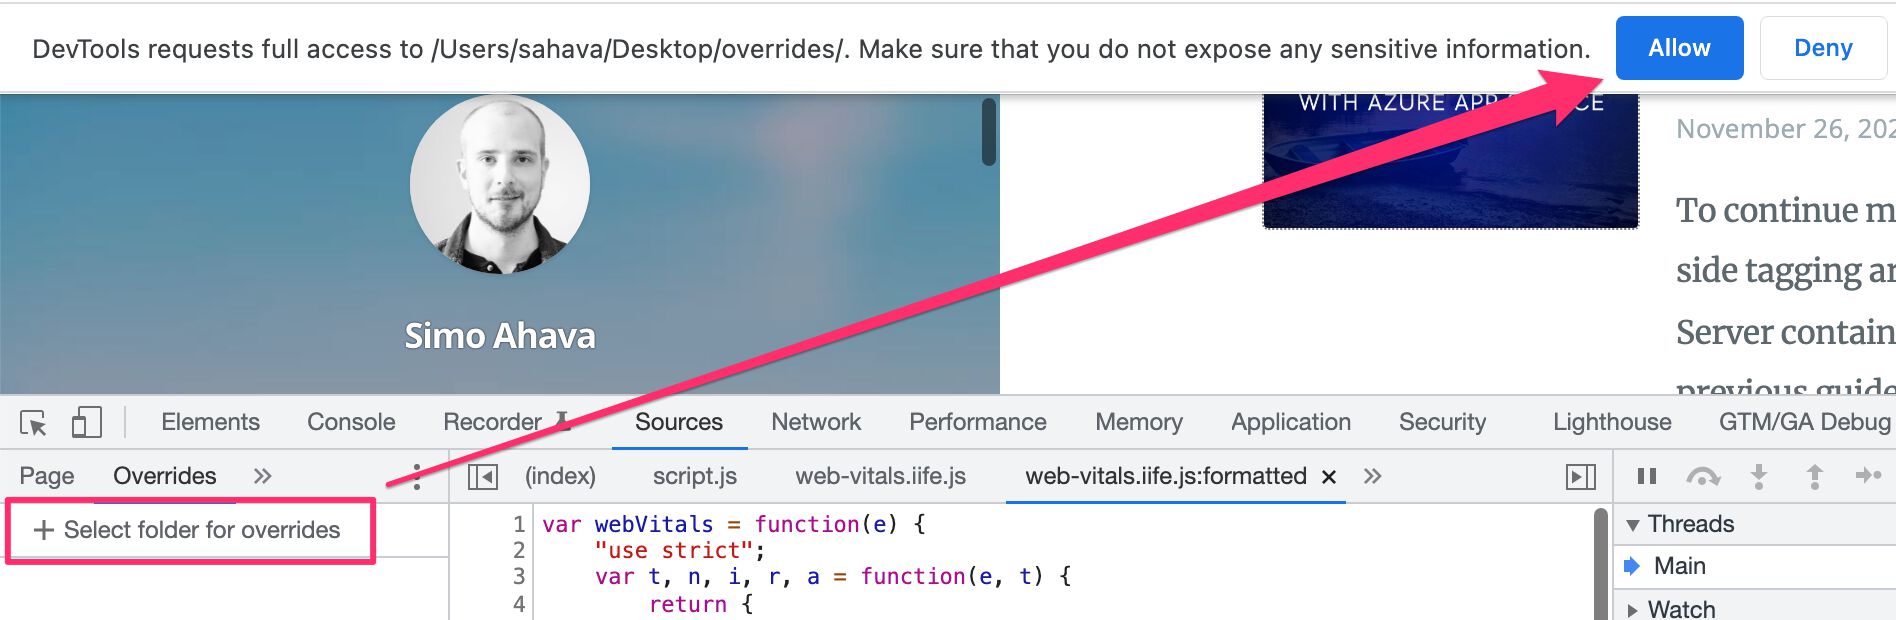
When you give the browser permission to write local overrides, you can then freely edit any of the files in the Sources panel, save them, and when you reload the page the saved and modified file will be used instead of the one loaded over the network.
In Chrome, you’ll see a little purple button next to the file if it has a local override.
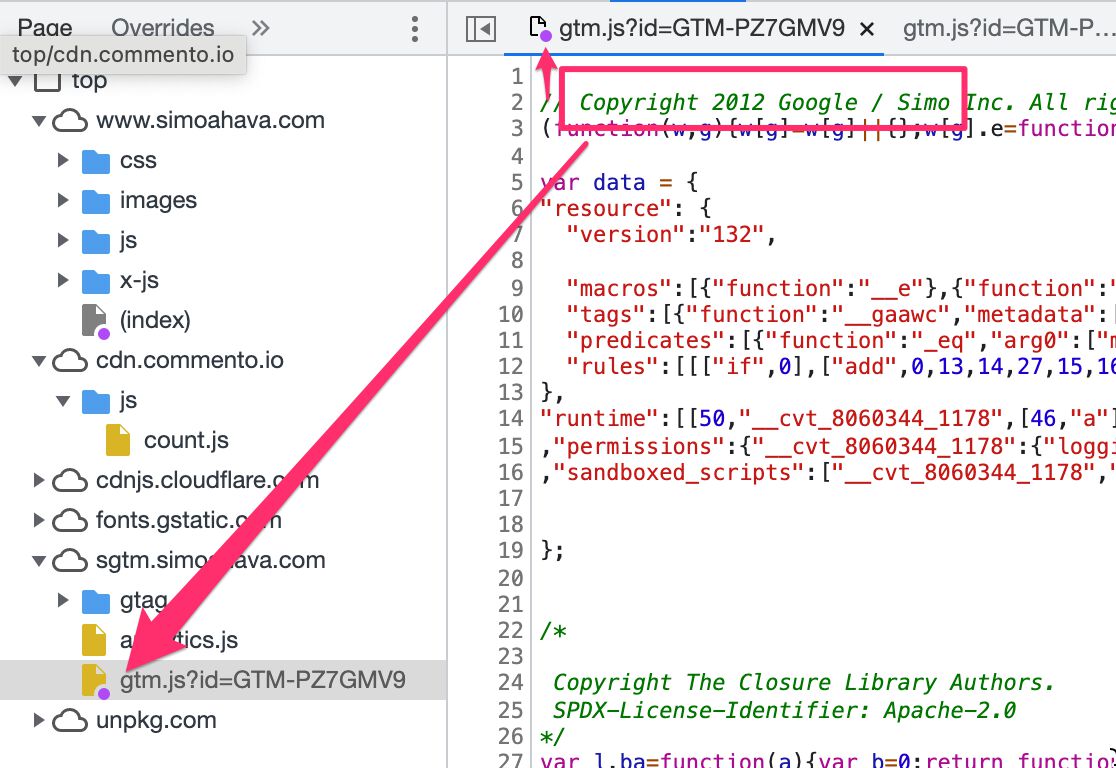
To stop using overrides, just open the Overrides tab in the Sources panel and uncheck “Enable Local Overrides”.
Application storage
The application storage tab shows all the browser storage used on the current page (and in embedded frames).
This includes things like cookies, localStorage, and sessionStorage.
You can use this tab to create, edit, and delete items in browser storage.
It’s a great resource to identify problems with persistence in your analytics tools, for example.
Here are some of the things you can do with application storage.
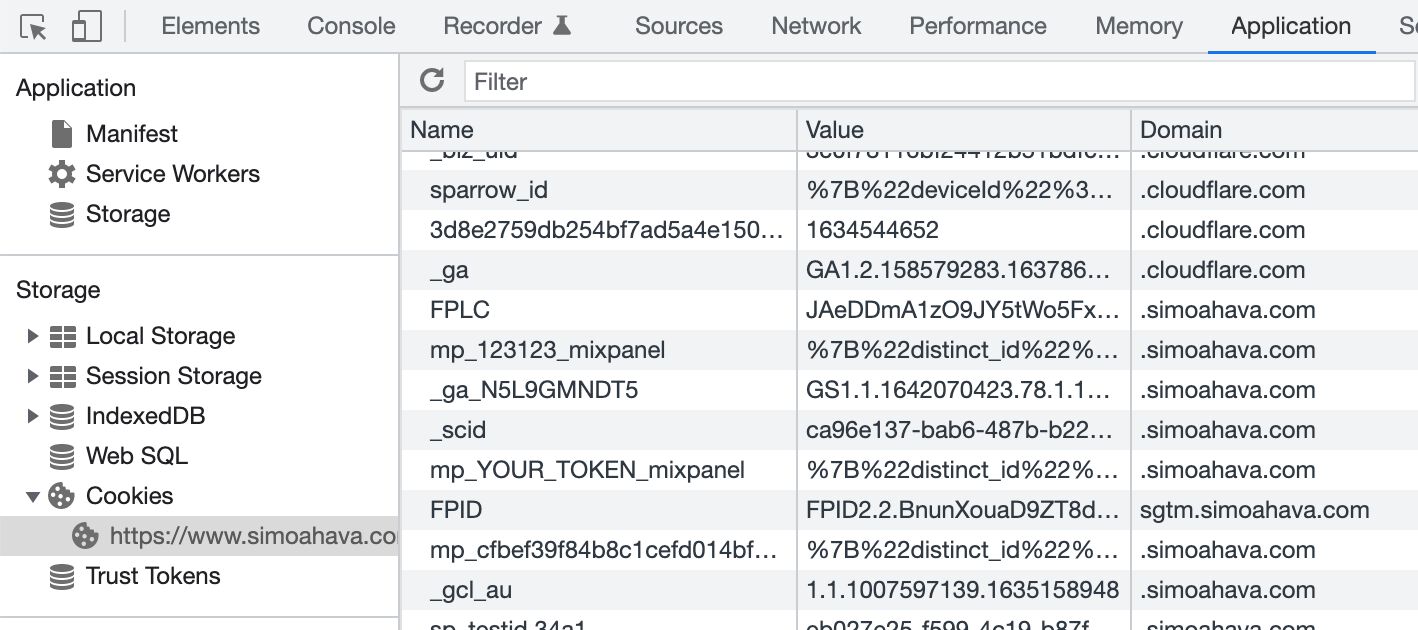
Inspect first-party and third-party storage
It’s a bit confusing, but you can see multiple domains in both the navigation column as well as in the actual storage list.
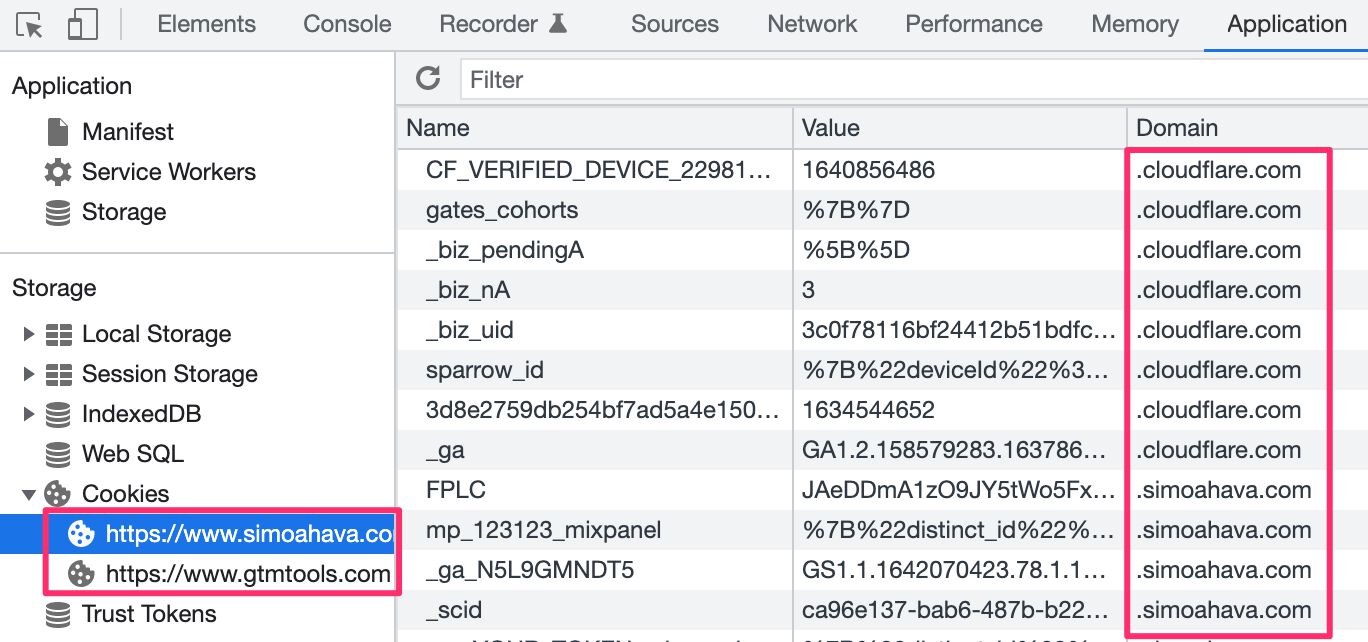
First, all the domains listed in the navigation column (simoahava.com and gtmtools.com in the screenshot above), represent URL origins loaded in frames. For example, in this case simoahava.com was the URL of the top frame, and the page I was on loaded an iframe from gtmtools.com. In the Application tab I can choose gtmtools.com to inspect the cookies of that particular context.
In the list of cookies, on the other hand, if you see multiple different domains listed it’s because the page is sending requests to these domains. If the browser supports third-party cookies, you’ll see all the cookies set on the domains the browser is communicating with.
If the browser blocks third-party cookies, you’ll only see cookies set on the site of the top frame (the URL the user is browsing).
Create, edit, and delete storage
By clicking any storage entry and pressing backspace / delete, you can remove that particular item from the browser storage.
You can edit any storage values by double-clicking the value you want to edit in the relevant column.
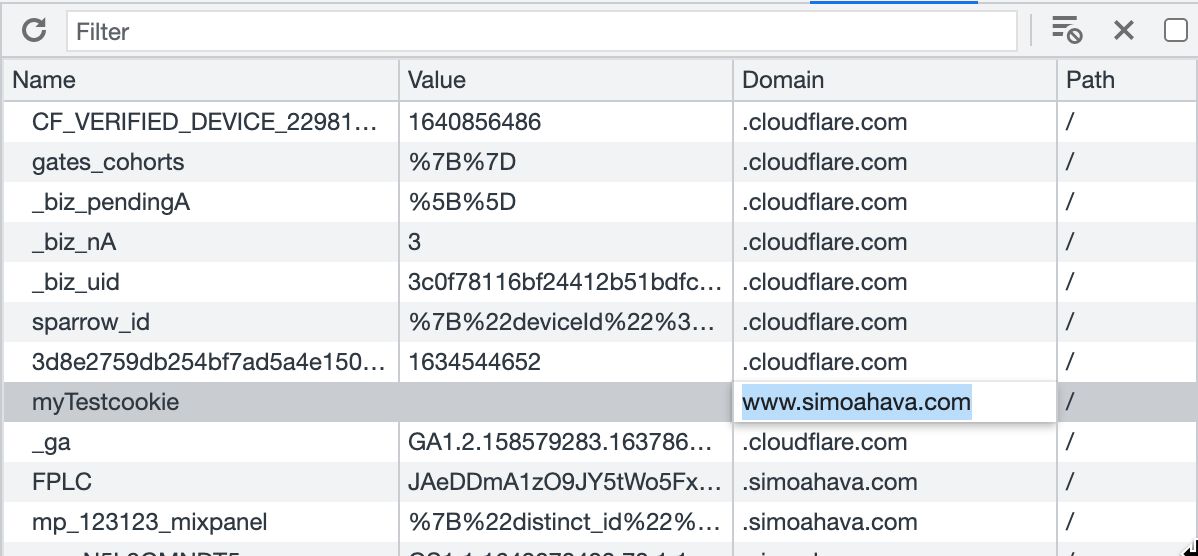
You can create a new cookie (or other storage entry) by double-clicking the empty row at the bottom of the storage list. You can then input any values you want into the columns.
Debug web analytics implementations
Once you have a feel for the developer tools, you can start debugging actual issues with your implementations.
Please note that since the scope of things you can do with JavaScript is so immensely vast, it’s impossible to exhaustively list all the things that you should do when debugging your setup.
In this chapter, I’ve listed some of the more common ways to approach implementation issues.
If you have other, common use cases you think should be listed here, please let me know in the comments!
Check browser cookies
Many analytics tools utilize browser storage to persist things like user and client identifiers.
Google Analytics 4 uses the _ga and _ga_<measurementId> cookies to store information about the user and the session, respectively.
If you see too many (or too few) users in your GA4 data compared to the count of sessions, for example, it might be that there’s something wrong with the browser cookies. So open the Application tab and look for _ga.
If you don’t find any cookies with that name or prefix, it’s possible that there’s something wrong with your implementation and the cookie is either not being set or it’s being set incorrectly.

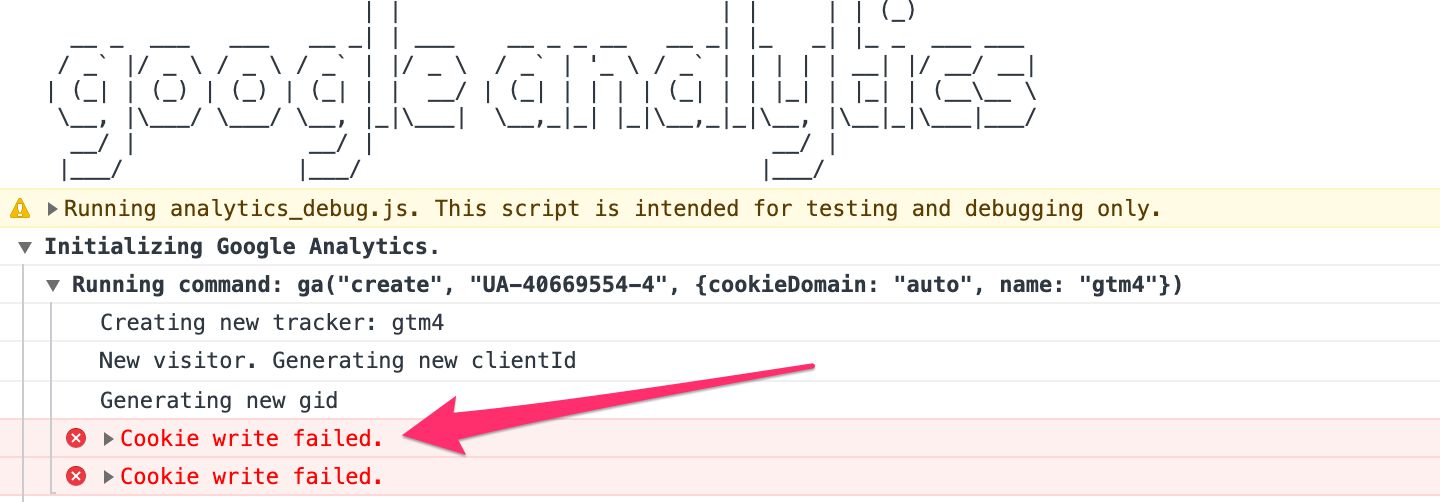
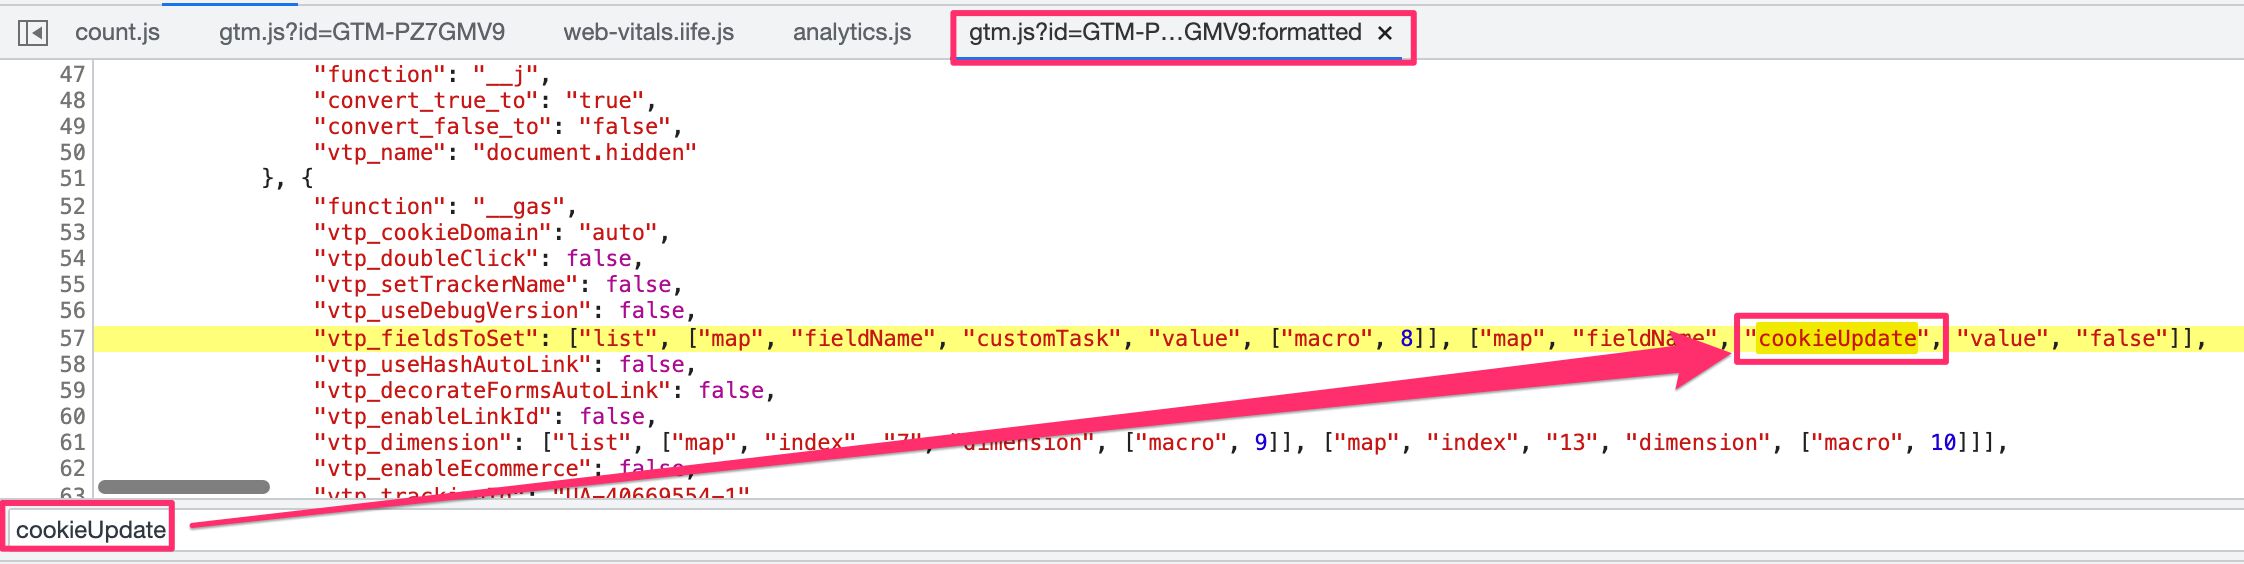
A typical mistake is overwriting the cookie_domain field with something incorrect. The tracker tries to set the cookie on an invalid domain and the cookie write fails.
It might be useful to have the GA Debugger extension enabled, as the JavaScript console will inform you if the cookie write failed for some reason.
Another very common reason for cookies failing is because the page is actually running in a cross-site embedded iframe, and due to third-party cookie restrictions the page is unable to set the cookies correctly.
Filter network requests
You’ll also want to look through the network requests to see if your endpoint is actually receiving the data.
Google Analytics requests are sent to the /collect path, with the domain www.google-analytics.com or analytics.google.com (latter if Google Signals is enabled).
If you see a request to /collect with a status code of 200, it means that your request was most likely collected by the endpoint successfully.
If you see an aborted request (or some other error), it’s typically because the request happened just as the user was navigating away from the page (although this is less common with Google Analytics 4).
If you don’t see the request at all, it means that something is preventing the request from being dispatched. Again, using the GA Debugger extension is a good idea, because the extension logs information into the console that might be of use.
Identify conflicts in global methods
Sometimes, rarely, the global methods used by your web analytics tool have been overwritten by some other tool.
This is a constant danger when using global methods, and Google Analytics using the ga namespace for Universal Analytics is an example of a global name that can easily be taken by some other, unrelated tool.
Sometimes it’s difficult to find issues with the global namespace, because using tools like Google Tag Manager might make global methods irrelevant.
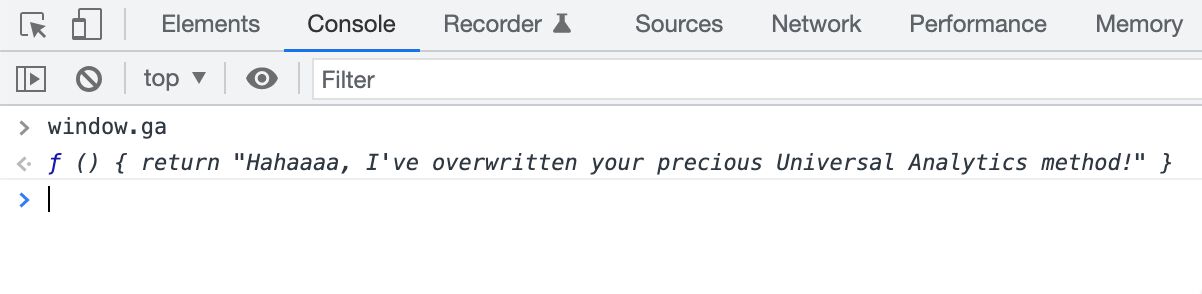
But if you’re having trouble with your requests working, you can always check if the global methods that your tool uses (e.g. ga, gtag, dataLayer) are either undefined or set to something that doesn’t resemble your analytics platform code at all.
Note about iframes
If you embed content in a cross-site (or third-party) iframe, remember that anything that happens in the iframe happens in third-party context.
This means that if you’re running Google Analytics in the iframe, it will not work because by default the GA cookies are not treated in a way that would make them work in third-party context.
You’ll see the Cookie write failed error message in the console when using the GA debugger, if this is the case.
Furthermore, even if you update the cookies to use the required samesite=none and secure flags, browsers like Safari and Brave outright block third-party storage.
Debug tag management solutions
Since tag management solutions are more like a framework for deploying analytics and advertising pixels, if they fail then everything that’s loaded through them fails too.
In this chapter, we’ll take a look at some of the ways you can debug a TMS implementation gone awry.
Check Data Layer queue for conflicts
First, if you’re seeing issues with your setup, check if the global dataLayer queue has been overwritten or is otherwise compromised.
With Google Tag Manager, type dataLayer.push into the console and check what it returns. If it outputs something like [native code], it means that dataLayer has been reset to its initial state, and Google Tag Manager’s listeners no longer work with it.

Alternatively, if you see something other than a variation of the below, it means that dataLayer has possible been overwritten in a way that doesn’t correctly work with GTM. This is a difficult scenario to debug, and requires that you add a breakpoint to the dataLayer processing in order to see if some other tool is cannibalizing the array and not passing the arguments to GTM.

You can mock this with something like:
window.dataLayer.push(function() { debugger; });
Then step through the stack and see if the gtm.js library is ever visited when stepping through the methods. If GTM is never referenced, it means that some other tool has taken control of dataLayer and you need to resolve this conflict elsewhere.
This is a notoriously difficult scenario to debug, so you just need to patiently look through the Sources to find the culprit. Search for references to
dataLayer, for example. Block JavaScript files one by one in the network debugger to find the one that is causing the conflict.
Search through the element inspector
Sometimes it might be useful to search through the element inspector to find the Custom HTML tags and script elements injected by Google Tag Manager.
You can simply search for a string that you know to be within the injected code, but just remember that Google Tag Manager minifies all injected code automatically, so searching for a specific variable name might not be very useful. Search for content within strings or script URLs instead.
If you don’t see any references to the elements you’d expect GTM to inject, it means that GTM did not add those elements to the page. Typically this is because the tag never fired or the tag was misconfigured. Sometimes it can be because of a CSP conflict that you need to resolve.
Look for requests in network tools
With GTM, too, it’s always useful to look for requests in the network tools. This is always the ultimate truth when it comes to debugging the end-to-end flow of pixel requests.
If Tag Assistant says that the tag fired but you can’t see anything in your analytics platform, then you need to open the network debugger and see if the request was ever sent.
Remember to check Preserve log to make sure that the requests aren’t gobbled up by page navigation.
If you don’t see the requests anywhere, it means that the tags never managed to dispatch them.
Note that this is only the first step of potentially a very complex debugging flow, because there can be a million different reasons for a failed request.
Sometimes you do see the request but you still don’t see data in your analytics tool. In this case, meticulously sift through the headers and the payload of the request to see if it has all the information you expect it to contain.
Search through sources
Finally, searching through sources can be very useful in identifying issues with your tag management system.
With GTM, it’s often the case that the version wasn’t actually published to the live environment but rather to a staging context.
It might be useful to take a tag that you expect the most recent version to have, and then search for something in that tag’s code (an ID, a parameter, a key-value pair) within the gtm.js library.
Sometimes searching through the sources is an exercise in futility, especially because the code is so minified that you can’t make any heads or tails of it. Trying to narrow down with more specific search terms often helps.
Useful browser extensions
I’ve already mentioned GA Debugger above, but there are other useful extensions you might consider installing in your browser (Chrome, most often) which make debugging your analytics setup a breeze.
Many of these extensions take the existing capabilities of browser developer tools and hone them to suit a specific set of use cases in the analytics world.
I still recommend to always use developer tools as your main tool of choice, but do take a look at these extensions and see if they could help alleviate some of the pain of debugging your analytics or tag manager implementation.
GTM/GA Debugger
David Vallejo’s Chrome extension, GTM/GA Debugger, is certainly the most ambitious and the most impressive browser extension for debugging Google Analytics and Google Tag Manager implementations.
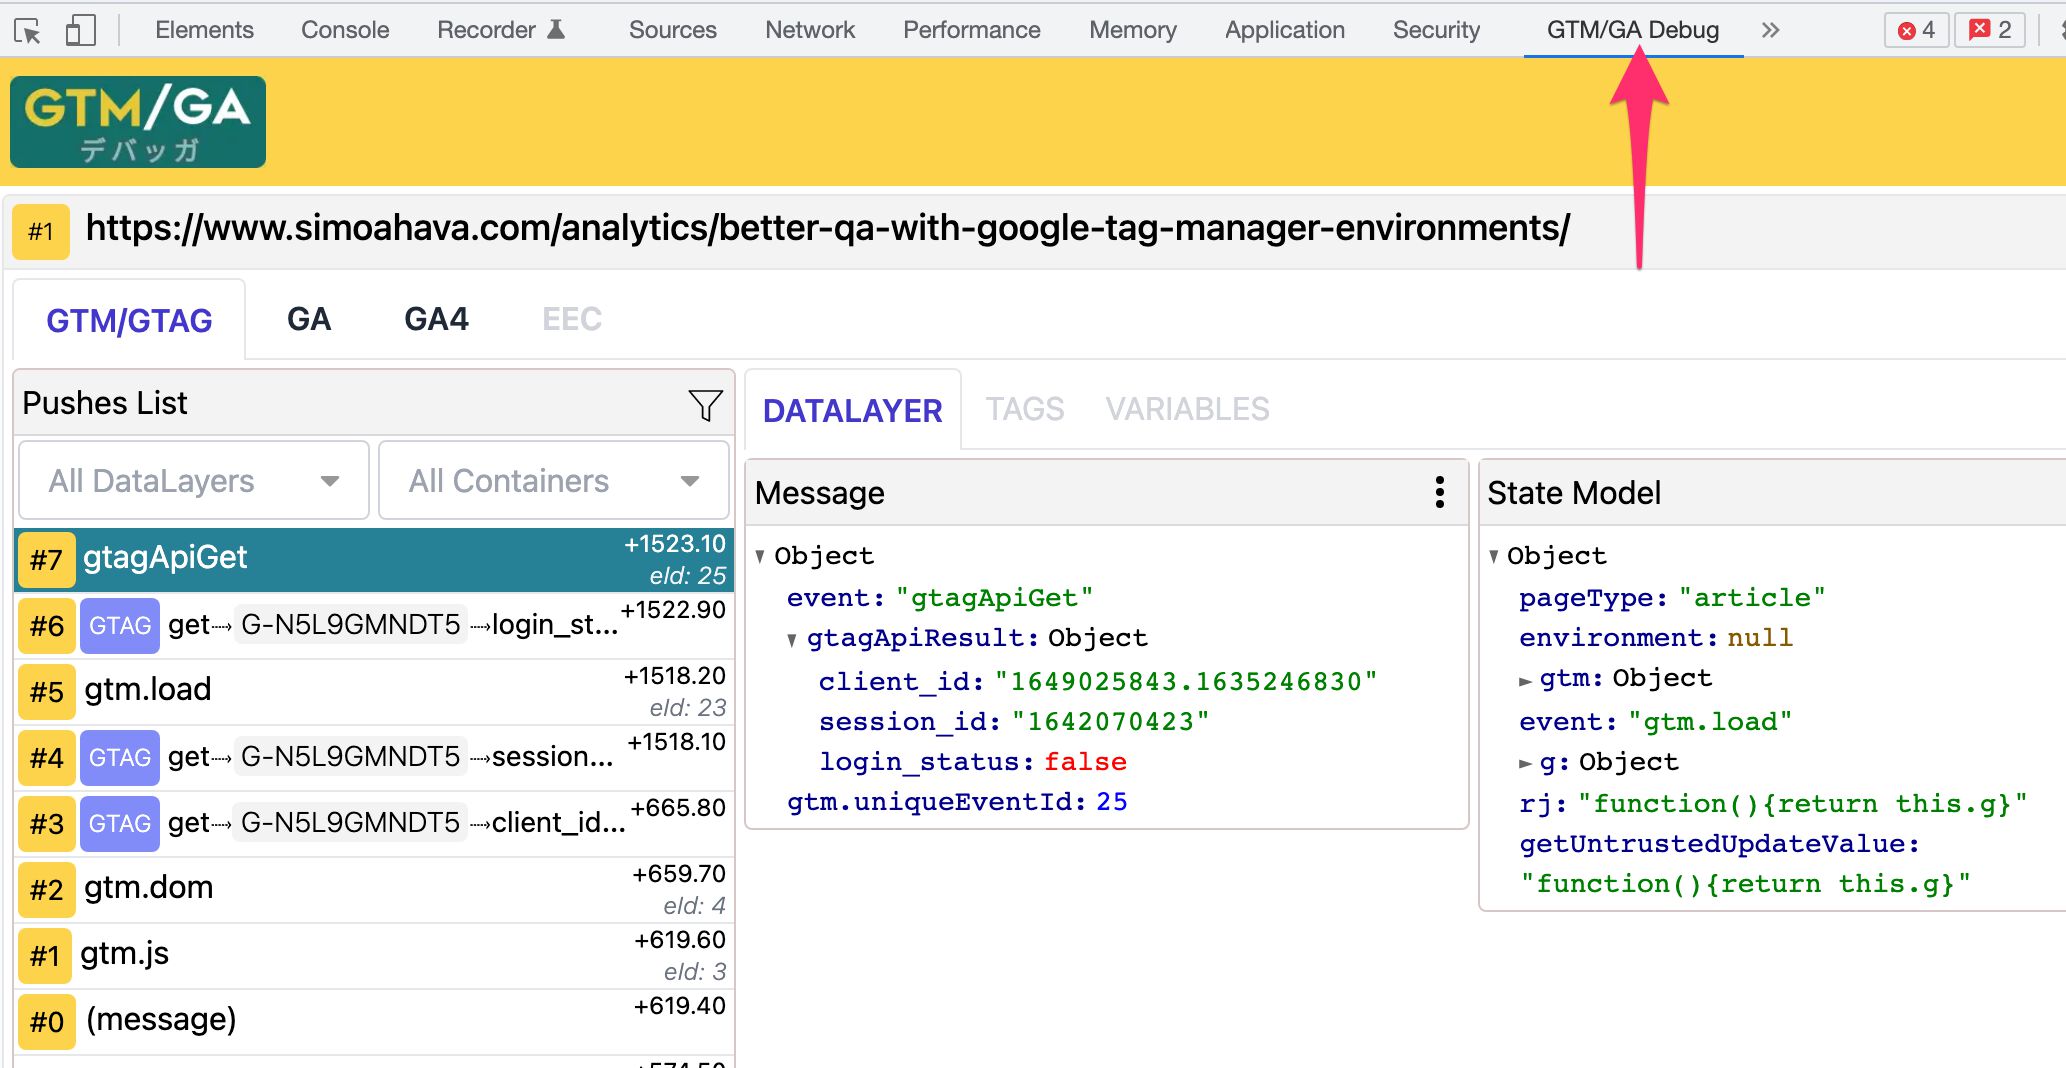
The feature set is so incredibly rich that it doesn’t make sense to go through all the functionality here, but here’s just a short overview of things you can do with the extension:
- Block GA3/GA4 hits
- Inspect server-side tagging hits
- Export as a table, copy objects
- Enhanced ecommerce reports
- Analyze dataLayer and the outgoing requests
- Show POST data in a meaningful way
- View all
dataLayermessages (not just the ones sent on the current page)
Everything is just displayed so nicely and so intuitively. You don’t have to sift through complicated headers and messy payloads – it’s all visually displayed in rich tables and with purposeful structure.
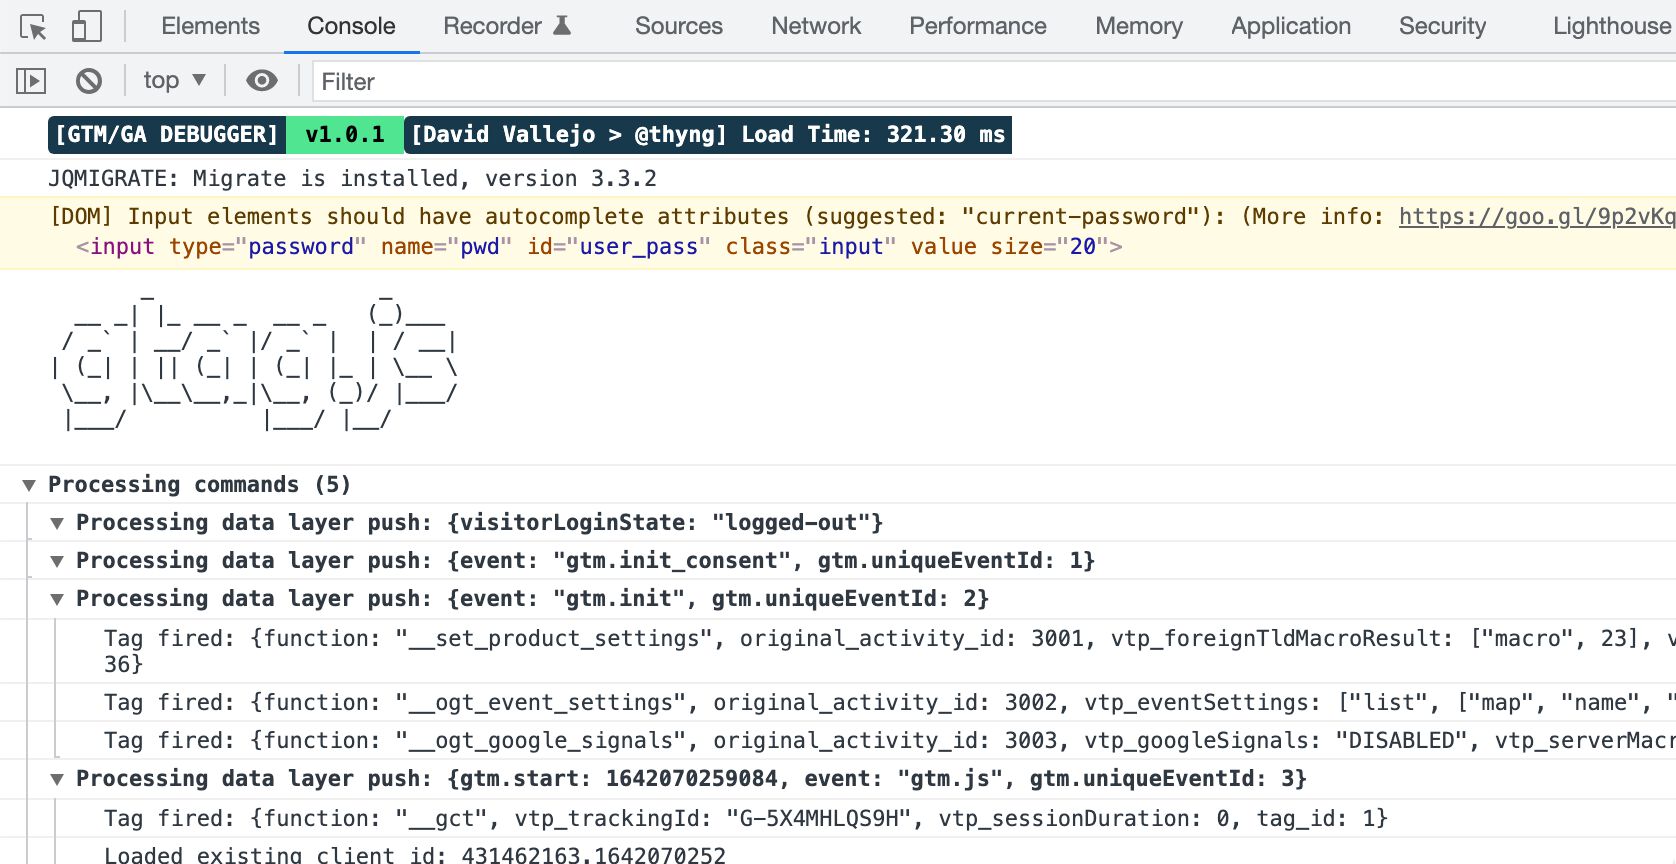
GA Debugger
GA Debugger is the official Universal Analytics, Google Analytics 4, and Google Tag Manager debugger.
It outputs information about the aforementioned platforms into the console.
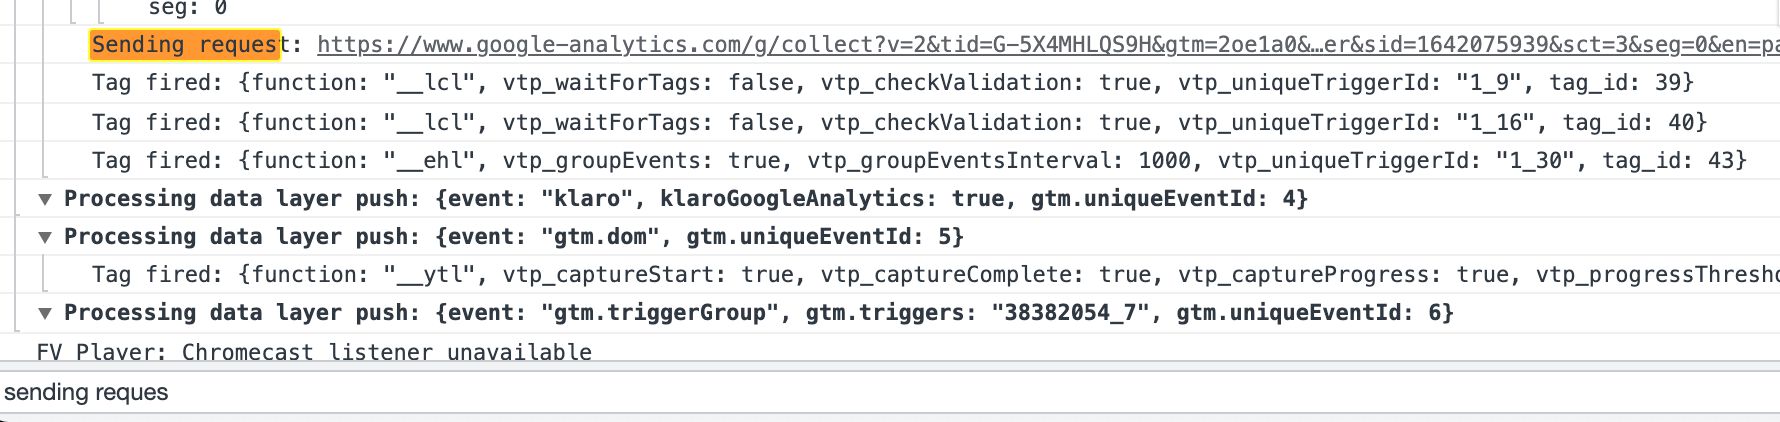
I love this tool because once the information is in the console, searching through it is easy with the JavaScript console’s own search tools.
The GA Debugger helpfully informs you why something went wrong rather than just showing a non-descript error message. Naturally, in some cases you still need to continue investigating, but the console output can be very helpful in collecting the initial set of leads for your research.
Note! This extension doesn’t work if you load your files from or collect hits to a server-side endpoint.
Live HTTP Headers
Live HTTP Headers is my favorite extension for debugging HTTP traffic. It’s an easy way to inspect the headers of all the HTTP requests dispatched by the browser.

Although today you can get pretty much all the same information in the network debugger of the developer tools, I still prefer the visual output of this extension and use it diligently whenever I want to quickly look through redirects or HTTP headers.
Summary
Even though this article is long and full of words and pictures, it covers only a fraction of the approaches you can take when debugging your analytics and tag management implementations.
The idea wasn’t to list everything that can go wrong and give you the solution how to fix it. Instead, the purpose of this guide is to give you the tools and the confidence to start collecting leads for your own investigations.
Debugging the complexity of what happens within a web browser is a daunting task. But the debugging steps themselves are often very predictable and can be repeated from one scenario to the next.
My workflow is pretty simple:
- Always start with inspecting the network requests. Try to find the requests that you’re debugging. If you find them, look through the headers and the payload to see if they contain the data you expect them to have.
- Search through the sources to find inconsistencies in the libraries you use (particularly Google Tag Manager). If you can’t find references to a specific tag you expect to be in GTM, it means that you might be previewing the wrong version or that you never actually published a version.
- Look through cookies to see if the values used by your analytics tool persist from one page load to the next. If the values change, then it means that the cookies are being reset or overwritten for some reason (typically a consent management platform is to blame).
- Utilize the element inspector especially when you are certain that the page should include some element or tag deployed through Google Tag Manager.
If you have additional ideas for the debugging flow that you think should be included in this guide, please let me know in the comments.
What are your favorite ways of debugging analytics and tag management solution issues?
