Customize The Scroll Depth Trigger In Google Tag Manager
Last updated 9 March 2018 with some new tips.
The Scroll Depth trigger in Google Tag Manager has a lot going for it. Tracking how far users scroll down a given page has long since been recognized as an important cog in the engagement tracking machine, and there have been really great solutions for implementing scroll depth tracking for web analytics over the years.
With Google Tag Manager’s native Scroll Depth trigger, it’s tempting to think we now have a be-all end-all solution that covers all the bases. However, as with everything else in analytics, the native scroll depth trigger does require customization to provide you with relevant information about your content and the visitors interacting with it.
In this article, I’ll explore some tricks that you might find useful when customizing the scroll depth trigger.
Table of Contents
The Simmer Newsletter
Subscribe to the Simmer newsletter to get the latest news and content from Simo Ahava into your email inbox!
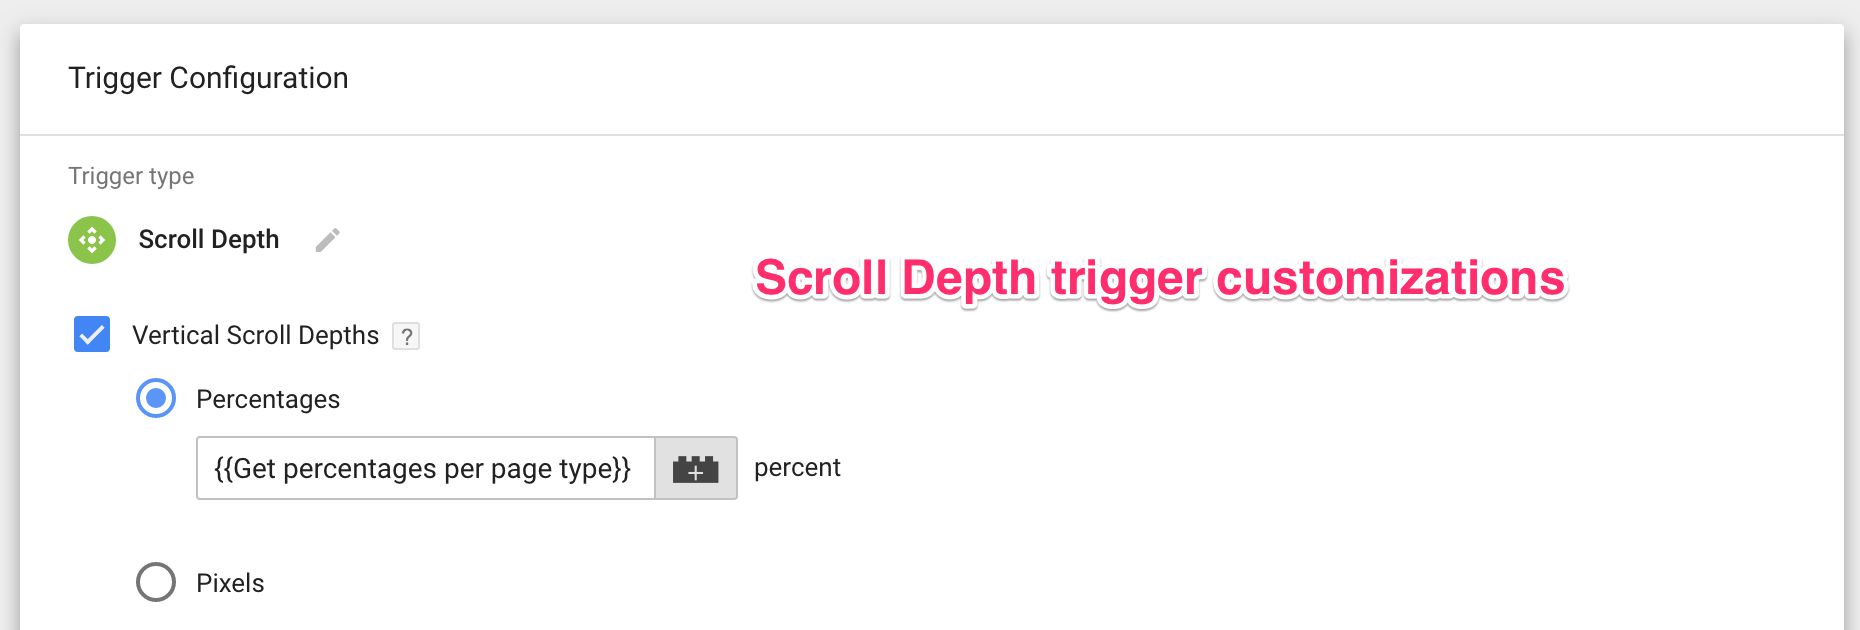
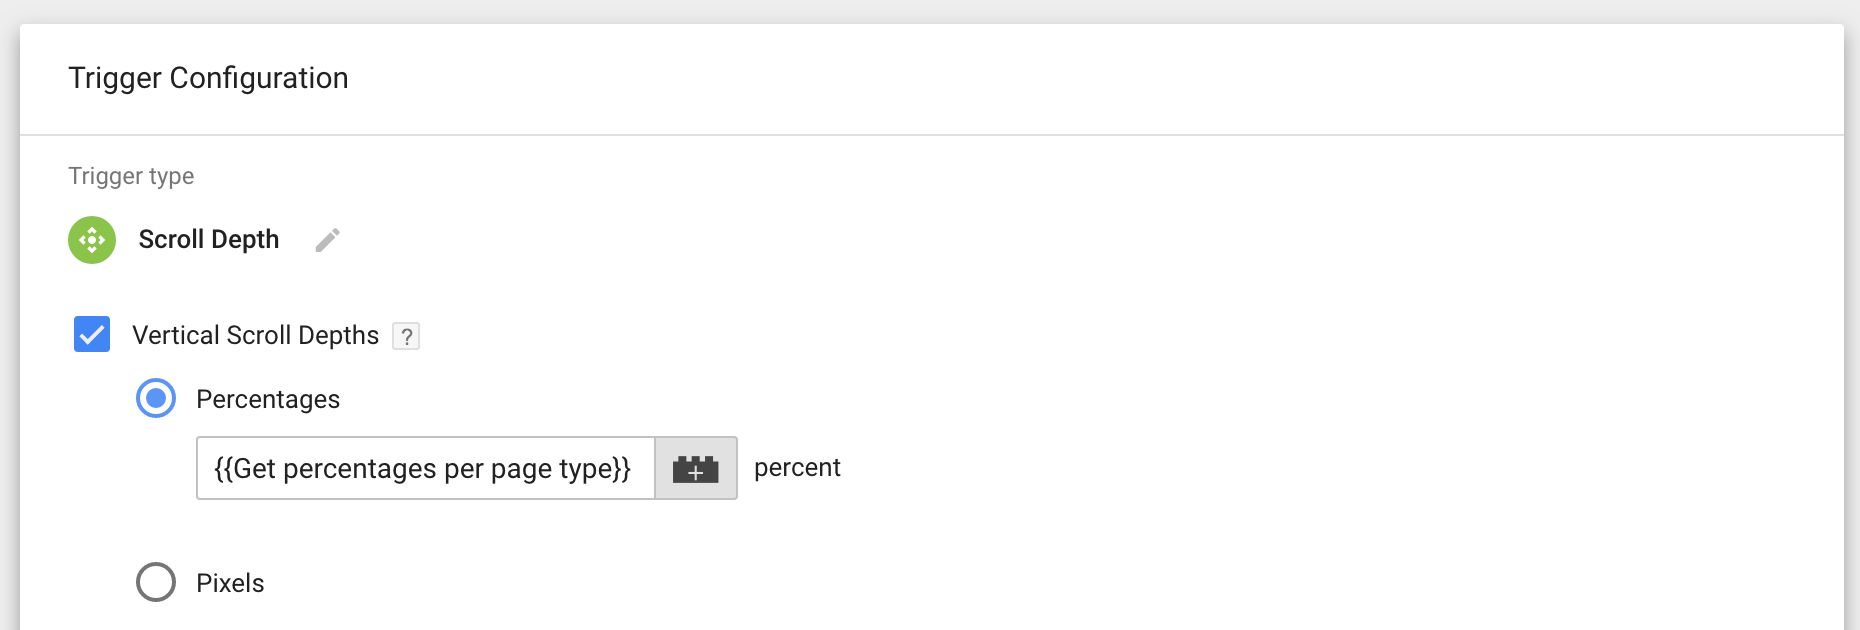
1. Variable percentages depending on page
The easiest customization you can make is to track different percentages depending on the page in question. For example, on article pages in my blog I might be interested in tracking in increments of 25% of vertical depth scrolled. But on list pages and summary pages I might only be interested in knowing who scrolls down to the bottom.
The Vertical Scroll Depths and Horizontal Scroll Depths fields require a number or a list of numbers (comma-separated) to work. Thus you can easily use a Custom JavaScript variable to return one list of numbers for a certain condition, and a different list of numbers for some other condition.
For example, here’s a Custom JavaScript variable that does what I described in the first paragraph of this chapter.
function() {
  return {{Page Path}}.indexOf('/analytics/') > -1 ? '25,50,75,100' : '75,100';
}
This variable returns the string 25,50,75,100 if the page URL contains /analytics/, and 75,100 otherwise. Thus, on blog pages, it will measure scroll depth in increments of 25 percent, but on other pages only scrolling up to 75% and 100% in depth.
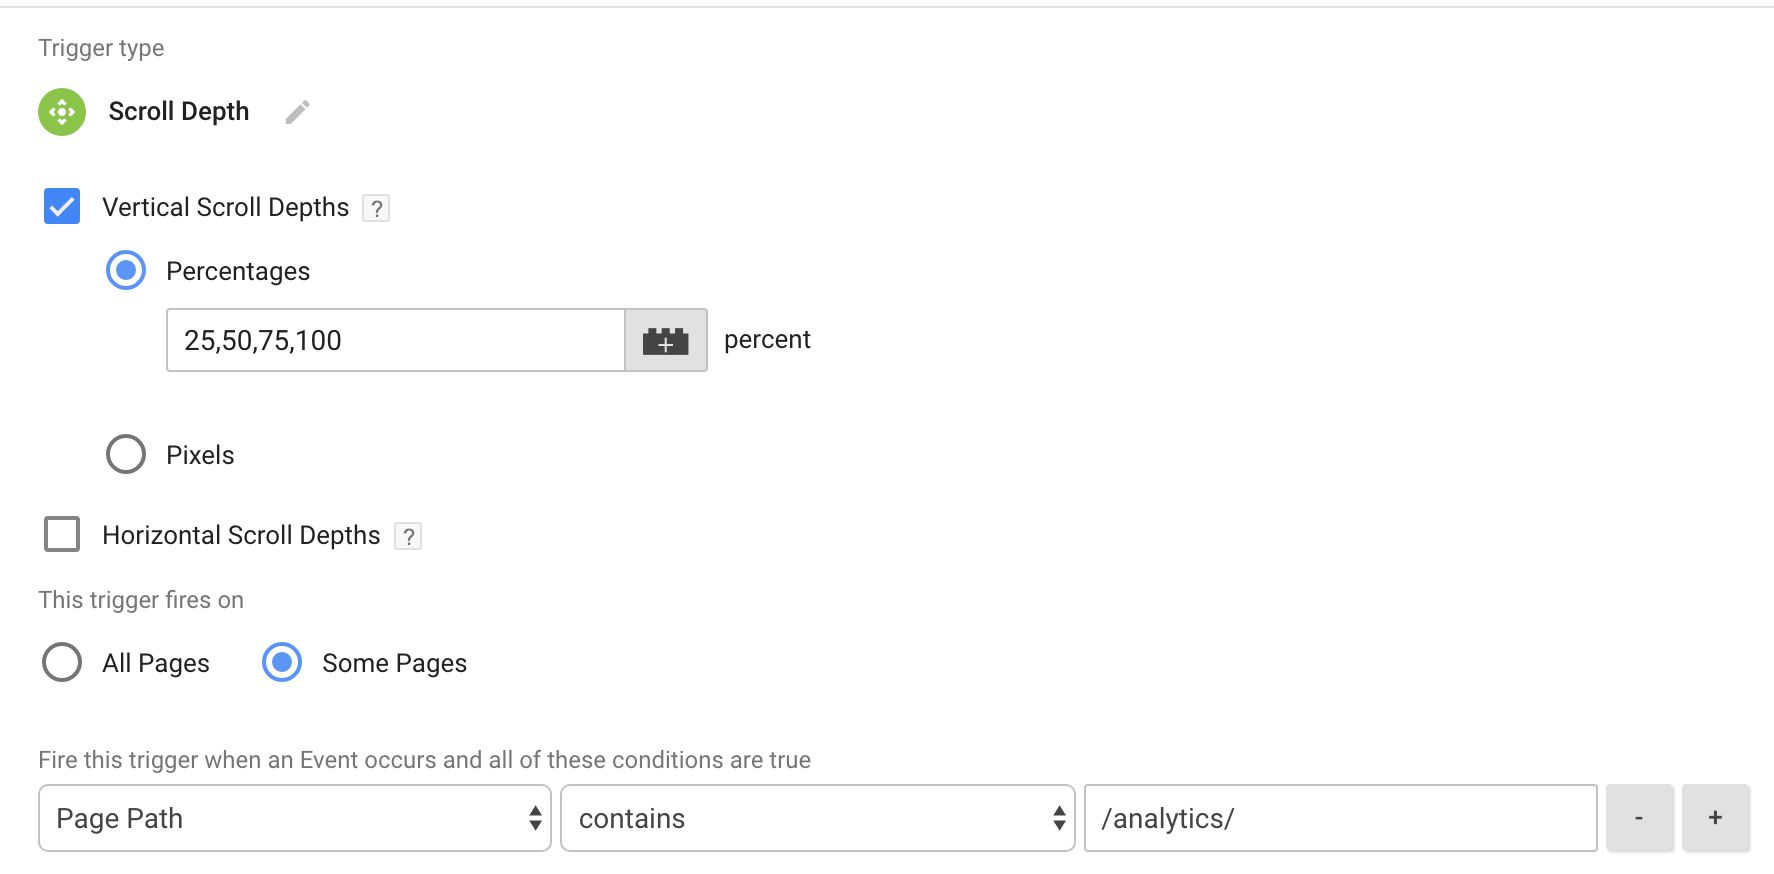
Then you can just add this variable to the trigger like so:
You don’t have to use a Custom JavaScript variable. I’m quirky in that I prefer to use it, always. But you could just as well use a RegEx Table variable to achieve the same thing:
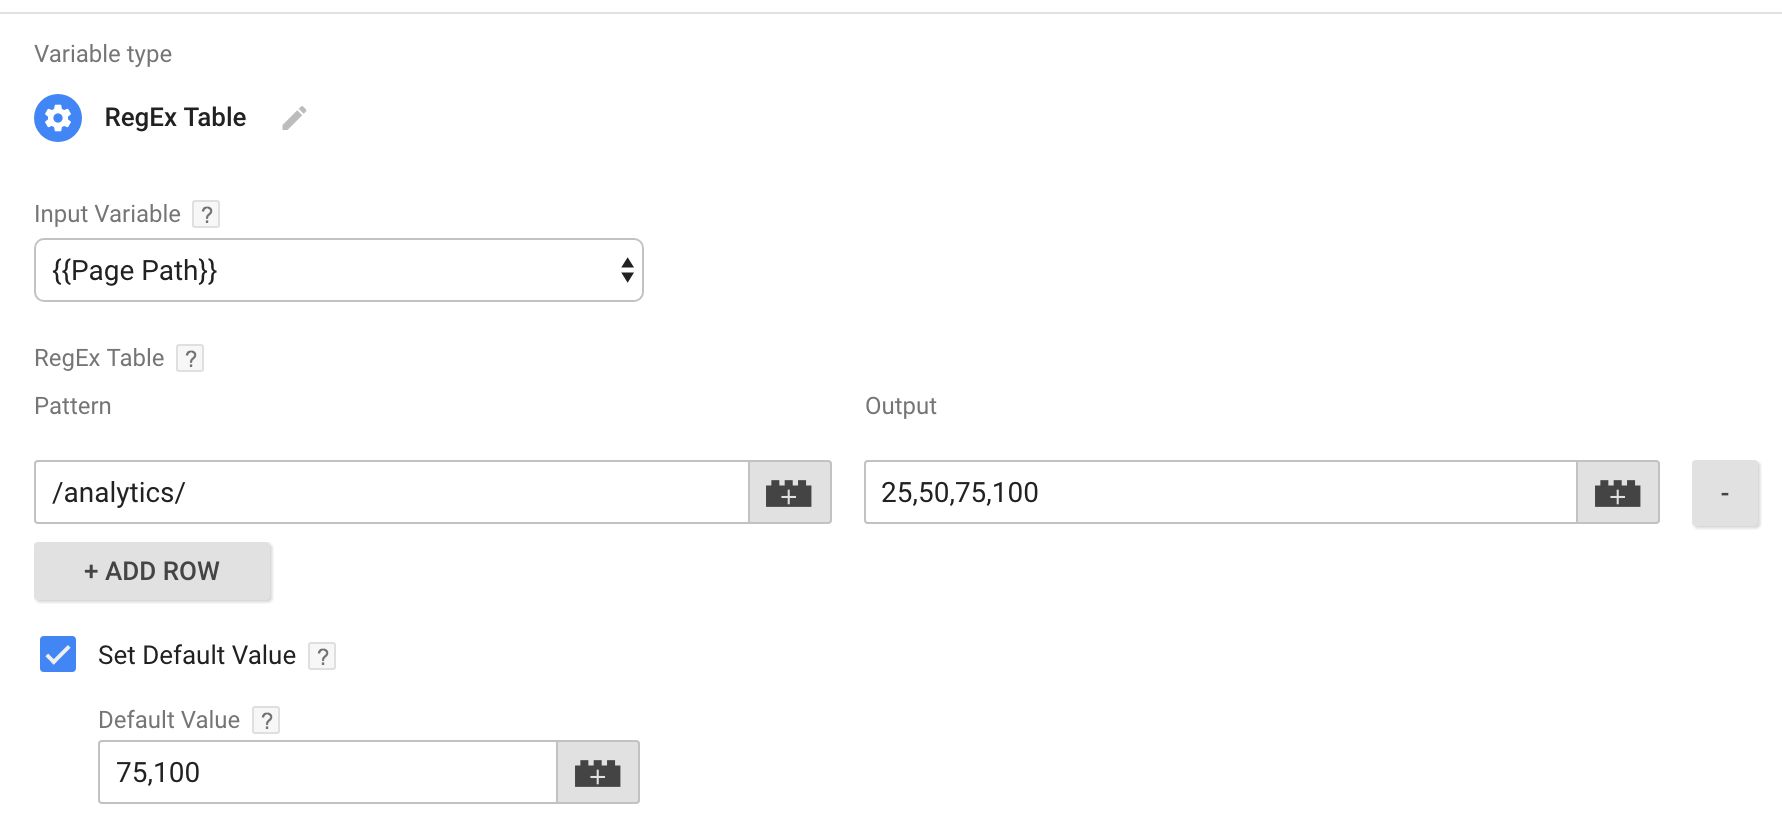
This is a simple customization, but it does allow you to measure relevant metrics for pages where it makes sense.
2. Only fire the scroll depth trigger on relevant pages
This should be a no-brainer, too. It might make sense to have the scroll depth trigger fire your tags only on pages where you are genuinely interested in scroll depth tracking. For example, I’m actually only interested in knowing how far users scroll on my blog pages and nowhere else. Thus I could make this simple modification to the trigger to delimit its firing capabilities:
A very simple modification but helps you collect only meaningful data.
2.1. Prevent the Scroll Depth trigger from activating
As you can see, there’s no “Enable when…" option on the Scroll Depth trigger, similar to what you might see with a Just Links trigger, for example. Thus you might be tempted to think that there’s no way to prevent those pesky gtm.scrollDepth events from populating the dataLayer on pages where you are not interested in tracking scroll depths.
However, there’s a very easy hack to make sure the trigger doesn’t push anything to dataLayer. Just set the percentage threshold to 101. It’s impossible to scroll to 101% length of the page, so by setting the threshold to this you’ll deactivate the trigger, effectively.
Thus you could modify #2 above by putting the following Custom JavaScript variable into the Percentages field of the trigger:
function() {
  return {{Page Path}}.indexOf('/analytics/') > -1 ? '25,50,75,100' : '101';
}
This sets the thresholds to ‘25,50,75,100’ on pages where the URL contains /analytics/, and ‘101’ elsewhere.
3. Only fire tags on pages where thresholds are not auto-collected
One problem with the Scroll Depth trigger is that it doesn’t care if the page is long or short. If you have a very short page, it’s possible that all the thresholds are met when the page is loaded, which leads to a bunch of gtm.scrollDepth events pushed into dataLayer, firing your tags even though the user never scrolled!
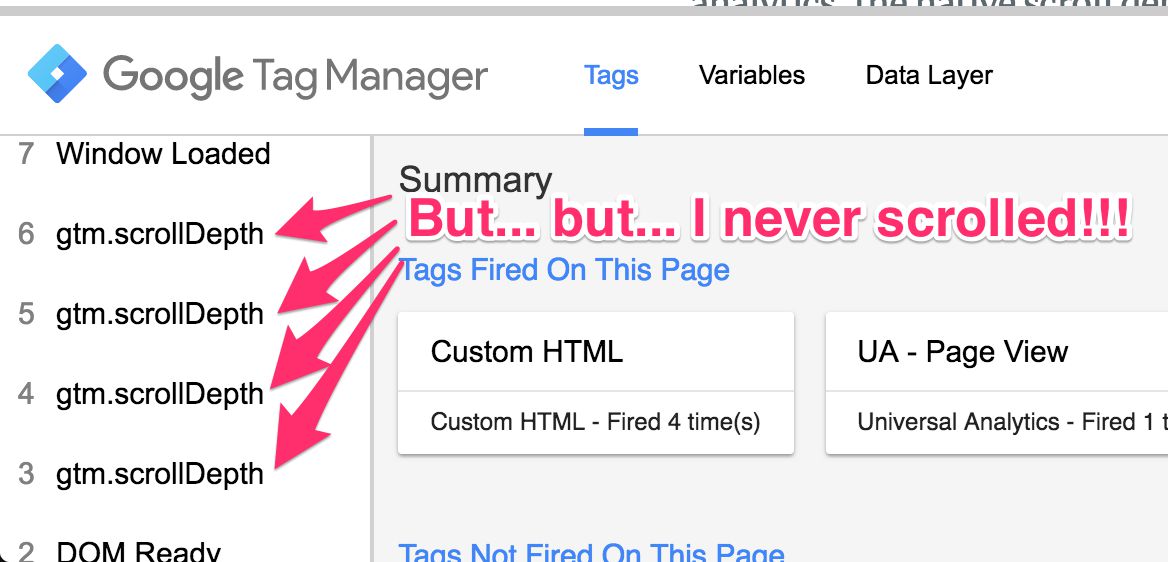
Luckily there’s a nifty trick we can use to fight this. We can prevent the Scroll Depth trigger from functioning on pages where the ratio between browser viewport height and page height is too high. The browser viewport is the area of the web browser that is filled by your page. The page itself is the entire document, parts of which are likely to be invisible below the fold of the viewport.
The higher the ratio between the height of the visible viewport and the height of the page, the less there is to scroll. For example, if the visible viewport is 400 pixels in height, and the page height is also 400 pixels, there is nothing to scroll. The entire page will be visible in the viewport, and any vertical thresholds you have defined in the Scroll Depth trigger will auto-fire.
So, if you want to only fire the trigger when the user actually scrolls to 25%, 50%, 75%, and 100%, you need to make sure the ratio between the visible viewport height and the page height is less than 0.25. This means that less than 25% of the page is visible in the browser viewport.
To do this, you need to create a Custom JavaScript variable that looks like this:
function() {
  // Change this to reflect the percentages or pixels you want to fire the trigger for
  var verticalScrollDepths = '25,50,75,100';

  // Change this to the MAXIMUM ratio of viewport height / page height you want the trigger to activate for
  var maximumRatio = 0.25;

  // Change this to what thresholds should be tracked if the ratio is more than the maximum
  // Leave it at '101' if you want to prevent the trigger from functioning in this case
  var fallbackDepths = '101';

  var heightOfPage = Math.max(document.body.scrollHeight, document.body.offsetHeight, document.documentElement.clientHeight, document.documentElement.scrollHeight, document.documentElement.offsetHeight);

  var heightOfViewport = Math.max(document.documentElement.clientHeight, window.innerHeight);

  var ratio = heightOfViewport / heightOfPage;

  return ratio < maximumRatio ? verticalScrollDepths : fallbackDepths;
}
First thing you’ll need to do is edit the verticalScrollDepths variable to reflect the list of thresholds you want to track if the page passes the ratio check.
Then, edit the maximumRatio to reflect the maximum ratio (between 0 and 1) of the height of the visible viewport vs. height of the actual page. A value of 0.25 would mean that at most 25% of the page can be visible in the viewport when the page is loaded.
Finally, edit the fallbackDepths variable to give a “default” value for the cases when the maximum ratio is surpassed. If you want to prevent the Scroll Depth trigger from working at all when the maximum ratio is surpassed, use the value 101, because a depth of 101% can never be tracked.
Then just add this to the “Vertical Scroll Depths” field and you should be all set.
Now the trigger will only fire in cases where the page is long enough to make sense for your tracking.
4. Track scroll percentages of a specific content element
This is a bit trickier, but still doable with some JavaScript magic.
By default, the Scroll Depth trigger calculates vertical scrolling depth from the top of the page to the bottom of the page. But you might only be interested in knowing the scroll depths of a specific content element, such as the article body. For example, on my site, I don’t really care if users scroll past the article end, through the Disqus comments, all the way to the bottom. But I do care if they scroll to the bottom of the main article body.
The way to make this work is to first calculate the height of the HTML element that contains the content whose scroll depths you want to track. Then, you need to check how far from the top of the page this element is. Finally, you need to tell the Scroll Depth trigger to track pixel thresholds that correspond with the desired depths of the content element, and add the distance to the top of the page to those numbers.
I think it’s easier to illustrate.
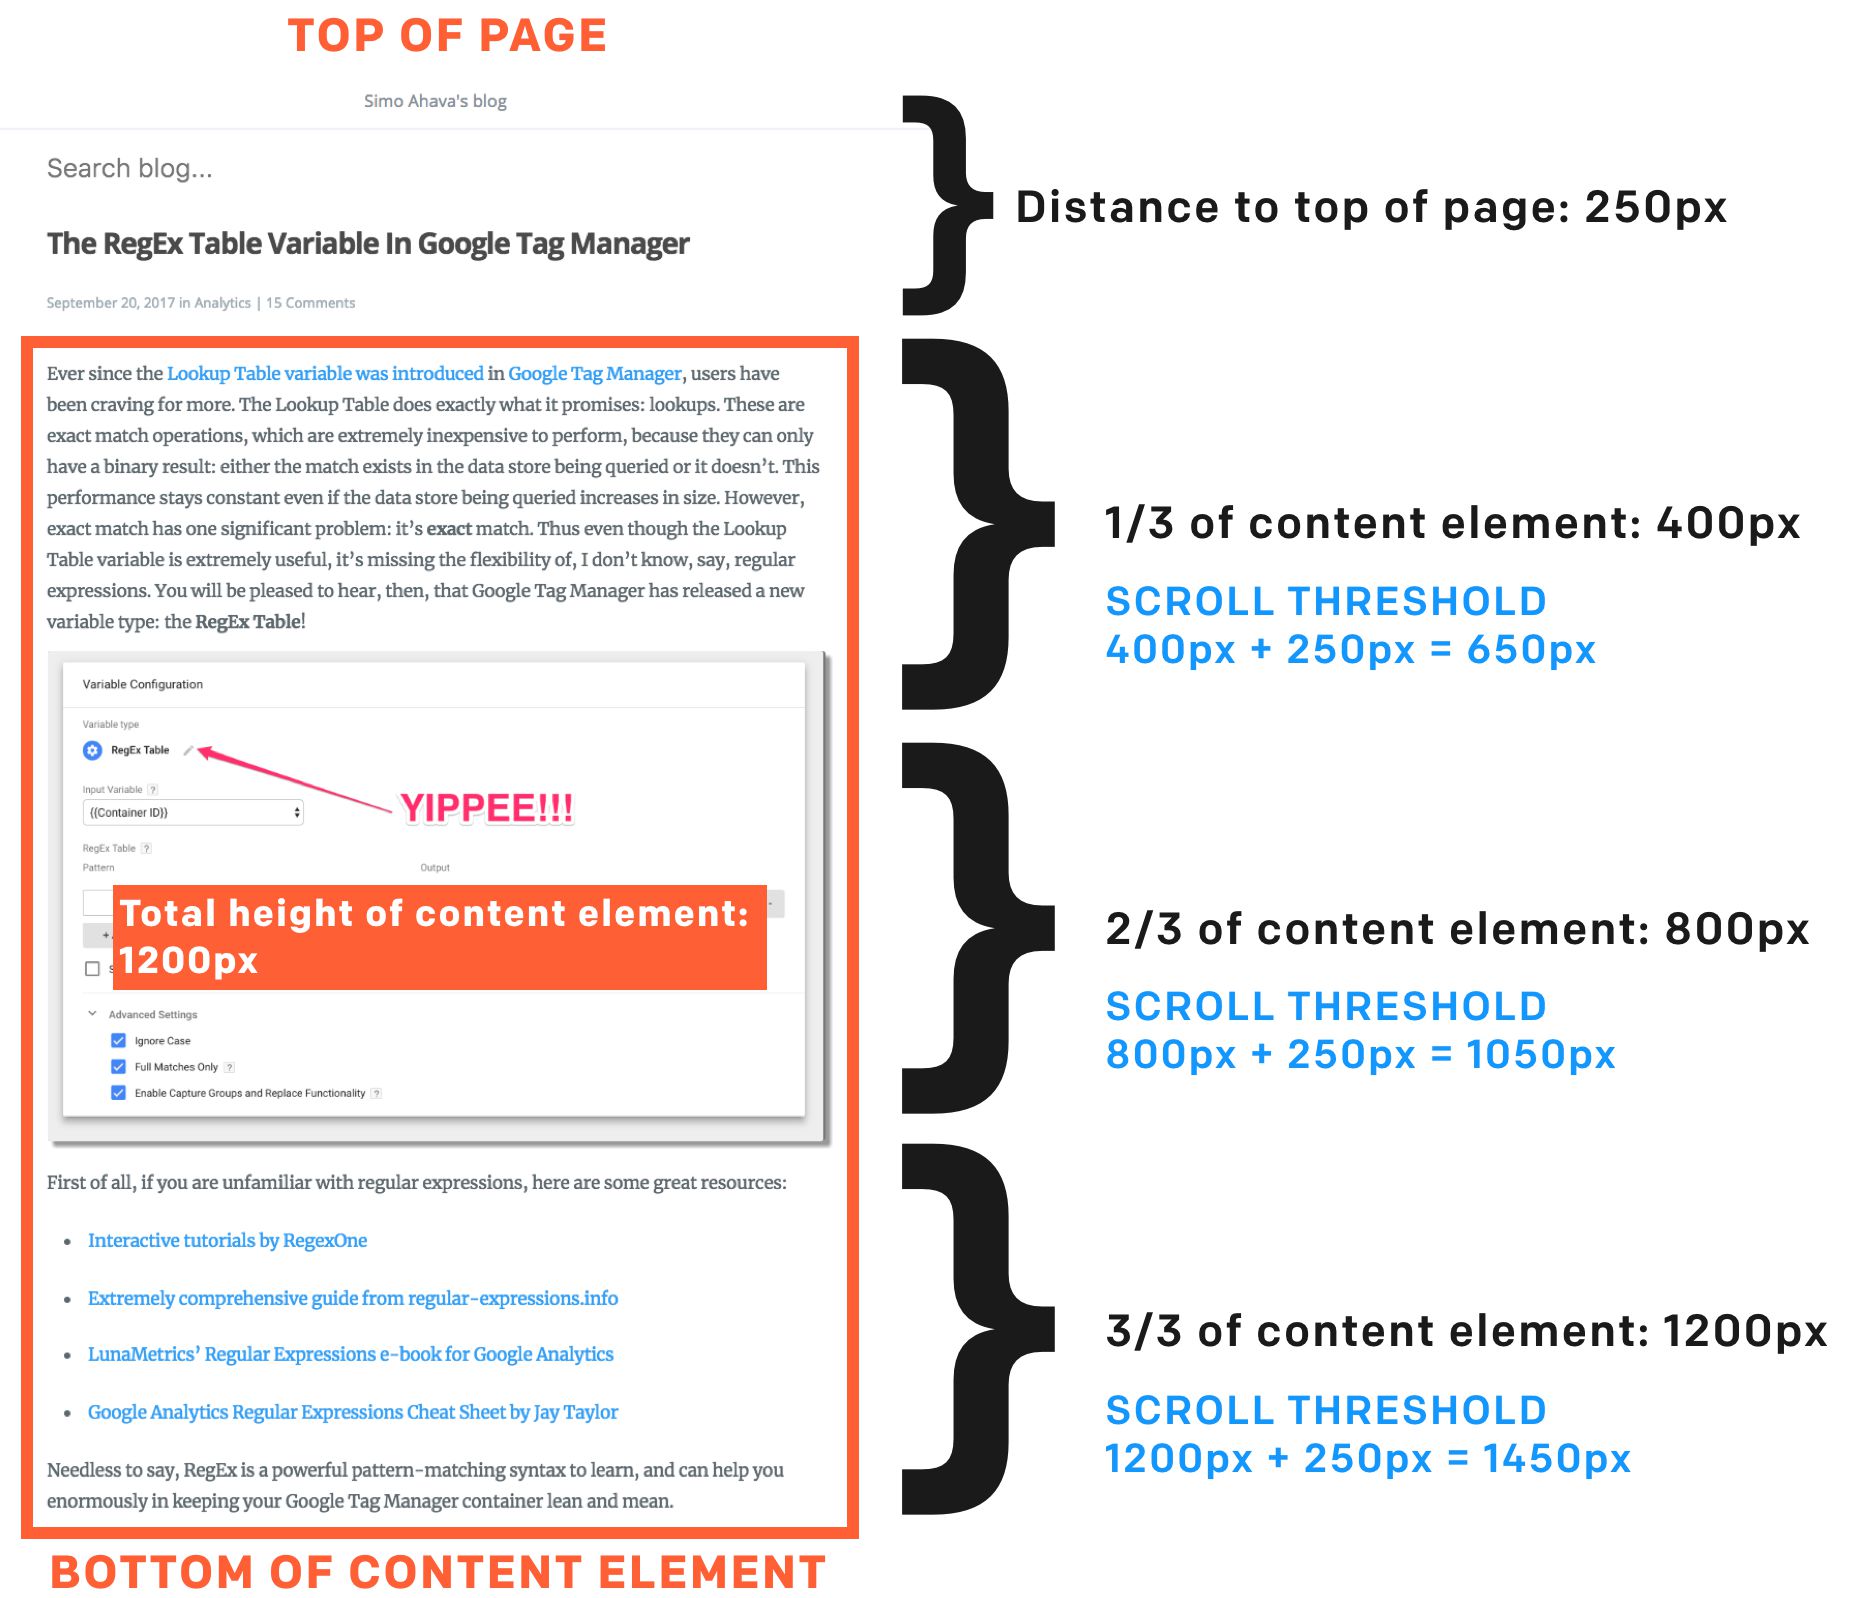
As you can see, the total height of the element is 1200 pixels. If I want to track scroll depth increments of 33%, it means that the respective marks are at 400, 800, and 1200 pixels. Since the top of the content element is exactly 250 pixels from the top of the page, I need to add this number to the thresholds before I feed it into the Scroll Depth trigger, because it measures everything counting from the top of the page. Thus the final pixel depths would be 650, 1050, and 1450 pixels.
Now, since we don’t want to hard-code these into the trigger, as that would lead to a horrible mess to manage (every single page would need its own trigger), we can use a Custom JavaScript variable to dynamically calculate the pixel depths.
function() {
  // Change the contents of this array to reflect the percentages of scroll depth you want to track
  var verticalPercentages = [25,50,75,100];

  // Change this to fetch the element you want to track scrolling in
  var targetElement = document.querySelector('div.post-content .main-content-wrap');

  var elementHeight = targetElement.offsetHeight;

  var totalOffsetTop = 0;

  while (targetElement) {
    totalOffsetTop += (targetElement.offsetTop - targetElement.scrollTop + targetElement.clientTop);
    targetElement = targetElement.offsetParent;
  }

  return verticalPercentages.map(function(percentage) {
    return parseInt(elementHeight * (percentage * 0.01) + totalOffsetTop);
  }).join();
}
You’d then need to add this variable reference to the Pixel field in the Vertical Scroll Depths selection of the trigger:

This setup calculates dynamically the correct pixel thresholds based on the percentages you wrote in the verticalPercentages array. This way, 0 percent depth is the top of the content element (specified in targetElement), and 100 percent depth is the bottom of the content element.
With this workaround, you can get more meaningful measurements on pages which have lots of different content areas filling up the real estate of the document itself.
4.1. Return the scroll depth percentage of element scrolling
One thing missing from #4 is the option to report on the percentages the user scrolled down the element. Because the trigger is setup using pixel depths rather than percentages, the {{Scroll Depth Threshold}} built-in variable will always return the pixel depth the user scrolled past, rather than the respective percentage of scrolling.
Getting the percentage is actually a bit of a hack. The problem with the Scroll Depth trigger is that it’s initialized fairly early in the page load, often before DOM Ready and any dynamically injected content is added to the page. This means that the thresholds of scrolling might be smaller than what the percentages actually would reflect.
This is, unfortunately, unavoidable right now. The Scroll Depth trigger has no options to delay its initialization until such a time as the content is completely loaded.
What this also means is that any variables you use to determine the height of the content and, subsequently, what the respective percentages actually reflect, can change from one trigger event to the next. Thus, in order to get the actual percentages used by the Scroll Depth trigger, we’ll need to do something that I’ve repeatedly instructed to avoid at all costs: implement a side effect in the Custom JavaScript variable.
Basically, we’ll need to store the scroll thresholds in a global variable when the Custom JavaScript variable is first run. After the initial run, we’ll always pull whatever was stored in the global variable instead of generating a new set each time the variable is invoked. This way, any triggers and tags that use the thresholds will always access the same values, even if they might be off a bit from what the content thresholds actually are.
The modification looks like this:
function() {

  if (typeof window._gtm_scroll_set === 'undefined') {

    // Change the contents of this array to reflect the percentages of scroll depth you want to track
    var verticalPercentages = [25,50,75,100];

    // Change this to fetch the element you want to track scrolling in
    var targetElement = document.querySelector('div.post-content .main-content-wrap');

    var elementHeight = targetElement.offsetHeight;

    var totalOffsetTop = 0;

    while (targetElement) {
      totalOffsetTop += (targetElement.offsetTop - targetElement.scrollTop + targetElement.clientTop);
      targetElement = targetElement.offsetParent;
    }

    window._gtm_scroll_set = {
      thresholds: verticalPercentages.map(function(percentage) {
          return parseInt(elementHeight * (percentage * 0.01) + totalOffsetTop);
        }).join(),
      percentages: verticalPercentages
    };

  }

  return window._gtm_scroll_set.thresholds;
}
As you can see, we populate a global variable window._gtm_scroll_set with an object that contains two properties:
-
thresholds: the array of scroll thresholds used by the Scroll Depth trigger. -
percentages: the array of vertical percentages you defined in the same variable.
Now that we know what the thresholds are, what the percentages are, and we can trust that the same thresholds are returned whenever this Custom JavaScript variable is invoked, we can create another Custom JavaScript variable whose only job is to return which percentage the user scrolled past when the trigger fired. This is what that variable looks like:
function() {
  if (typeof window._gtm_scroll_set !== 'undefined') {

    var percentages = window._gtm_scroll_set.percentages;

    var thresholds = window._gtm_scroll_set.thresholds.split(',').map(function(t) {
      return parseInt(t);
    });

    var crossedIndex = thresholds.indexOf({{Scroll Depth Threshold}});

    return percentages[crossedIndex];

  }
  return {{Scroll Depth Threshold}};
}
This Custom JavaScript variable checks which threshold was returned by {{Scroll Depth Threshold}}, and returns the respective percentage value.
The order of things is thus:
-
Use the first Custom JavaScript variable in the Scroll Depth trigger’s Pixel Depths field.
-
Use the second Custom JavaScript variable wherever you want to get the percentage value for the scroll depth reached when the trigger fires.
Note that even though I am introducing a side effect in the Custom JavaScript variable, it is mitigated by checking if the global variable has already been set. Thus the typical downside of side effects (constantly and unpredictably updating global state) is mitigated.
It’s not perfect - nothing that impacts global state ever is. There’s always the risk that some other JavaScript accesses and modifies window._gtm_scroll_set, which would break your setup.
Summary
These four tips ranged from the really simple to the moderately complex.
There are many ways in which you can customize Google Tag Manager’s default trigger. With the scroll depth trigger, these customizations are almost necessary, because the trigger itself is lacking in some critical configurations options for now.
For example, I would like to see the following features in the trigger:
-
Option to establish when the trigger is initialized (e.g. after DOM Ready, with a Data Layer event, etc.).
-
Option to prevent the trigger from auto-firing if the thresholds have been crossed when the page loads.
-
Option to reset the trigger manually, which is useful especially on single-page apps.
-
Option to define a content element instead of the entire page for determining scroll depth.
With the tips in this article, you can do plenty, but especially the feature where you could reset the trigger is sorely missing from the current implementation.
Do you have tips you want to share for Google Tag Manager’s Scroll Depth trigger?
